Battle of Stecken: The Battle of Stecken is the final scenario in Michael Hopper's
Rise of Eagles 1805. There isn't a really good account of the Battle of Stecken online that I could find,
but there is a little bit about in John H Gill's A Soldier for Napoleon. It was in effect a surprise Austrian counter-attack against a Bavarian position at Stecken a few days after Austerlitz. Gill indicates that the Bavarian commander Wrede, had little choice but to withdraw after a sharp engagement.
The Forces:
Bavaria:
C-in-C: Wrede (Capable)
Marsigli's Bde: 1 base of Trained SK2 Infantry, 4 bases of Trained SK1 Infantry, 1 base of Trained Light Cavalry
Minucci's Bde: 1 base of Trained SK2 Infantry, 4 bases of Trained SK1 Infantry, 1 base of Trained Light Cavalry, 1 base of Trained 8lb Foot Artillery
Seydewitz' Bde: 2 bases of Trained Dragoons, 1 base of Trained Light Cavalry, 1 base of Trained 4lb Horse Artillery
Austro-Hungarian Empire:
C-in-C: Ferdinand (Plodding)
1st Division: Schwarzenberg (Capable)
1st Bde: 4 bases of Trained SK1 Infantry
2nd Bde: 4 bases of Trained SK1 Infantry
Cavalry Division: Hohenzollern (Capable)
1 base of Trained 3lb Horse Artillery
1st Bde: 2 bases of Trained Cuirassiers
2nd Bde: 1 base of Trained Dragoons, 1 base of Trained Lancers, 1 base of Trained Light Cavalry
Set-Up:
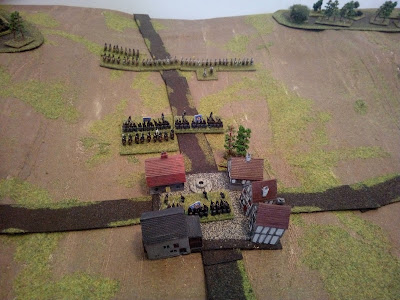
 |
| The Bavarians start around and on the road to Stecken. Marsigli's Bde is around the houses, Minucci's Bde is on the road. The Austrian infantry is just emerging from the woods (top-right) |
 |
| A closer look at Minucci's Brigade |
 |
| And at Marsigli's. |
 |
| Ferdinand accompanying Schwarzenberg and his division as they break cover to start the battle |
The Battle:
 |
| Schwarzenberg forms up his troops for a steady, measured advance. This is not caution so much as an appreciation that the distance between the woods and the Bavarian positions is a bit too great to achieve anything by rapid movement and surprise. |
 |
| The Bavarian infantry's musketry proves more ferocious than that of the Kaiserlichs: the first Austrian battalion is in rout (centre-top) |
 |
| Hohenzollern's Cavalry Division has arrived, but is faced by steady Bavarian infantry, supported by Light Horse. |
 |
| The action begins more generally with a determined Bavarian counter-attack... |
 |
| Although the Austrians have defeated the Bavarian push on the far right (right); the ther Austrian units have been pushed back in some disorder |
 |
| The Bavarians renew their attack and Minucci's light infantry battalion (the 4th Light Infantry) has attacked in splendid style, creating a gap right in the middle of the Austrian line (centre); however, the Austrian infantry have shown great courage in holding out along the rest of the line, despite suffering heavy casualties |
 |
| Although there is no stopping the attack of the 4th Light Infantry (top-centre), the rest of Schwarzenberg's Division presses forward, routing couple of Bavarian battalions and severely disordering a couple more.. |
 |
| A closer view |
 |
| Schwarzenberg sees little but choice but to push on his attack (centre-right), driving the Bavarians back before him |
 |
| Ferdinand (edge of woods) rallies the Austrians facing the invincible 4th Light Infantry, but elsewhere there is a stand off |
 |
| Schwarzenberg pushes up the hill forcing back the Bavarian guns (left) but falling back in the face of withering Bavarian musketry |
 |
| Another successful Bavarian attack, led by Wrede in person, (centre-left) routs another Austrian battalion. Another Austrian battalion swings around ready to take it in the flank, but morale is wavering across the line.. |
 |
| ...and everyone's morale collapses at the same time. Minucci's troops and Schwarzenberg's troops collapse at the same time! |
 |
| Bavarians running (bottom) and Austrians running (top-right) |
 |
| A wider view. The blue flags (centre-left) show where the remainder of the Bavarian troops are in retreat |
 |
| Unfortunately for Ferdinand, his cavalry division can make no impression on the Bavarians and thus he calls of the action, his armys morale being weaker than the Bavarians (whose reinforcing cavalry brigade has now arrived) |
Game Notes: An interesting scenario and a good game. I played it three times and made more or less serious errors of set-up on each occasion which materially affected the result. First time out, I forgot that the Bavarian sub-commanders were brigadiers and treated them instead as major-generals. The extra order, combat and rallying capabilities led them to make short work of the French. I can't remember what I did wrong in the second game, although it seemed to lead to the Bavarians collapsing almost instantly in that one. In this one, although I don't think it made much difference, I forgot to give the Austrians the horse artillery unit which might have made them able to break the other Bavarian brigade - without it, they stood little chance against the steady Bavarian infantry. There were no particular rules issues here although it did remind me of one thing that I don't think is very clear in the rules as written. Support for attacks is calculated at the beginning of the attacking movement which is okay, although it does mean you have to remember a few bits of stuff. This means that some supporting units 'go forward' with the attack (i.e. if you paid order points for them as the force they were in was directly attacking) and some won't (since they are giving support from their starting position because they weren't in the same force that 'attacked'). It works okay, but is a good example of the kind of thing where a new player could get confused.
This is the last game from this scenario book that I will be playing for the present time. I am hoping to get the two biggest battles, Caldiero and Austerlitz, to the table in the relatively near future but I need to do a little bit of work on the terrain to make them work for a "big battles" rule set like
Horse, Foot & Guns or
Polemos Marechal de l'Empire (basically the terrain in the book doesn't cover sufficient depth). The scenario book is great for the wargamer. They are clearly written and have pretty much all the details required for your ruleset of choice, despite being firmly based on Shako II. Within the confines of history, the scenarios are quite well-balanced too. There is a very wide range of actions in terms of size of forces and size of battlefields too: truly there is something for everyone in it. It is also a good way of following the events of the campaigns generally to get a feel for the history.


Excellent write-ups and thoughts on these scenarios thanks! I'm just in the middle of the ROE Elchingen scenario for the second time, and am planning Caldiero for later this week.
ReplyDeleteMany thanks, Chasseur. I'm looking forward to getting Caldiero to the table myself. I have never played it before and it looks a finely balanced scenario. I just need a bit of free time to research the additional area I will incorporate into the battle.
DeleteI rarely go to TMP as I find I am too busy with other choices, no disrespect to TMP. However, today I indulged myself and saw your on-going superb efforts to use the core RoE 1805 information for your own purposes.
ReplyDeleteIf I may, the terrain for Caldiero can be found at the following site: http://lazarus.elte.hu/hun/digkonyv/topo/3felmeres.htm.
If you look at the map for coordinates 29-45, go to the top and left of the map the whole battlefield of Caldiero is noted, east of Verona.
Cheers
Michael
Thanks very much Michael, much appreciated. I found Caldiero and environs on the map you suggested: http://lazarus.elte.hu/hun/digkonyv/topo/200e/29-45.jpg
DeleteThe terrain for Stecken can be found at the following site: http://lazarus.elte.hu/hun/digkonyv/topo/3felmeres.htm.
ReplyDeleteIf you look at the map for coordinates 33-50, go to the very bottom of the map and just to the right of center, the town of “Steken” is noted. Similarly, reference the very top of the map for 33-49 and terrain leading north to Stecken can be found.
The hill running from B1-B2 to D3-D4 (RoE 1805 map) is described very briefly as a hill, not a plateau. The description is vague enough that a plateau was chosen based on recommendations from play tests. Units defending the edge of the plateau receive the benefit of being up hill in melee. This random determination of the hill status was meant to minimize any bonus that the Austrians would get for defending this specific hill near the key crossroads (section D3 on the map). This indulgence was interpretive and not necessarily accurate.
Any questions on other OB or map information - log1cal.mh@gmail.com. I apologize - not trying to steal your website thread for personal reasons - just offering information to support your efforts to examine the bigger map areas for your games.
Best
Michael
Thanks very much for the extra information on Stecken, Michael. And certainly no need to apologize for putting your e-mail on there for queries, it is rather very kind of you to do so.
ReplyDeleteHow is the work on your Peninsular War scenario book going?
The first peninsular war book is in the same state, put on hold with a death in the family in late July so I could attend to estate stuff. It has 55 (or 56?!) scenarios, cost will not be double as I included a bunch of really obscure small actions that I read about and translated/assembled information, so will aim to break even on production costs for the self indulgence of including them. I should take a look at them and remember where I left off with proof reading. I am out of country throughout February so perhaps I will finish the proof reading in March when I return.
ReplyDeleteThanks for that Michael, I hope the process goes well.
DeleteOh, and yes, I used Hausmann's book "Soldier for Napoleon", along with a few other books that identified forces, commanders and events. One of the hardest things to nail down (for Stecken) was the Austrian cavalry commander as Friedrich Hohenzollern.
ReplyDeleteGesichte des k. k. Dragoner-Regimentes – Feldmarshall A. Windisch-Graetz (p. 362-388) was helpful. Hollins' Elite series book on Austrian commanders (page 9) identified Hohenzollern. It was a tough exercise confirming the Austrian OB for this one. Aside from Schwarzenburg, the infantry commander who had seniority was the lieutenant colonel of the 21st line, outranking the senior officers of the depot battalions, but I no longer have access to the information identifying the colonel's name. I use to. :( Websites keep moving around and I failed to download everything off the site that made reference to original German sources.
Anyway, been really enjoying seeing how you converted the information to Polemos - all the best for 2019.
Michael
Thanks very much for your kind comments Michael. I am very hopeful of getting around to Caldiero & Austerlitz before too long, and may get to some of your 1809 scenarios at some point this year too.
Delete