Heretical Gaming is my blog about my gaming life, featuring small skirmishes and big battles from many historical periods (and some in the mythic past or the far future too). The focus is on battle reports using a wide variety of rules, with the occasional rules review, book review and odd musing about the gaming and history. Most of the battles use 6mm-sized figures and vehicles, but occasionally 15mm and 28mm figures appear too.
Showing posts with label Napoleonics. Show all posts

Tuesday, 4 August 2026

Hobby Update 04 Aug 26

Progress has been a little slower over the last week or so, but prior to that I had made a couple more dints into the lead mountain First, I completed a few Vietnam War-era figures from The Assault Group: there are some VC with a mixture of weapons, some ANZACs and some US Special Forces: 


Then I did a small batch of 95th Rifles from Perry Miniatures. 

The current strategy is to get the uniformed and historical 28mm figures from the lead pile done first, and then will move onto the miscellaneous and fantasy stuff and dig out the partially painted figures to get some quick wins. Then I will switch back to 15mm and 6mm uniformed and historical stuff, and then go back to the 28mm odds-and-ends to finish off. That effectively means prioritizing the remaining 28mm Napoleonics mainly. Wish me luck!

I have also found time to get one game in - of which more anon - and have also done some more messing around with scenario designs to try and get some more easy games onto the table.
 

Wednesday, 1 January 2025

01 Jan 25 - Hobby Update

There hasn't been too much happening on the hobby side recently, although I did get a bit done over the last week. Things have just been generally difficult as well as very busy, and somewhat sapped my enthusiasm and energy levels for gaming (except thinking about it - that is always easy to do!)


Some 1810-13 Saxon Infantry (top-left base is a 'Frankenstein' French infantry base, made up of lots of odds and ends, plus a couple of ECW individually-based figures (for use as markers), plus a Polish WW2 sniper! All Baccus except for the Scotia sniper I think

More Saxons, with a couple of bases of Italian infantry on the left

And the full thing

Some Kubelwagens (GHQ?) and some H&R Germans with StG44, a couple of French vehicles, some generic Allied motobikes, some British Paras with flamethrowers, and some Polish with their light platoon mortar

Some German artillery, and some British Paras with satchel charges

Some Napoleonic Saxon infantry, plus some Commanded Shot for the Thirty Years War

Game-wise, I re-did the 1632 Battle of Lutzen in the Neil Thomas style for the C18 and Polemos: Ruse de Guerre - a battle report for that soon - but otherwise game-time has been for family boardgames and RPGs. But hoping (as always!) to get more to the table soon...


Saturday, 25 May 2024

Thinking About the Bruce Quarrie Napoleonic ruleset...

As you do. Or at least, as you might do, if you are a wargamer of a certain age who likes Napoleonics. I don't think I would ever go back to playing Napoleon's Campaigns in Miniature as written. The mechanics are just too effortful to go through in the number of times you need to do it to be fun for me as an essential part of the game, regardless of any other vices or virtues.  In any case, this post isn't a review, or anything like that - I already did one of those - but more a meandering wandering through the ruleset, and perhaps see if there are any concepts I might salvage. I have used the Polemos sets I most often play, Ruse de Guerre, General de Division and Marechal d'Empire as the basis for comparisons.


This post on TMP is the proximate reason for my current interest. It contains a reasonable defence of the Quarrie rules, although I can't 'quite' agree with most of it.

'National Characteristics' are probably the most remembered part of the Quarrie rules (along with rules for the prices of loaves of bread, etc.). Not being critical for a moment, what is it trying to achieve and what does it actually achieve?
 
Each unit is rated for how good it is at firing, melee, morale and movement. The middle two are divided into two categories, the latter into four. The categories of movement aren't particularly an issue, the author just incorporates the move rates of different formations into unit ratings as opposed to having them as modifiers in the movement rules: no real issue there. Morale is broadly divided into 'normal morale' and 'discipline/reaction'; melee into 'charge bonus' and 'normal melee'.

Quarrie wants to embed certain differences in performance between different armies. These differences are not to be considered as primarily functions of unit experience I think, since there are separate modifiers for being 'Raw' and 'Veteran'. I think this is pretty under-developed in the rules, but I it is technically possible to have 'Raw Old Guard' and 'Veteran Old Guard', as distinct from just the 'Old Guard'. This looks to take place at the unit level, so a 'new' unit of Old Guard should indeed be 'Raw'. So, the basic ratings look to be considered a product of selection, training, doctrine and military culture.

Most line infantry are pretty similar. Russian, Polish and British Highlanders & Fusiliers are considered to be better in melee. All British infantry are considered better at shooting.  British, some Confederation of the Rhine troops, Poles and Russians are considered to have higher morale, Austrians lower. Spanish infantry is just a bit worse at everything. Light infantry shoots better than line infantry. French infantry, along with some Confederation and British Highlanders are considered most 'enthusiastic', Poles and Spanish the least. After that, each nation's troops get one better for an additional level of 'eliteness'; so Grenadiers will be a bit better than line infantry at everything; Guards one better than that. If a nation has more than one 'level' of Guards, so much the better for them because each score will tend to be raised by 'one' every time.

Quarrie took the historically untenable view that skirmishing was always done by units with some kind of light infantry-esque designation. Other writers (Griffith and Barker) were correct that a light infantry name just as often implied a tailor's flourish on a jacket or a different colour of feather as anything real. 

In the TMP thread I linked to above, one writer makes the following remark:
Glenn Pearce, a current rules author who posts here occasionally, asserts that there are no differences in unit quality from one army to another, that formations are a needless detail, that it doesn't matter what figures go on a base, and that Napoleonic and ACW battles don't look any different. These principles are are a return to Donald Featherstone's of sixty years ago. 
 
I know (online!) Glenn Pearce a little (he is the author of Polemos: Ruse de Guerre, and prior to that played a lot of Polemos Napoleonic and can firmly state that he does entirely believe there were differences in unit quality from one army to another; it is simply that those differences can be much more easily, and perhaps better, simulated by using troop quality ratings without a blanket -1 for being Spanish. So in his rules, there are basically 6 types of infantry: well-trained, trained and poor quality infantry, which are either light infantry or line infantry. 
There are middle grounds. Black Powder's approach is a little closer to Quarrie's in using a stat-block approach. The stat-block is much simpler though, and big differences are represented by a special rule - British Cavalry can be prone to 'galloping at everything', French infanty get an additional bonus for attacking in column, whatever. Neil Thomas' approach is closer to Glenn Pearce's (same basic 6-types of infantry, more-or-less), but also uses the special rules used by Black Powder.

In any case, it would be relatively simple to take the headline elements of national characteristics and apply them to Polemos: Ruse de Guerre or a similar ruleset, if you wanted. It would look something like:

Infantry:
British +1 firing
Scottish Highlanders +1 firing, +1 close combat
Russians and Poles +1 close combat
Spanish & Neapolitans -1 to everything (firing, close combat, rallying from shaken)
Austrians -1 to rally checks, +1 close combat when attacking (first round only)
French +1 close combat when attacking (first round only)
Light Infantry +1 firing

Cavalry:
Spanish & Neapolitans, Irregular cavalry -1 to everything (firing, close combat, rallying from shaken)
Lancers +1 close combat when attacking (first round only) 
Light cavalry -1 in close combat with other cavalry
Cuirassiers +1 close combat, +1 to rally checks
British Dragoon Guards +1 close combat, +1 to rally checks

Artillery:
There is some absolute weirdness in the fire factors here; amusingly the Royal Horse Artillery is much better than the Horse Artillery of the Imperial Guard at firing cannon! Trying to find a pattern is a little difficult but maybe:
Austrians, Spanish, Neapolitans -1 firing, -1 rally checks
French +1 rally checks

One would then apply the 'Poor' and 'Well-Trained' labels as required, although Well-Trained would now better be thought of as 'Veteran'.  One would need a separate 'Elite' category too, which would be a double-strength 'Veteran'. This would cover all the various 'elite' troops of the Napoleonic period.

So Veteran-Elite French Light Infantry would be +4 firing, +2 close combat (+3 when attacking in the first round), +2 rally checks
Raw Spanish militia would be -2 firing, -2 close combat, -2 rally checks

I strongly believe that Quarrie, in line with many other rule-writers, has erred in differentiating more amongst the top end of the quality scale than at the bottom. I don't think it is true of many periods, but it is slightly more defensible in some than in the horse-and-musket era. Think of it this way: there is no lower bound of troop quality before one gets to 'indistinguishable from a civilian just handed a pike ', but it is very hard to  describe how much 'better'  one experienced Napoleonic soldier could be than another. Shako was notably good in this regard, usefully dividing the lower end of the scale - but many other rules, not so much.

The Polemos rulesets tend to ignore formations. The only exceptions to this are that in some rules (but neither of the Napoleonic sets, nor Ruse de Guerre) there is a march column formation. This is to simulate the beginning of a battle in earlier periods where deployment had to be done in a certain fashion, or getting caught in an ambush unawares. But there are no meaningful unit formations (yes, squares get mentioned in one set: however, mechanically they make no difference, they are for narrative only). However, I think we can replicate some of the thinking through the tempo point system. The tempo system has 3 elements: the player (expressed through the bidding system), the commanders (who generate the tempo points) and the costs in tempo points of performing those manoeuvres. It is therefore quite a simple matter. Quarrie in essence thinks that the French and British are quickest, later Prussians and Russians in the middle, and the Austrians, Spanish and early Prussians are the slowest. To the extent that one agrees with with one can either:

1 - Reduce the average competence of those generals to reflect that a general would have to be comparatively amazing to wring out of Austrians the same performance that the average French general would need to get the same performance out of his troops. Conversely, the average French and British general could be somewhat improved.

2 - Increase the tempo cost points to perform different actions. For instance, in Ruse de Guerre, the side that has the initiative (i.e. 'won the tempo') is able to get their troops to perform simple movement for zero cost. Instead, the costs for those armies considered less mobile could increase, so it cost a single tempo point to move such a force. And further, each army could in effect have its own menu: Russians for example could be good at simple actions but less good at more complex manouevres, or whatever the prejudices of the gamers involved believe. Polemos SPQR basically uses this system anyway and it works fine.
 
In addition to 'morale', which does the things that you would normally expect morale to do, Quarrie's rules also have the concept of 'Control'. This might be understood as the tendency to go battle-mad (or not). Ruse de Guerre basically eliminates most of this kind of thing - one of the reasons it is such a smooth set to play is that involuntary moves, especially sequences of involuntary moves, add in quite a lot of complexity to rules (because it multiplies the number of interactions units can have across phases basically); this becomes even more true when the chances of various things happening are probabilistic. So I can see where he was coming from. However, Quarrie and many other rules writers want their British cavalry to 'gallop at everything' etc. And the Polemos Napoleonic rules do have this concept. What might that look like:

Infantry: Highlanders; French, Austrian, Prussian, Portuguese, Austrian & Confederation Light Infantry; Bavarians +1 to Pursuit rolls
Spanish Line Infantry and Guerrillas -1 to Pursuit rolls
Cavalry: British Cavalry, Eastern European Irregular Cavalry +1 to Pursuit rolls
Spanish Cavalry -1 to Pursuit rolls 

Quarrie uses the above factors for pursuit, or when a commander leaves their troops, or after an attempted charge fails to make contact. Including the second option might make for an interesting mechanic within Polemos, by using the 'Pursuit' table if their commander moved over a certain distance away. However, probably the above modifiers are sufficient within the current structure of the game.

The firing modifiers probably don't warrant inclusion, since they are mostly encompassed within existing concepts. However, Quarrie is keen to give troops which used 2-deep line a fire bonus. He fluffed the maths a bit in the actual rules IIRC, but his logic is basically:

Troops that used 2-deep line: +1 fire combat rolls, -1 close combat rolls

As we can see, it becomes quite hard to win firefights against British infantry.

Quarrie has quite an interesting command and orders mechanic, in terms of the time it takes. He uses written orders, which is a method I have very little patience for in most circumstances, so I won't delve into that. But what he uses, although the rules are slightly under-written, is an interesting delay mechanic. Essentially, for each 'node' in the command chain, it may take, depending upon the circumstances and the quality of the commander involved, 0-3 turns (each supposedly representing 2.5 minutes) for any given order to be translated into action. Now, it isn't particularly clear in the Quarrie rules whether this is envisaged as primarily a two-step procedure (C-in-C to unit), or as something which should go down through the chain of command; and if the latter, what is the lowest level of command that this should be applied to. Now, I think the logic of the Quarrie rules is that it should go all the way down, including individually rated unit commanders. However, my suspicion is that I think he played it down to Brigade commander level only. In any case, we can port something of this across to Polemos rules, by limiting the rate at which certain commanders can 'absorb' tempo points. We might say that Decisive commanders can 'absorb' 3 points a turn (from whatever source), Capable commanders 2, and Plodding commanders only 1. This should achieve something of the same effect. What I quite like too is that all commanders in Quarrie have a 50% chance on any given day of being one level down from their theoretical performance: so an 'A' class commander has a 50% chance of performing as a 'B' class commander. This could be quite easily adopted into Polemos, although one would need to define the performance characteristics of a 'worse-than-plodding general' - that is a pretty trivial task, however. 

Quarrie also posits 'Control' modifiers - essentially modifiers to pursuit tests, so some generals' troops are more likely to pursue beaten enemies, others less so. The best generals get to modify either way. This is all fairly easy to include. Quarrie also gives different quantities of morale boost for different generals, and whether they were attacking or defending. I think this is a pretty terrible and unrealistic idea, but it wouldn't be impossible to include. However, Quarrie suggests quite huge swings (+5 to -1, depending on the general) and I don't think that reflects what Napoleon and Wellington actually did, or were good at. But it could be done.

Campaign

After my recent campaign, which did feature attrition, sieges and assaults in a not entirely convincing way, I did re-look at Quarrie to see how he handled sieges and especially, campaign attrition. He uses the following rates:

Bivouacked in friendly territory: 0
Bivouacked in allied territory, marching through friendly territory: 1.3% / week
Marching through hostile territory: 2% / week

x2: half rations, winter, guerrilla effects in Russia and Spain
x4: totally out of supply
 
To slightly extend this, you might also have:
Marching through allied territory: 1.5% / week
 
x2: barren country
 
Recovery:
10% / week when at rest for a full week (no offensive moves) 

The rules Quarrie gives for foraging are pretty simple, with an urban area of a given size on a scale of fertile/barren terrain able to support a certain number of troops, with any excess 'out of supply'.

Siege Rules:

Odds (Attacker:Defender) / Defender points
4:1 / 1
3:1 / 2
2:1 / 4
1:1 / 6
1:2 / 8
1:3 / 10
1:4 / 12

Add difference between General's factors
(for Polemos, would add the difference between the general's ratings, so Decisive = 2, Capable = 1, Plodding = 0)

Food supplies for defender: +1 / week available
Ammunition supplies for defender: +1 / week available
 
Now, I think there is a mistake in this next factor. Quarrie gives +1 to the defender for every day's march away a relieving force might be. Taken literally, the fact that a relief force is marching to relieve Danzig from Cadiz should make it pretty much invulnerable! So it should be a minus, I presume.
 
Distance in day's march from possible relief force: -1 / day
 
The Defender's points total indicates the behaviour:
6 or less: surrender once breach is made
7-10: fight that number of days then capitulate
11 or more: continue to fight until at 50% or less of original strength, then requires 6 on a D6 / day to keep fighting. 

Losses:
Entrenching (30 days*): Attackers 1 fig (i.e. 33 soldiers) / day, Defenders 0.5 fig (i.e. 17 soldiers)
Siege bombardment begins: Attackers 1 fig (i.e. 33 soldiers) / day, Defenders 1.5 fig / day (i.e. 50 soldiers)
Sickness (cumulative with above): Attackers 0.5 fig (i.e. 17 soldiers) / day, Defenders 1 fig/day (i.e. 50 soldiers)
Multiply attackers by 1.5 / week after the first, defenders 2 / week after the first
Street fighting: Both sides 1 fig / day 
 
*Given that the figures are given in weeks, I would choose 28 or 35.

Quarrie doesn't give a figure for how long it takes to make a breach though. This feels a bit of an ommission. Checking on the figures that CS Grant gives in his 'The Armies and Uniforms of Marlborough's Wars', actually effecting the breach seems to take only 2-4 days, if I am reading it correctly. Given that Quarrie gives a slightly quicker figure for the preliminary engineering, if we call effecting the breach the work of a week, that seems about correct.


POSTSCRIPT:


Potential Errors in the National Characteristics section:
In the version I am using (the Kindle version), I spotted the following anomalies in the National Characteristics tables (there were quite a few TBH):

The movement in column of Scandinavian Life Guard cavalry is given as 110; this seems to be a straight typo it should be 310. This is true of Prussian cuirassiers too.
Spanish cuirassiers and guard cavalry seem to have slightly low road movement rates, and Spanish lancers, dragoons and hussars seem to have low skirmish movement rates. 
Spanish horse artillery isn't considered to be pulled by horses, given its movement rates. I think if you are making the argument they didn't really have any, then you should probably not bother listing them as a separate troop type.
Confederation of the Rhine cuirassiers seem to have a columnar movement rate that is too low.
Confederation of the Rhine dragoons have a control rating which is much too high (think typo, probably should be Morale:6 Control:2); there is a similar error for the Hussars, and several of the other categories of cavalry.
Portuguese Atiradores have a typo in for their columnar movement.
The skirmish movement rates are a bit all over the place. Some units have a skirmish move rate the same as their road move, some the same as the columnar movement, some an entirely different movement rate. There is no discernable principle in play here. I would suggest that it should be the same as the columnar rate for all cavalry. For the infantry, the situation is somewhat more complex: one might make the case that some of the nations have skirmish movement rates aligned to their road movement (French, CoR and Italian line skirmishers, but not Guard or Dragoons on foot; Polish; Portuguese and Prussians); other countries (Spain, Russia and Scandinavia) align with their columnar movement; yet others (Austria & Britain) have some units which align with Road movement (British & Austrian Lights - think the Austrians are their grenzer units), some which align with Columnar movement (British Fusiliers) and some which have entirely different ones. I don't think there really is any underlying logic here, and if there were it would be indefensible. I think overall it would be best just to align the skirmish move rates with columnar movement for everyone.
The fire factors for the Young Guard and the French Grenadiers seem way too high relative to everything else.
Giving British 'Dragoon Guards' and 'Fusiliers' higher ratings than 'Dragoons' and 'Line Infantry' is anomalous in the Napoleonic-era.
Austrian uhlans can't skirmish; everyone else's can.
British hussars can't skirmish; everyone else's can. 
British, Confederation, Italian and Portuguese Dragoons can't skirmish; everyone else's can. I think this may be defensible in the British case, since the Light Dragoons can skirmish: but I think if you were to make this argument, you should make the British more like heavy cavalry and raise their meless scores and reduce their movement rates.
Can see why Spanish cavalry control factors could be low, can't see why Spanish Hussars should be even lower than that low baseline


Tuesday, 14 May 2024

The George Gush Napoleonic Northern Italy Campaign - Campaign Report

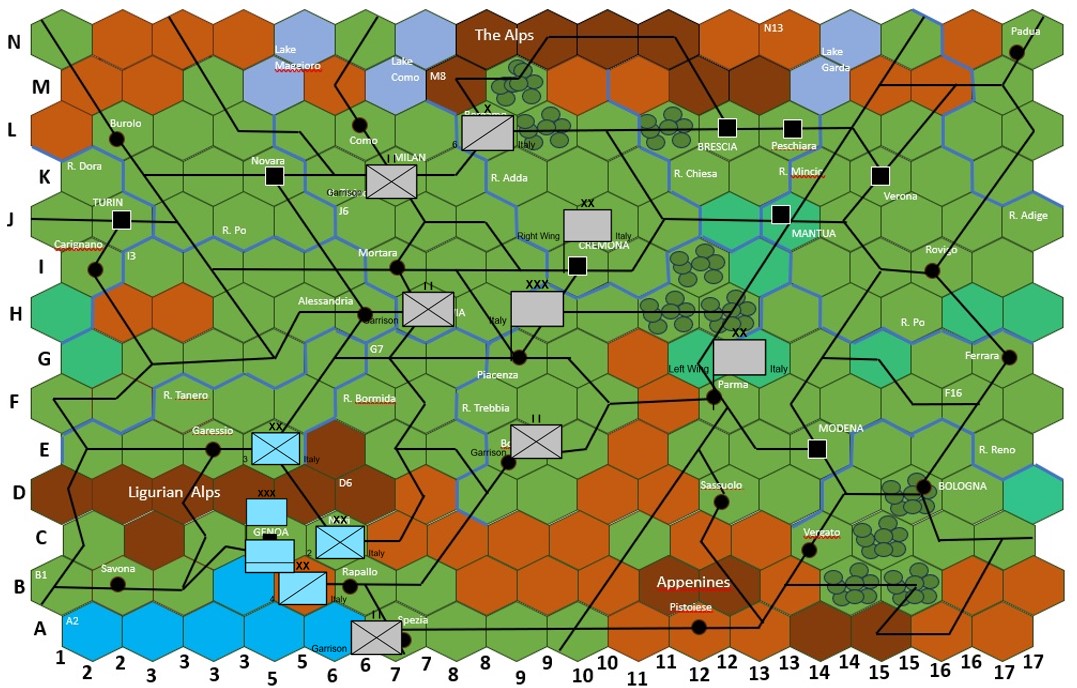
 I (as umpire) and my two heroic players have just completed a refight of George Gush's Napoleonic campaign, set in Northern Italy and as detailed in Miniature Wargames 31: an earlier post gives an outline.


And first up, I really do want to thank my two players - as someone doing this kind of thing for the first-time, they were absolutely amazing: enthusiastic, and patient. Couldn't have asked for, or even imagined, better! I hope they had fun.
I have three elements I want to cover. The 'technical' side of the rules and so on, I will add as a separate page of the blog, so I will cover the story of the campaign, and then some thoughts about the whole affair, what worked, what sort-of-worked and what really didn't.
 

The story of the campaign.

The full orders of battle will be in the campaign page, but in brief:
The French Army is commanded by General Sauret, who has 4 divisions: those of Renault, Panis, Arnoux and Villeneuve. Arnoux's division is somewhat weaker than the other those of Renault and Panis, Villeneuve's Division is a cavalry division.
 
The Austrian Army is commanded by Marshal Altenburg, who has 2 'wings' (those of Liechtenstein  and Sachsen-Coburg, with 7 infantry brigade and 3 cavalry brigade equivalents). A couple of those brigades are broken up into garrison forces.

Starting Deployment:

The French commander has decided on a 'Southern'-focused deployment just in front of Genoa, with the Ligurian apls to protect his left; the Austrians are in a more central positionin the Piacenza-Cremona-Parma triangle, with some forward detachments a little further forward to give warning of French intentions. These detachments were mainly the Austrian militia battalions. There is a little risk-reward element here: isolated militia battalions are fairly likely to be overrun if attacked - but that might happen to any isolated detachment, and you don't care as much about losing a lowly militia battalion (compared to say, a precious cavalry regiment).

We are a couple of days in now. The advancing French overwhelmed the isolated militia battalion in Spezia and are advancing up the E-W road to the South. Apart from some tiny affaires des postes in the Ligurians as Austrian cavalry patrols and French light infantry skirmish, that is it really. The Austrians do not yet have any indication of what the French are up to.


By Day 5, the French attack is developing. The Austrians are aware of the Spezia incident and Liechtenstein's wing is marching towards the crossroads in A10 to intercept the French, unaware that the French main body has passed. The French have in fact nearly reached Modena and Bologna, two game-winning objectives. On the other hand, the French cavalry patrols which have just spotted Liechtenstein's advance are not going to stop Liechtenstein's force cutting off the French lines-of-communication...


And the predictable situation the following day: the French have captured the two objectives, which if they can hold until day 29, then they win the game. On the other hand, their supply lines have been cut. This can cause quite a lot of damage quite quickly to an army.

We are now at Day 8. General Sauret knows there is no way his forces can hold out for weeks with no supplies, so he sets his forces in motion back to the crossroads. Keeping in mind his orders to keep is forces as concentrated as he can, he doesn't try to leave strong forces guarding his objectives. The 'scattering' effect behind the French columns moving back West is from units dropping out to look for food etc and then re-organize. Because the battalion/regiment/battery is the lowest unit in the game, then straggling and losses etc. are effectively modelled by whole units becoming disrupted - or destroyed - rather than each unit losing a percentage of their strength. Once you get to thinking of a unit as an 'Army strength point', it works really well. But more to say on this in the notes. The Austrian commander, has moved forward to reinforce Liechtenstein - things not looking great for the French!

The first major battle of the campaign is now fought - it is an Austrian victory! The French suffer heavy losses and are pushed back. The Austrian casualties are somewhat lighter but not negligible.

This is the position after the battle. Sauret is in a slightly desperate position! However, some reinforcements (a new brigade, currently in Spezia) is coming forward to reinforce him.

There is a lot of fog-of-war happening at this point. The Austrian commander is aware of Modena and Bologna falling, but is not aware of what is happening around the southern crossroads. He therefore orders his Army to retire and concentrate on Modena, unaware that the French are really in a hugely difficult situation.

Day 10. Another battle is fought around the crossroads, and this time the French, being stronger (they have brought in new units to replace their losses in the previous battle, at the cost of great disorganization, but the Austrians have no supports in range) gain the victory. Their losses were somewhat greater, but very unfortunately for the Austrians, their army commander, Marshal Altenburg, is captured during the action!! Not only have the French managed to escape the trap, their opponent is disorganized and outnumbered at the key point of action. The French player commander is a truly Napoleonic high-priest of concentration, and despite the heavier losses he has suffered to this point, reaps the rewards here.

Day 12. Prince Liechtenstein, temporarily in command of the Army Reserve along with his own remaining troops of the Left Wing, retreats towards Modena and occupies it. Sachsen-Coburg's lead elements are in Parma, but the French troops are advancing fast towards the junction of the two armies (slight shades of the 100 days here?!)

Prince Liechtenstein was faced with a very difficult tactical choice here. He could defend Modena itself in strength - but then the Austrian main army would be surrounded and besieged, and would be unlikely to last out until the end of the game. He could leave a smaller force in Modena and try to concentrate with Sachsen-Coburg - but Modena would likely fall quite quickly, with the main French army between the Austrians and Modena and Bologna - probably losing conditions. Or he could fight outside Modena - stopping the French for two days would allow reinforcements to come, and he would then be in a position to strongly garrison Modena and maintain a potent field force. But losing the battle would mean that Modena would fall without fighting...

For better or worse, he chose the latter option. It did not go well, the outnumbered Austrians were defeated and the French occupied Modena.

The positions by Day 14. The French have captured Modena and are concentrated in front of it. Not an easy situation for the Austrians!

Day 17: The French have also taken Bologna, and re-established a line of communication that goes through Pistoiese rather than near Parma; Sachsen-Coburg's troops manage to ambush and defeat the rear of the French column as it moved past, causing some losses to the French but not fundamentally changing the situation.

Day 20: The Austrians under their new commander, Prince Hohenzollern, make another attack and take Modena - but with very severe losses. It is now very doubtful that they can really stand up to the French if the French should re-concentrate. The Austrian commander is no longer very confident that his army can stop the French.

Day 22: Sauret has re-grouped his forces. Liechtenstein withdraws slightly, leaving some troops to garrison Modena, which the French commander places under siege. He takes it by storm the following day, with only modest losses.
Day 24: The main Austrian army has withdrawn North, to defend its other cities and supply lines and depot. A small raiding force (an Austrian Grenzer battalion) causes quite a rumpus in the French rear around Rapallo, cutting off supplies to the main French army for a couple of days. Arnoux's Division is converging on it however, and destroys it the following day. Indirectly however, that Grenzer battalion caused really quite serious damage through the straggling, desertion and illness which resulted!
Day 26, and the last day of campaign action (the game rolled on for a couple of days, but nothing happened - neither side's troops had any orders which could affect anything). The French have succeeded in taking their objectives, despite the rather heavier casualties they suffered.

Game Notes: 

That was really interesting, and a lot of fun - at least for me! I think the players seemed to enjoy it mostly, and found it interesting. It was a hard game for both of them: the set-up is that the twop players (Napoleon and the Archduke Charles) are just 'off-table', issuing orders but can't get involved directly in the action. So as the action moved further from the SW corner (for the French) and from the NE corner (for the Austrians), news took 2-3 days to arrive, and subsequent orders took 2-3 days to reach the respondents, so the fog of war and confusion was particularly heavy. I made tactical decisions for the local French commanders and Austrian commanders as best I could, given their previous orders. Where there were two or more options, I let the dice decide. For example, the French cavalry regiment guarding the crossroads on Day 6 could have plausibly retreated East (on his main force) or West (onto his LoC). The commander decided to do the latter. I also used a similar mechanism for dealing with intelligence information from prisoners. The fog of war and delays prevented the Austrian commander from ever knowing quite how close he was to victory during the second week of the campaign.
 
The reason for doing it this way was to prevent commanders being unable to influence events at tactical battles they were actually present at. Of course, this is a very gnarly problem for every campaign. Let me summarize:
 
1 - Each player fights all the battles, commanding their own troops in F2F battles. Issue: when commanding battles, there is implied telepathy between the tactical commander and the overall commander. In this case, 'Grouchy' at Wavre would 'know' what 'Napoleon' wanted him to do at all times.
 
2 - Each player only fights the battles the overall commander is present at. Okay, but this means that a 3rd party, or the umpire has to control the opposition. This may be sub-optimal for all kinds of reasons, even if it could be practically done.

3 - Neither player fights any of the battles. But then, the tactical commander may totally 'get wrong' what the player-general would be able to literally shout in his ear, because they are co-located.
 
4 - Neither player fights any of the battles, because their persona can never be present. But this means that they are always days away from the scene of the action, which is almost anathema to actual Napoleonic generalship.

I went for #4. but probably in retrospect I should have gone for #3. So the players were in effect in a situation in real-life represented the situation on the wings: for example, Napoleon in relation to the Northern and Southern armies in 1812, or King Joseph and Jourdan in the Peninsular (possibly the closest comparison), or Napoleon and his detached corps in 1813 and 1814. So it certainly was done this way, but without the option to be at the vital point.
 
The hardest tactical decisions for me concerned cities and how many troops to garrison with. This is because the solution is mathematically computatable if you know what the enemy might do. This made it hard for me, since I did in fact know! So I am still unsure whether Prince Liechtenstein (i.e. me!) made the correct decision outside Modena, since my internal deliberations would have to be 'known' to General Sauret, in some sense.

I think the campaign rules worked generally pretty well. The stacking limits were pretty harsh and unrealistic, but I think if we think of a battalion representing a brigade, it sort of makes more sense. Northern Italy is quite a big place for the size of forces stipulated in the scenario. On the other hand, they did make it easy to administer the action and made sure that I could always set up the tactical actions quite easily. Rolling for terrain is sometimes a bit unintuitive (Liechtenstein's terrain rolls for the Modena battlefield were awful!) but seems to be more achievable than the alternatives.

The out-of-supply rules were a bit harsher than I perhaps intuited when I was modifying the rules. I used a simple mechanism of an out-of-supply unit receives the equivalent of a normal musket shot. This gives units perhaps a 1-in-10 chance of being eliminated. It is impossible to eliminate units in towns this way, but the odds are worse for units in rough terrain. There is somewhat more chance of them being 'shaken'; this only means they have to rally the next day, which is normally fine, except then there is a 1-in-10 chance of being eliminated at this point too. So perhaps this was overall a little harsh, although it did also seem to work quite well at the army level. I need to number-crunch the odds a bit more though.
 
I deliberately just wanted the players to concentrate on the commanders' roles. I didn't want them to do any staff work, I took that on. It felt both more fun for the players and more realistic really. I will be interested to know if players wanted to do more of the organizational work or if they were happy that they didn't need to do it, or if they wanted more visibility of it (e.g. more morning states) without necessarily doing it more.
 
We took the campaign at a reasonably leisurely pace, which worked well for 1 umpire and 2 players. I think it would be difficult to increase the number of players too much though without much more formal and demanding systems.  However, I think I could maybe run a couple of these campaigns simultaneously, without too much trouble. I learnt a lot about the mechanics of running the campaign, so I think I now have a decent system for running these things, after a few moments of awkwardness early on. I also have some ideas about how to run it faster, but with more colour and atrmosphere too, if I do any more.
 
I will put out the camapign notes as a separate page soon, perhaps with a sample of the reports and orders sent, to give a feel for that. I will do the battle reports themselves at some point and link to them, but I wanted to get the campaign summary out first. 

I am really pleased that, at least once, I have run a wargames campaign in the 'classic' style of Barker, Grant, Featherstone et. al. It wasn't as hard as I imagined it might be - the blogging of Paul Leniston has really helped over the years work out where the difficult bits actually lie and how you overcome them - and I would recommend giving it a try - it really is quite thrilling to be part of it all unfolding in ways you wouldn't have imagined yourself.


Friday, 5 April 2024

Alcolea - Neil Thomas-esque

As well as a 'proper' test of the Alcolea scenario (see link for more of the background details), I used the base scenario to construct another Neil Thomas-esque scenario. Again, I made this a more 'generic horse & musket' game rather than sticking to its Napoleonic origins. The high-level objectives of the game are the same though: the Franco-Jacobite Spanish forces must either seize the crossing or defeat the opposition army - in this case, a Dutch force. The Dutch force is mainly poorly-trained, with a small cadre of trained troops; the Franco-Spanish forces are trained, with an elite battalion included. 

As usual, I used the Polemos: Ruse de Guerre rules. 


The Forces:

Franco-Spanish-Jacobites: 8 bases of Infantry (1 base Well-Trained), 3 bases of Dragoons, 1 base of 8pdr Foot Artillery
Dutch: 10 bases of Infantry (8 bases Poorly-trained), 1 base of Cavalry, 1 base of 8pdr Foot Artillery

The Set-Up:

Very similar to the 'main' scenario, changed into a slightly more representational terrain on a square 2'x2' board, but otherwise pretty similar I think. The Franco-Spanish are approaching from bottom-right.

The advancing Franco-Spanish

One part of the Dutch force, on the hill to the flank

And the other part, guarding the bridge and town. The barricades are represented by another 'urban area' on the top end of the bridge.

The Battle:

French infantry, supported by artillery, get ready to storm the bridge

A wider shot: Spanish infantry are positioned along the road to help protect the flanks; the Frech Dragoons are switching position and riding down the road (left) to isolate the Dutch on the hill

But considering attack to be the best form of defence, they storm the hill!


The French making slow-going against the Scots and Swiss in Dutch pay by the bridge

However, the Spanish, despite suffering quite heavy losses of their own, including one battalion which has routed, have caved in the Dutch flank on the hill

Still it is a bridge too far for the French...

However, excpet for a knot of infantry and cavalry at the far end of the hill, the Spanish are triumphant and the Dutch are in flight!

And it is only a matter of a few more minutes before the entire Dutch wing is broken

After a little more desultory firing, the Dutch commander withdraws, deciding not to contest the bridge any further since the loss of his Army's right wing.

Game Notes: 

Another Thomas-esque game which worked pretty well. Doing these scenarios back-to-back shows how little one loses in the more simplified scenario. The loss isn't 'nothing', but it is pretty small. The Dutch were a bit unlucky: if they hadn't failed their army morale test, tactically they were still in quite strong position around the bridge, with better troops in a better position. However, c'est la guerre and Polemos is going to punish the 'Spanish' (i.e. the Dutch, in this refight) for having that kind of risky deployment, which allows catastrophic success against a weaker wing to help defeat the stronger. Also, Ruse de Guerre as a baseline makes higher ground less strong a factor than in Polemos: General de Division...although how much that matters also depends on choices you make about troop quality...
In any case, all good fun: I commend this approach to the house!

Figures by Baccus 6mm, buildings by Leven.

Thursday, 4 April 2024

Alcolea - a Polemos General de Division Refight

Continuing this short series of really lesser-known Peninsular War actions, playtesting scenarios from a forthcoming Michael Hopper scenario book, this game recreates the action at Alcolea, an early action in Dupont's ill-fated attempt to conquer Andalusia in the summer of 1808, which led to the surrender at Bailen.

The basic situation is that a Spanish force with a very small core of regulars supported by a ton of new levies is trying to stop Dupont's advance, by blocking the bridge. It is also on the high ground threatening his flank. Dupont either has to force the bridge, or defeat the Spanish force in front of him.

I used the Polemos General de Division Napoleonic rules for this refight.


I won't give the detailed forces - you'll need to wait for the scenario book to come out if you want that - but in broad terms, I used:

French: 6 bases of Cavalry, 17 bases of Infantry, 3 bases of Artillery
Spanish: 2 bases of Cavalry, 20 bases of Infantry, 1 base of Artillery

As with these other early battles, there are some important choices to be made: the French were hardly the veterans of Austerlitz and Jena, but even the Legions of Reserve and Provisional Regiments were much more experienced and better trained than the Spanish levies. How these are reflected in the game will depend a lot on what your ruleset can handle. But a little more of this in the game notes.

The Set-Up:

The Spanish on the hills and across the river.

One half of the Spanish army

And the other half, guarding the crossing

And a closer look at the built-up area and the bridge, the heart and hinge of the Spanish defence

The advancing Imperials. I don't have the Marins de le Garde so I am using a Young Guard battalion as the closest thing in my collection (I really should get around to doing them, some of the smartest troops to grace a battlefield ever!)

The Battle:

Slightly surprisingly, the Spanish begin by attacking! Seizing the initiative, they were at least doing something Dupont wasn't expecting...

The young French Fantassins seem to flinch a little as the Spaniards approach...

But they deliver a couple of devastating volleys which blow away the head of the attacking Spanish column

The remnants run away up the slope

The French re-group, and then launch a much larger attack of their own, with the Marins de la Garde and Dragoons leading

There is some quite fierce fighting, but the Spanish are slowly being pushed back in the centre of the slope and the Marins break through the first line, which bends back to left and right; meanwhile, more of Dupont's troops are advancing towards the bridge

The French are waved forward for a second time, as their commanders try to renew the impetus of the attack

The Spanish are somewhat akwardly positioned, and suffering severely, but are still fighting hard - they have repulsed the French Dragoons, and stopped the supporting French infantry column

In the congested fighting, the French infantry - pinned on the plateau - re-orientate their supports and try and push back down the slope

The Spanish infantry on the right flank (nearest, bottom) break and run; Spanish counter-attacks can make no progress and more Spanish battalions rout (top of the hill)

Another Spanish counter-attack has some success, the French are just clinging to the edge of the plateau!

The French generals desperately try and re-organize their men


They launch yet another attack

Which partly miscarries! Successful on the far side of the plateau, the raw Spanish troops prove surprisingly handy with their muskets...

The Spanish launch another counter-attack into the heart of the French!

This act of heroism succeeds! Some of the French start to break and run!

The French look to be in some trouble, with two battalions running and third holding on in tatters at the base of the slope...

Meanwhile, the French assualt on the bridge begins and is executed with aplomb: the bridge is crossed and the defenders pushed back

Dupont leads his mn into the assault, sword in hand, at odds of 2-1 against (and more if you count the flanking troops!)

Suddenly Spanish resistance on the hill collapses and it is sauve qui peut...

The Spaniards are in full fight

Dupont and his troops will not be stopped!

With the Spanish in full retreat, their army morale collapses and despite the earlier scare, Dupont is master of the road to Cordoba...


Game Notes: 

Perhaps a surprisingly close game, or maybe the Spanish were a bit luckier than in real life. They were almost certainly more smartly-dressed than their historical counterparts, so perhaps that did it...
Polemos General de Division games definitely have a certain 'grammar' - poor infantry defend hills and better troops have to heave them off them; the first attack can be very dicey, but the second attack is a little more likely to succeed. The essential modifiers here are +2 for being uphill, -2 for being Raw. French troops will generally also get a +1 for being better/having more skirmishers. There are some detailed modifiers in the shooting, and interactions about what happens when the two sides are equally shaken, but that is the nub of it. So this gives the design space to have troops which are a bit less Raw, and only have -1 on their morale: I think that is what I used here for some of the Imperial troops, although the better logic would actually be to make the Spanish levies a -3 instead. Anyhow, it was all good exciting fun and perhaps not inherently too unreasonable. I did use a basically half-sized board which should be appropriate for figures based on a 60mm x 30mm base, but it felt a bit cramped in this game; I think 6'x4' tables might be better off going to 4'x2.66' rather than 3'x2', in this scenatio series.


Figures by Baccus 6mm, buildings mainly by Leven I think.