Heretical Gaming is my blog about my gaming life, featuring small skirmishes and big battles from many historical periods (and some in the mythic past or the far future too). The focus is on battle reports using a wide variety of rules, with the occasional rules review, book review and odd musing about the gaming and history. Most of the battles use 6mm-sized figures and vehicles, but occasionally 15mm and 28mm figures appear too.

Monday 30 March 2020

DBA: Battle of the Standard AAR (1)

The Battle of the Standard took place near Northallerton in 1138, as an English Army attempted to stop a large-scale Scottish raid made by King David himself.  It has been the subject of two magazine articles in my collection, one in Miniature Wargames 20 and the other in Wargames Illustrated 74.  The former proposes quite a large battle and a very large Scottish Army, the latter is slightly more sceptical and in any case proposed a DBA scenario, which makes things easier.  The Wikipedia page is pretty good for this one and was very helpful in fleshing out the two magazine articles a little.


The Forces:

The English Army:
1 x Standard (General) (CWg)
4 x Dismounted Norman Knights (4Bd)
3 x Serjeants and Local Levies (4Sp)
1 x Crossbowmen (4Cb)
3 x Archers (Ps)

The Scottish Army:
1 x Mounted Knights (3Kn)
8 x Spearmen (4Pk)
2 x Galway Warriors (3Wb)
1 x Bowmen (Ps)

The Scottish army was deployed in four lines, with the Galwegians in the van, and the archers in the second line.  I put the Scots' King with the mounted knights, but he could equally well be placed with one of the pike elements.

I think these are straight selections from the DBA list at the time of publication (Nov 93) and this is what I used for my refight; the latest version of DBA differs a little.  In the latest list, the orders of battle should probably be:

The English Army:
1 x Standard (General) (CWg)
3 x Dismounted Norman Knights (4Bd)
4 x Serjeants and Local Levies (4Sp)
2 x Bowmen (3Bw)
1 x Archers (Ps)
The final element could be either extra knights (3Kn), mounted archers (Mtd-3Bw), Welsh (3Ax) or South Welsh (3Lb). I don't think any of these really fit, but might be tempted to go for the extra knights.

The Scottish Army:
1 x Mounted Knights (3Kn)
7 x Nobles & Yeoman (4Pk)
2 x Galway Warriors (3Wb)
1 x Highland Archers (3Bw)
1 x Small Folk (7Hd)
This would probably work just as well for the Scots.

The Scenario:
The Scottish Army is trying to break through, or simply break, the English Army blocking the Great North Road going to Northallerton.  It had high morale having previously defeated an Anglo-Norman Army at Clitheroe.  The main special feature of this scenario is the Scottish deployment and command and control issues.  I simulated this by deploying the Scots in four lines, with the Galwegians in the lead; and ruling that the Scottish side must use its first PIPs to advance the Galwegians (i.e. the Warbands) to attack the nearest Anglo-Norman troops.

The terrain is very simple.  There is a slightly raised ridge along which the road lies.  This acts as a slope for troops moving laterally.  The English position is flanked by passable marshy ground.

The Set-Up:
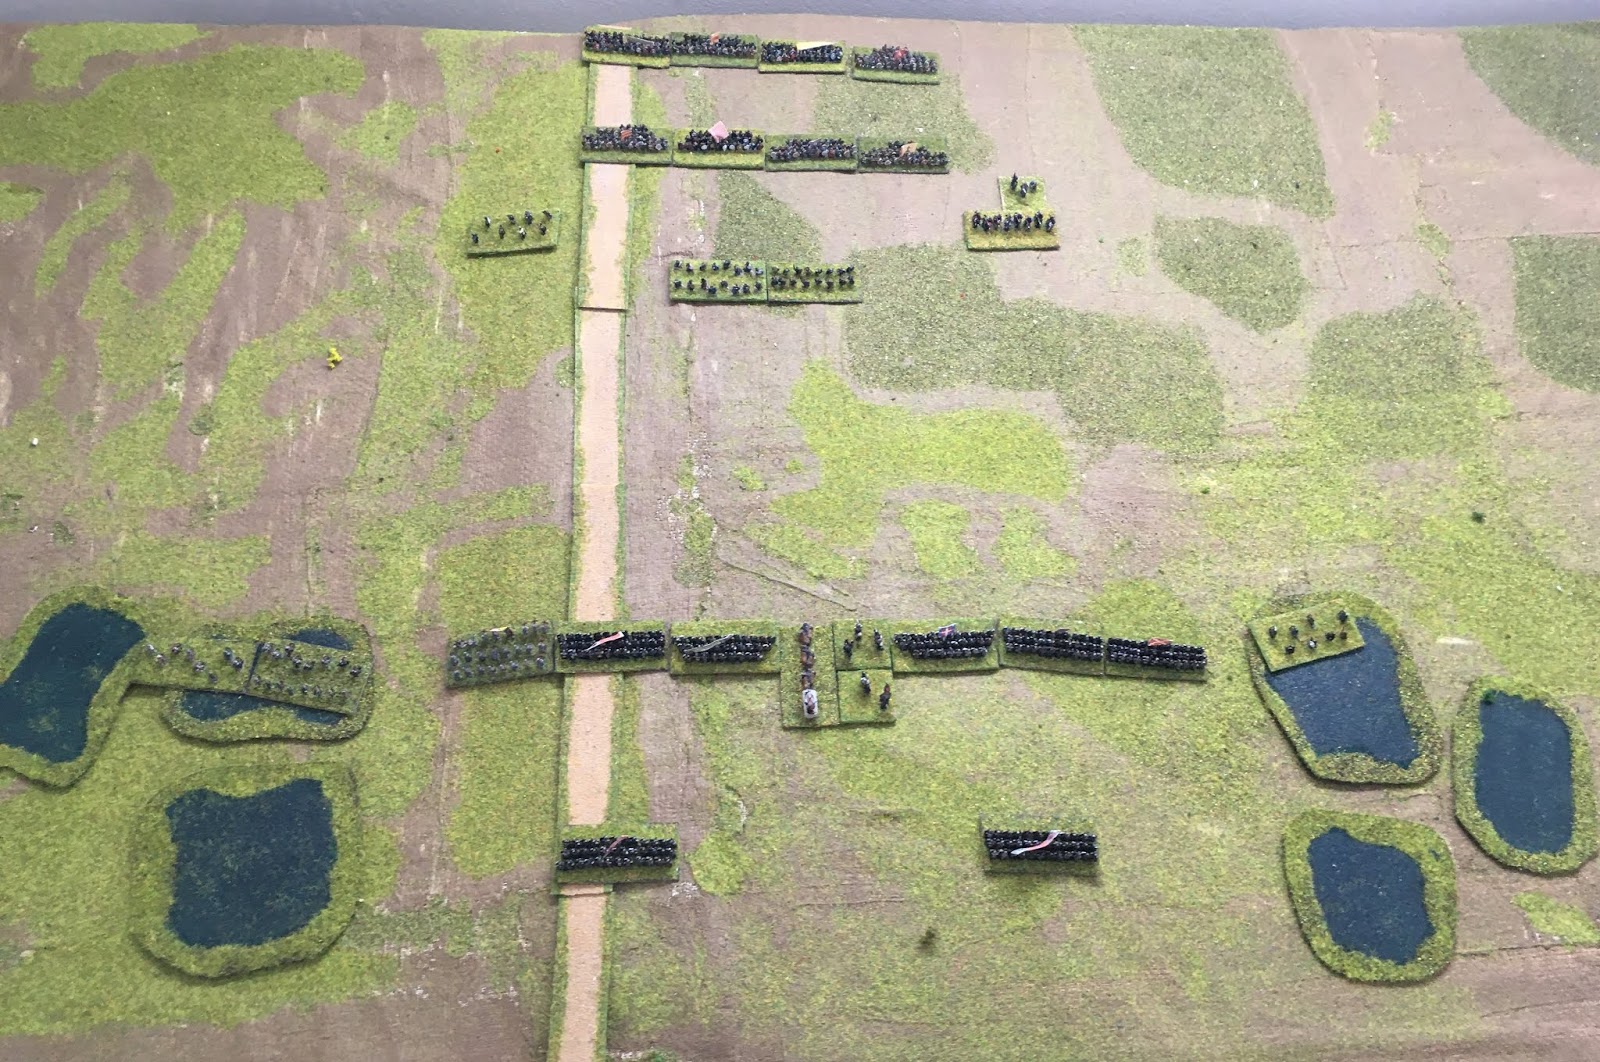
The Anglo-Norman army defending its position astride the road and ridge, flanked by marshy ground to both sides.  The standard is in the centre of the line, with spearmen to its right and dismounted knights and the crossbowmen to the left.  There are a couple of groups of dismounted knights as reserves, and skirmishing archers on the flanks.


The Scottish Army in its four-line deployment: Galwegian warriors in the van, archers and mounted knights in the second line (and offset), and the spearmen in the third and fourth lines.


Another wider view of the terrain, showing the ridge a little better.

The standard in the middle of the Anglo-Norman line.
The Battle:
The Galwegians charge, not waiting for any support!


The Anglo-Norman crossbowmen turn to fire at the advancing Galwegians (left)...

...which makes absolutely no difference and the Galwegians charge home into the dismounted knights on and around the standard

And the ferocious Galwegian warriors eliminate their opponents in short order!


The Anglo-Normans rush in their reserves of dismounted knights...

Who at least temporarily restore the situation, and half the Galwegian warriors have fallen...the remainder of the Scottish Army advance more slowly in support

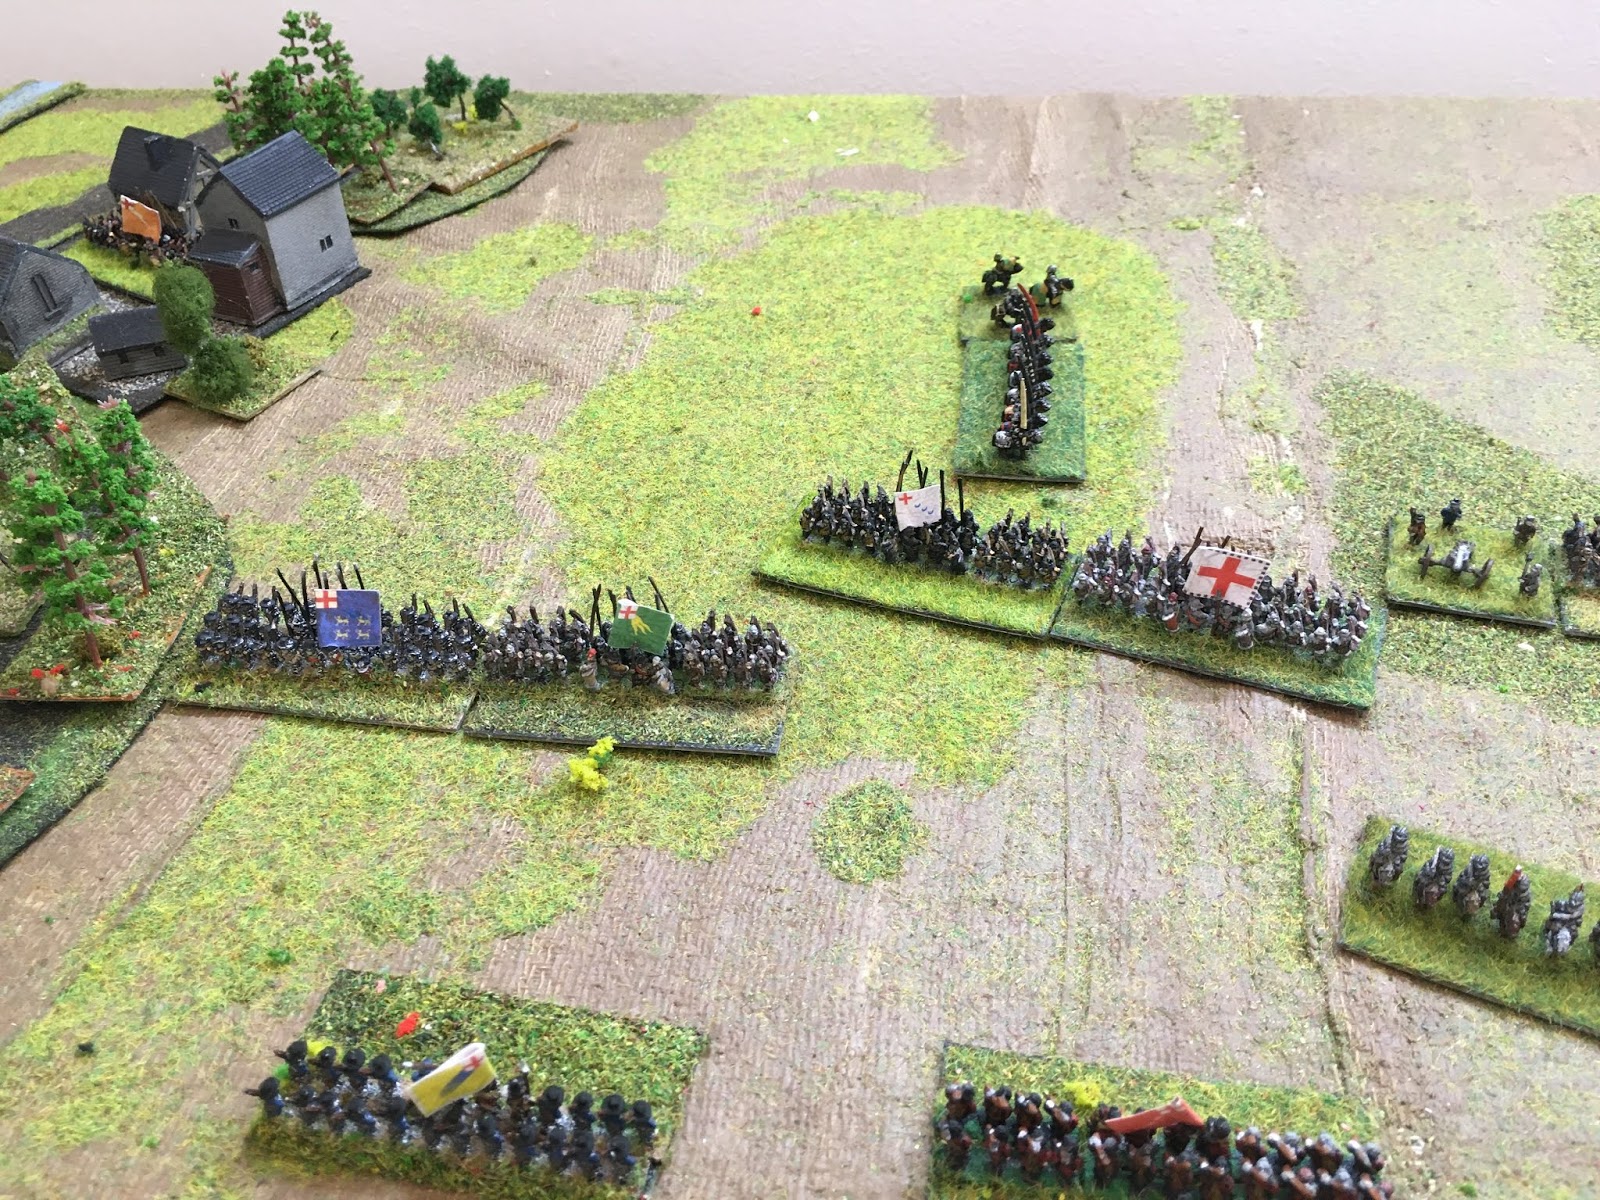
A wider shot; the Galwegians again try and break through the Anglo-Norman line; on the Anglo-Norman left, groups of archers indulge in ineffective skirmishing (left); King David moves his knights towards the other flank (top)

A closer view of the Galwegians resuming their attack in the centre...

Which is totally successful! At this point, the morale of the Anglo-Norman army broke...

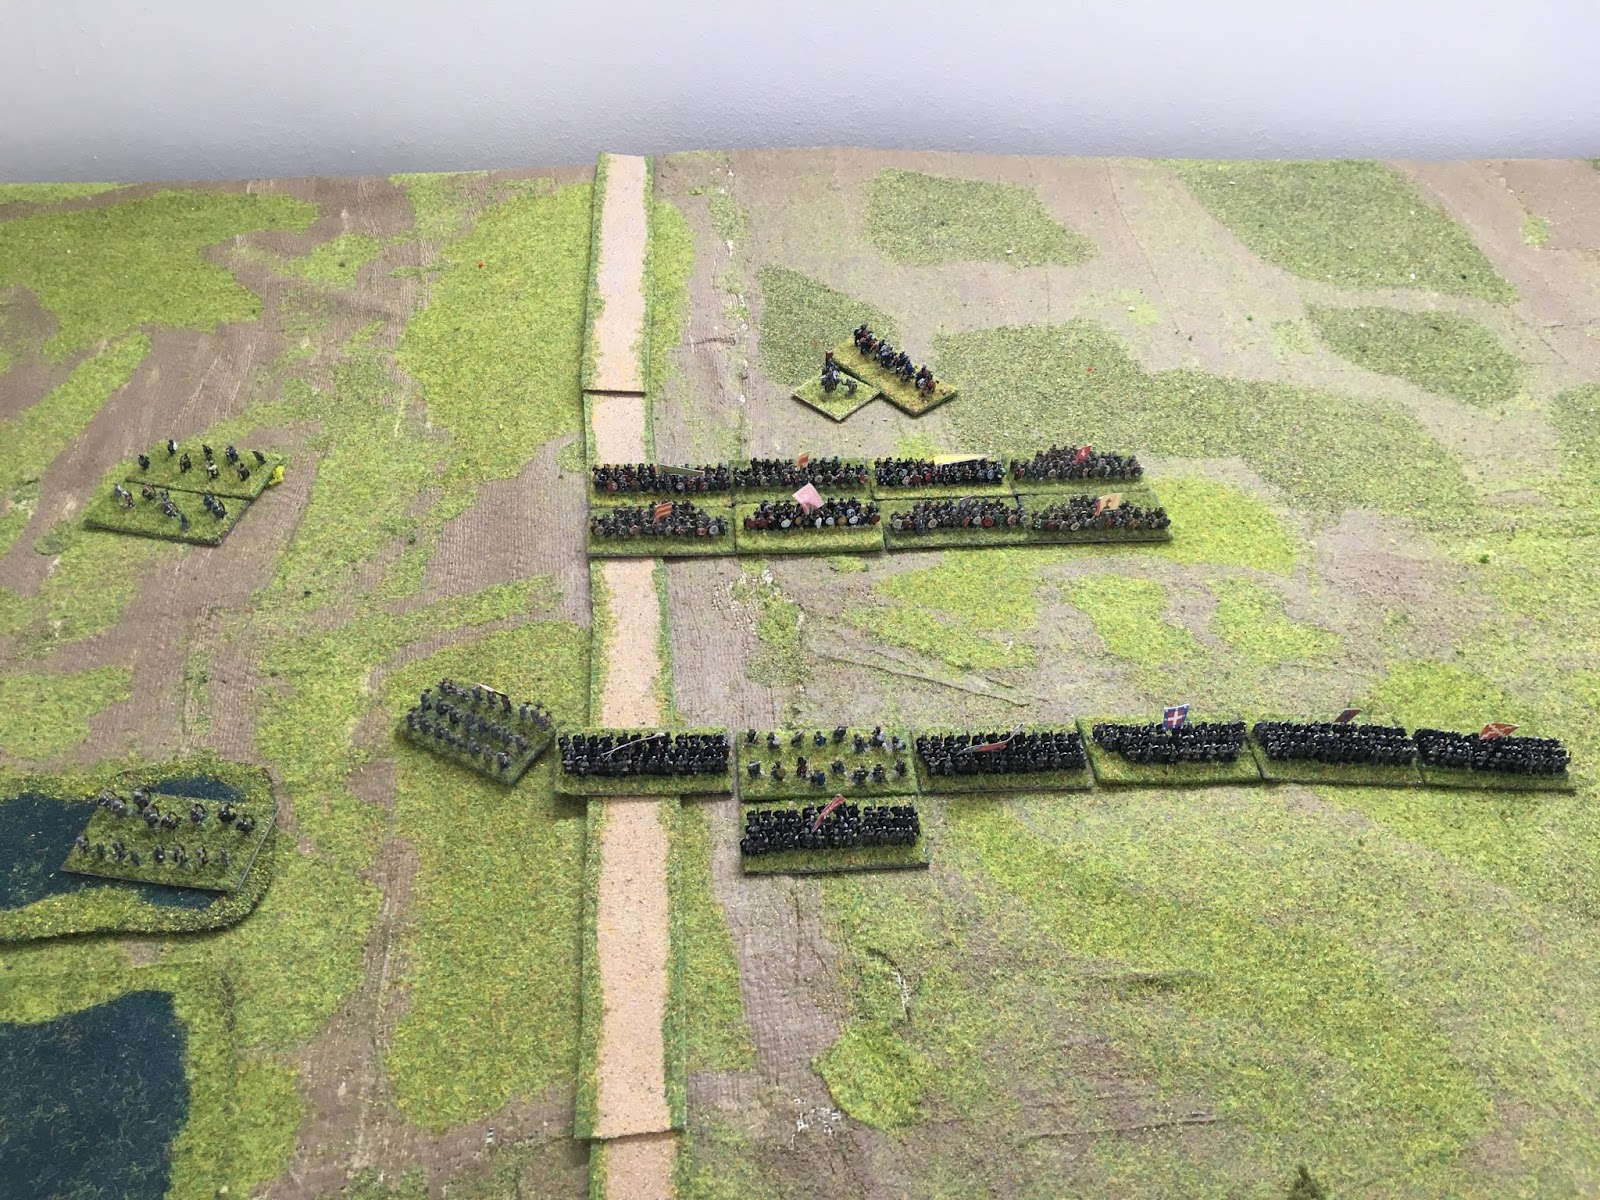
A wider view of the position at the end of the battle.
Game Notes: Typically DBA - short and sweet! 


The result of this refight was more or less what would have happened in reality if the battle had gone according to the Scottish plan.  The key element in the rules here is that although dismounted knights and Anglo-Norman spearmen have better combat factors than aggressive tribal warriors, if the tribal warriors win they are likely to eliminate their enemy straight off whereas the warriors are only beaten if they are decisively defeated, otherwise they will merealy be pushed back.  The English were undone in this refight by basically horrible, horrible dice rolling and the Galwegians should never have been able to get waway with this so easily...the best one could say is that probably the vast majority of the Anglo-Norman would have escaped in the rout...
The terrain set-up seemed to work reasonably well.  The English army came from the Normans in the Baccus 6mm Early Medieval range, with an Irregular Miniatures' later medieval wagon-standard filling in (IW32);  whilst the Scottish army mainly came from the Baccus 6mm Saxon range, but with Celtic warriors being used for the Galwegians ("Picts").
Anyway, with this game being so short, I re-loaded and had another go...Battle 2 coming up shortly!

Saturday 28 March 2020

Neil Thomas' Wargaming an Introduction: The Battle of Dreux 1562

Next in my series of refighting scenarios from old wargames magazines comes this one from Miniature Wargames 8, featuring the Battle of Dreux

MW started off with some lovely covers, didn't it?
This one appeared in a series called "Military Developments of the Sixteenth Century" which was pretty good for the standards of the day in actually getting a decent balance between describing the battle and describing how to actually stage it.  However, I was helped a lot by using Don Featherstone's scenario for the battle in his Wargaming Pike & Shot.


Reading it was interesting in that although there was probably less hard information in there, Featherstone always spends a lot of time in describing how to transform a battle into a wargame.  Despite their very different approaches, this isn't so different from the Grant way either.  Perhaps most veteran wargamers end up with quite similar views on this.

The French Wars of Religion fall right in the middle of my main interests (and armies).  Not having C16 armies, I took the Kinchian advice of making the game fit the figures and adopted a compromise: gendarmes would be represented by c.1500 Men-at-Arms, whilst everyone else would come from my War of the Three Kingdoms forces.  Obviously my mid C17 regiments of Foot are not really very like Swiss pike blocks or Spanish proto-tercios, but this is Heretical Gaming, after all...

I used the Pike & Shot rules from Neil Thomas' Wargaming: An Introduction, which were at least written with this conflict in mind. Dreux is rather too late for DBA and rather too early for Polemos ECW or Twilight of Divine Right; and my basing doesn't suit DBR.  I think maybe that David Heading (Author of Polemos: ECW) has a set that might be suitable...


The Forces:

The Catholic Army:

2 units of Gendarmes (Gendarmes, heavy armour, Elite)


1 unit of Light  Horse (Light Cavalry (Arquebus), light armour, Average)


4 units of French Infantry (3 x pikemen, medium armour, Levy; 3 x Shot (muskets), light armour, Levy)


1 unit of Spanish Infantry (3 x pikemen, medium armour, Elite; 3 x Shot (muskets), light armour, Elite)


1 unit of Landsknechts (4 x pikemen, medium armour, Average; 2 x Shot (muskets), light armour, Average)


2 units of Swiss Infantry (4 x pikemen, medium armour, Elite; 2 x Shot (muskets), light armour, Elite)


1 unit of Artillery
Total: 12 units


The Huguenot Army:

1 unit of Gendarmes (Gendarmes, heavy armour, Elite)


3 units of Reiters (Reiters, heavy armour, Average)


1 unit of Light Horse (Light Cavalry (Arquebus), light armour, Average)


3 units of French Infantry (Shot (muskets), light armour, Average)


2 units of Landsknechts (4 x pikemen, medium armour, Average; 2 x Shot (muskets), light armour, Average)


Total: 10 units


The aim of the scenario is simple: to defeat the opposing army.  Therefore if the Catholic Army is reduced to three or less units, the Huguenots win; if the Huguenots are reduced to two or less units, the Catholics win.

The Set-Up:

The Catholic Army is top, stretched between the two villages (Epinay, left; Blainville, right); the Huguenot Army approaches from the bottom.


The Catholic Right Wing: the Spanish infantry (orange flag) are in the village, with French (blue flag) and Landsknecht (green flag) infantry next (centre) then the Swiss infantry (white flags) (right); Guise's Gendarmes support

The Catholic Left Wing, with the Swiss (left) flanked by the artillery and then the remaining French infantry; Montmorency's Gendarmes and the Mounted Arquebusiers form the Left flank (right)

Conde's Huguenot Army: the Gendarmes and Reiters are forward, with the infantry in support
The Battle:
Montmorency and Conde's horsemen charge and clash

The Huguenot Reiters come off distinctly worse!

Conde's gendarmes go round the flank, but Montmorency's knights fight with great valour and resist it

The Reiters are eliminated in short order; French infantry advance into towards the flank of the Huguenot Gendarmes...

...who are getting distinctly the worse of the fight!

More Huguenot Reiters approach the French infantry, but rely on pistol shooting and do not dare close with pikemen...

The Huguenot gendarmes suffer mounting losses and support cannot reach them in time


And they are all killed or taken!

Landsknecht musketeers prove surprisingly effective, quickly reducing Montmorency's gendarmes to a small rump of effectives (right); whilst the Huguenot Reiters retreat back towards their own infantry (left)


French and Landsknecht infantry (left) advance against the Huguenot Left, hoping to get to push of pike...note that Guise's gendarmes are being transferred to the other wing (top)


Montmorency pulls his gendarmes out of the battle line (centre), relying instead on his infantry and mounted arquebusiers

The fire from the Huguenot Foot is fierce, causing casualties along the line; on the other hand the Catholic artillery (centre-right) was absolutely useless throughout the engagement!

Casualties mount on the French infantry on the Catholic Left!

The Catholic Landsknechts are pulled out of the battle by Guise just before they collapse (centre), but they have bought enough time for the French infantry to charge home (left)

They quickly gain ascendancy over the Huguenots...

....this fight is only going one way!

A French infantry regiment has dispersed under the hail of fire, leaving a gap on the Royalist Left (centre)

However, the victorious French infantry has turned the Huguenot Right!

Pike and musket take a heavy toll of more Huguenot Reiters in the centre

The Huguenot infantry comes under mounting pressure on its left...

However, the Reiters on the right prove to be very steady indeed, causing great harm to the French pikemen (who should have had the advantage)

A wider shot: the Catholics have turned the Huguenot Left (left) and are trying to get forward on the right...

Reiters attack and eliminate the Catholic artillery by shooting the gunners...


But there is increasing pressure on the next Huguenot regiment on the left...

....this is only going one way...

Meanwhile, Catholic French infantry in the centre eliminate the Reiters that had recently silenced the Catholic artillery

A wider shot

The flank attack on the Huguenot infantry must succeed, yet given the situation the Catholic Foot are making slightly heavy weather of this...

One of the Huguenot's landsknecht regiments has suffered very heavy losses and is now threatened by Guise's gendarmes (centre)

In a smart move, the Huguenots close ranks in front of the depleted regiment to prevent it from being routed or destroyed

The Huguenots move some badly worn Reiters to help protect the Left...

Another French Catholic regiment succumbs to fire and disperses, leaving the Catholic left looking increasingly threadbare...

The Huguenot Left is now dead, captured or fled in its entirety however...


The wider situation: a pocket of Huguenot forces exists to the centre and right, with superior, although far from fresh, Catholic forces converging upon them

The Catholic Right tries to press its advantage by attacking into the Huguenot centre

But incurs quite serious casualties in the face of determined Huguenot resistance

However, Catholic numbers and tactical advantage tell and another Huguenot regiment succumbs


The last fresh Huguenot unit (Landsknecht infantry) launches an attack on the Catholic mounted arquebusiers...

They defy the odds and hold on despite their heavy casualties!  Their Huguenot counterparts succumb, however...things are looking grim for the Huguenot cause now...


The Catholic Mounted Arquebusiers are eventually seen off - the remaining Catholic Gendarmes keep a respectful distance away from the Landsknechts (centre-top)

The last remaining Reiters put in a charge to try and turn round the fortunes of the day...

Whilst fresh Spanish infantry (left) advances upon the weary Landsknechts (right)

The Gendarmes have lost their initial confidence and are in no mood to test themselves against musket and pike...

A desperate yet inconclusive struggle continues in the rear, with both Reiters and Catholic Landsknechts at their last gasp...

However, one of the Huguenot Landsknecht regiments is finished off by the Spanish tercio, and the Huguenot army is defeated!

The position at the end of the battle.
Game Notes: A good fun game, although the Huguenots always felt a bit up against it in this scenario, especially after their disasterous start!  Neil Thomas' rules are very intuitive so it is easy to pick them up again having not played them in a while, although that isn't true of the tactical niceties.  I'm not convinced that the Reiters vs. Pikemen is calibrated quite right, because Reiters can't both get close enough to fire pistols and also disengage: if they are close enough to discharge pistols, they are close enough to be caught by the pikemen. But this quibble apart, the rules seemed fair enough, generally.
The rules as written use both casualty points (hits) and base removal: after every four points received, then a unit will lose a base.  Because I use single base units, I instead use the system from Neil Thomas horse-and-musket ruleset published in Battlegames magazine, "Simplicity in Practice": the attacking unit rolls a die to convert hits into a casualty (the equivalent of removing a single base). So if a unit scores 1 hit, that is converted to a casualty on the d6 roll of 5-6; 2 hits is 4-6, 3 hits is 3-6, 4 hits is 2-6; hits over 4 start again (so 5 hits = 1 roll as 4 hits plus 1 roll as 1 hit).  Commanders are also used; if a commander is persent with a unit, it may re-roll once any failed morale rolls, but if a commander is present with a unit when it is eliminated, the commander is captured or killed.
Figures were a mixture of Baccus 6mm Late Medieval and European Crisis ranges.  I think the buildings are a mixture of Timecast and Leven.