Yesterday I was asked to go through an example of a
Polemos General de Division battle to show how it plays out on the table to help someone new to the rules understand what is going on.
With that in mind, the aim of this post is to present a few turns of a complete Polemos General de Division game. It is deliberately long and long-winded, in order to provide the clearest possible explanation. That said, no doubt I haven't been clear at some point or I have done something not in the rules because I have house-ruled it but played it so often I have forgotten that it
is actually a house rule...
All comments and constructive criticism very welcome.
The Scenario
For the scenario I chose the
First Battle of Bassano , fought on 8th September 1796 which took place between a French Army under General Bonaparte against an Austrian force led by Field Marshal
Wurmser.
The scenario itself was only slightly adapted from one written by Andrew Sayce back in Miniature Wargames 121.
Adapting the Scenario
The typical difference between a Polemos scenario and a more standard ruleset is that generally a single base represents a single unit, and strength differences between units are ignored: instead the number of bases is calculated at an Army level. Normally this makes absolutely no difference as every army's battalions were roughly the same strength, but not in this scenario: the Austrians had distinctly larger battalions. So the forces ended up as follows:
The French Army:
C-in-C: General Bonaparte
1st Division: Gen Massena (Decisive)
1 x Light brigade: 3 bases of Trained SK2 infantry
2 x Line brigades: 4 bases of Trained SK1 infantry
1 x Line brigade: 3 bases of Trained SK1 infantry
Artillery: 1 x 8lb Foot Bty, 1 x 6lb Foot Bty
2nd Division: Gen Augerau (Capable)
1 x Light brigade: 3 bases of Trained SK2 infantry
2 x Line brigades: 3 bases of Trained SK1 infantry
1 x Line brigade: 4 bases of Trained SK1 infantry
Artillery: 1 x 8lb Foot Bty, 1 x 6lb Foot Bty
Cavalry Division: Gen Murat (Decisive)
1 x Brigade: 3 bases of Trained light cavalry
Artillery: 1 x 4lb Horse Bty
Independent Cavalry Brigade (detached from Murat's Division)
4 bases of Trained light cavalry
The French force will generate tempo as: D6 + 4 (1 for each independent formation in the Army)
Its Army morale will be 10
(2.5 x number of independent formations)
The Austrian Army
C-in-C: FM Wurmser
1st Division: Gen Kheil (Plodding*)
2 x Line brigades: 4 bases of Trained SK0 infantry
1 x Light brigade: 3 bases of Trained SK2 infantry
Artillery: 1 x base of 8lb Foot, 1 x base of 6lb Foot
2nd Division: Gen Reisky (Plodding*)
2 x Line brigades: 4 bases of Trained SK0 infantry
1 x Light brigade: 3 bases of Trained SK2 infantry
Artillery: 1 x base of 8lb Foot, 2 x bases of 6lb Foot
Grenadier Reserve
4 bases of Veteran SKo infantry
Light Cavalry Brigade
3 bases of Trained Light Cavalry
Light Cavalry Brigade
3 bases of Trained Light Cavalry
Uhlan Brigade
3 bases of Trained Lancers
Dragoon Brigade
5 bases of Trained Dragoons
*The actual formations in the Austrian force weren't known to the scenario writer, nor do they appear in the Napoleonic Wars Data Book, so I simply made up a typical structure with a couple of fictitious commanders.
The Austrian Army will generate tempo as follows: D6 + 7
The Austrian Army will have an Army morale of 17.5 (i.e. 2.5 x 7)
Terrain Notes:
The high ground is classed as steep slopes
The watercourse is a river, only passable at the bridge
The built-up area is a town
Scenario Special Rules:
The author suggests a -1 to all Austrian morale rolls to account for their poor morale and tiredness. I will use this on all combat rolls, but not on firing or melee rolls to incorporate this.
Note on modifiers - when I go through the modifiers, I do them all from the perspective of the attacker or firer. This is why you may see a '+' when the rulebook has a '-'. It makes absolutely no difference to the results, I just find it easier to count this way when playing solo.
I normally use individually-based figures now to indicate Tempo Points and Shaken levels but I have used black and red counters respectively in this game in order to make them more obvious (obtrusive?!) to the reader.
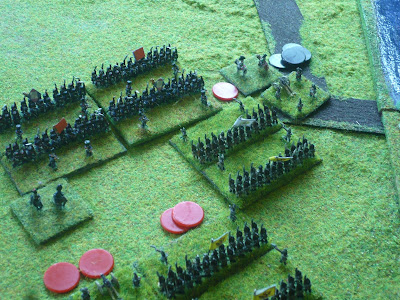
The Deployment
 |
| The Austrian forces are deployed at the bottom, French forces towards the top. For the French, Massena's Division and the Light Cavalry Brigade are to the left of the river as we look at it, Augerau's Division and Murat's Division are to the right. The two Austrian divisions are deployed each side of the river also, with the cavalry and grenadiers to the rear. |
 |
| The view along the lines, from the French left towards the river. Augerau's Division occupies the high ground looking over the town and river valley |
Turn 1 - Tempo Bidding:
Both sides rolled for tempo:
French roll 6 + 4 =10.
Austrians roll 5 + 7 =12.
Then both sides bid:
French bid 5. Austrians bid 5. Napoleon has 5 TPs to allocate, Wurmser has 7.
As a tie on the first turn in the game, both sides roll to see who gets the tempo on the first turn. Napoleon wins.
Turn 1 : Tempo Player Bombardment
 |
| Augerau's artillery bombards unsuccessfully (rolls 6, +1 for extra base, +1 for extra target base = 8, no effect) |
 |
| As does Massena's. |
Turn 1 - Tempo Player Moves Generals & Issues TPs
 |
| Napoleon gives two TPs to Massena (foreground), a single TP to the Cav Bde commander. Massena converts this into 10 order points, the Cav Bde commander into 2 order points. |
 |
| Napoleon gives one TP each to Murat and Augerau, who generate 5 and 4 TPs respectively. |
Turn 1 - Tempo Player's Movement
(there were no attacks in this turn)
 |
| Massena uses an order point to move his light brigade (see the extra skirmishers) forward |
 |
| Massena uses two more order points to move an infantry brigade parallel to his light brigade |
 |
| Massena uses a fourth order point to move forward half of a reserve brigade towards the French right flank |
 |
| He uses a fifth order point to move the other half of the reserve brigade behind the advancing light infantrymen |
 |
| And he uses a sixth order point to move his last infantry brigade up towards Napoleon and his artillery. The artillery can't move since they carried out ineffective bombardment fire. |
 |
| Augerau uses his first order point to move forward his light brigade. |
 |
| He uses his second order point to move forward the supporting brigade |
 |
| He uses a third order point to move forward half of his reserve brigade |
 |
| And he uses a fourth order point to move the other half of the reserve brigade too |
 |
| He doesn't have sufficient points remaining to advance his last brigade |
 |
| The independent cavalry brigade moves forward. All turning must be done by wheeling. I use a homemade marker with distances of 1/2BW and 1BW marked on for ease. |
 |
| Murat moves forward his division in two groups |
Turn 1: Non-Tempo Player Bombardment
 |
| The Austrian artillery bombards the French. Rolls 5, gets cease fire miss next turn's bombardment (indicated by smoke) |
 |
| The other Austrian artillery bombards Massena's advancing troops: Rolls 6, +1 for extra base firing, +1 for extra base target, -1 for target moved last turn = 7 (no effect) |
Turn 1: Non-Tempo Player Moves Generals & Issues Tempo Points
 |
| Wurmser gives two TPs to the Uhlan brigade. Because it is further than 6BW from Wurmser, each TP only generates a single order point. |
 |
| A TP is given to Kheil (located next to the bridge), generating 3 order points. |
 |
| And two TPs are given to the Grenadiers, generating 4 order points. |
 |
| Kheil moves his infantry up to support his artillery |
Turn 1: Non-Tempo Player Movement
(There were no attacks - the picture above belongs to this section too (formattting issue!)
 |
| The Grenadiers move up, some of them along the road to reinforce the town of Bassano. |
Turn 2: Tempo Bidding
Napoleon bid 2 of his 10 Tempo points, Wurmser bid 6 of his 12: The Austrians therefore have the tempo:
Turn 2: Tempo Player Bombardment
 |
| Austrian bombardment on the right flank: no effect |
 |
| Austrian bombardment on the left forom Kheil's artillery: rolls 10, +1 extra base, +1 target base, -1moved = 11, target must retire or be shaken. The French retire 1BW (see gap in French advance) |
Turn 2: Tempo Player Moving Generals & Issuing TPs
 |
| Wurmser gives 2 TPs to one of the groups of Dragoons - because of range, order points havled to 2. |
 |
| 1 TP given to the Grenadiers for 2 order points |
 |
| 1 TP given to Kheil, 1 TP given to a Lt Cav Bde |
Turn 2 - Tempo Player Movement
(no attacks this turn)
 |
| Movement - Austrian Dragoons move up to secure the Austrian right flank |
 |
| Austrian Grenadiers enter Bassano to support the Grenzers |
 |
| Not a great shot here, but Kheil has brought up some of his reserve infantry to give rear support to his artillery; the grenzers and light cavalry on the left both advance slightly forward |
Turn 2: Non-Tempo Player Bombardment
 |
| Non-tempo player bombardment: Augerau's artillery bombards without effect (and Massena's artillery doesn't achive anything either) |
Turn 2: Non-Tempo Player Moves Generals and Issues TPs
 |
| Napoleon issues his tempo points: 2 to Massena (10 order points, 1 to each group of the independent Lt Cav Bde (4 order points) |
 |
| 3 to Augerau (12 order points) and 1 to Murat (5 order points) |
Turn 2: Non-Tempo Player Attacks
 |
| Attack! French infantry attack Austrian cavalry, costing 3 order points.. French roll 4, Austrian roll 3. -1 to Austrians for morale (scenario rules). No other modifiers from the general "Testing to Charge" table or from the "Infantry Attack on Cavalry" table. French win by 2. Check "Result" under the "Infantry Attack on Cavalry" table. Infantry win = Cavalry retire 1BW. |
 |
| And the Cavalry retire thus. |
Turn 2: Non-Tempo Player Movement
 |
| Massena advances his 4-base infantry brigade for 4 order points. |
 |
| Murat advances each of his groups for 2 order points per group. |
 |
| Augerau moves all of his infantry groups (five) for a total of 10 order points. |
Turn 3 - Tempo Bidding
Napoleon bids 7 and is left with 3 points, Wurmser bids 10 and is left with 2 points. The Austrians retain the tempo.
Turn 3 - Tempo Player Moves Generals & Issues Tempo Points
(The Austrian bombardment was ineffective this turn)
 |
| 1 TP to Kheil for 3 order points. Note that he has moved and attached himself to the light cavalry. He had just insufficient movement to attach himself to the Grenzers ahead of them) |
 |
| 1 more TP to the Grenadiers for 2 order points |
Turn 3 - Tempo Player Attacks
 |
| Kheil orders his 3 Grenzer bases to attack for 2 order points. Go to "Testing to Charge" and "Infantry vs Infantry" table. Roll: Austrian 6, French 4. -1 Morale, +1 Infantry Support, +2 Cavalry Support, -1 Defender secure flank, +1 Defender firing at close range (1/2BW): result: Attacker wins by 2. Defender shaken but may fire. Go to "Firing" table. Roll: French 1, Austrian 5, +2 first fire, -1 defender supporting base, -1 firer shaken. Result of firing: no effect. |
 |
| Go to "Outcome of Infantry vs Infantry Attack". Side with greater number of shaken levels (here French defenders) fall back 1BW. Fall back result indicates infantry take a second shaken level (indicated by red markers) |
 |
| Remaining Grenzer battalion attacks the French, using same tables as above. Roll: Austrians 5, French 3. -1 Austrian morale, -1 French infantry suppoer, +2 Cavalry support, +1 defender firing at close range. Attacker wins by 3, defender shaken may fire. Firing, roll: French 1, Austrians 2, +2 First fire, -1 firer shaken. Result - no effect. |
 |
| Check "Outcome of Infantry vs Infantry Attaxcks" - side with greater number of shaken levels falls back. Note that the first French base falls back and pushes the rear supporting base backwards too. Both gain an extra shaken point. The leading French base "should" be at 3 shaken i.e. break (1 for shaken in the charge, 1 for the fall back, 1 for falling back into another base) but a base can only get 2 levels of shaken in one turn. |
Turn 3 - Tempo Player Movement
 |
| Austrian grenadiers continue their slow (1BW per turn) move through the town. |
Turn 3 - Non-Tempo Player Bombardment
 |
| French artillery bombards: rolls 8, +1 for extra base firing, +1 for extra target base. Result, target must retire or be shaken. Target retires. Augerau's artillery got a no effect result on the other flank. |
Turn 3 - Non-Tempo Player Generals' Moves and TP Allocation
 |
| Napoleon gives 2TPs to Massena for a total of 10 order points. |
 |
| 1 TP to the independent Cav Bde for 2 order points. |
 |
| Massena, leading in person, ordersthis brigade to attack (cost 6 order points) |
 |
| Infantry attack artillery, look on "Testing to Charge" and "Cavalry/Infantry Attack Artillery" table. Roll: French 6, Austrians 4, +1 for General leading, -2 for Austrian infantry support, +! for French support, +! for poor Austrian morale Result, French attackers wins by 3, Austrian artillery shaken but may fire. |
 |
| Artillery fire conducted not as a bombardment uses the normal "Firing" table at close range. Roll: Austrians 5, French 2. +2 for supporting artillery, -1 for shaken. Result - target takes 1 shalen level. Look on "Outcome of attacks on Artillery" - both sides shaken levels equal, foot artillery falls back 1BW taking their guns. |
 |
| Falling back artillery takes another shaken level and then inflicts shaken level on the base to the rear it pushes back. Supporting artillery retires along with the unit it was supporting but does not take shaken levels. |
 |
| French general tests to see if he was hit. Rolls 9, -1 for being decisive, total 8 - no effect. French infantry ends up next to Austrian infantry, but the next French infantry attack will be conducted upon them (by the two-base column on the top-right of the shot) |
 |
| French conduct infantry attack as detailed previously. Roll: French 1, Austrians 4, +1 poor Austrian morale, +1 skirmish level advantage, +3 defender fires at point-blank range. Defender wins by 2, shaken but may fire. |
 |
| Austrian infantry fires. Roll: Austrians 3, French 4. +2 for first fire, +4 for point-blank fire, -1 for shaken. Total +4, one shaken inflicted on target. Check outcome of "Infantry vs Infantry": both sides with 1 shaken level, defender falls back 1BW. |
 |
| The Austrian infantry falls back, inflicting a level of shaken into the rear supporting infantry base. |
I didn't take a picture, but the French infantry carried out another attack on the Austrian Uhlans, achieving exactly the same result as previously.
Turn 3 - Non-Tempo Player Movement
 |
| French Light Cavalry advances down the road under the watchful eye of General Bonaparte. |
Turn 3 - Outcome Moves
 |
| Massena's Light Infantry Bde must check its formation morale. It has 3 bases, all of which are shaken. Roll: 5, check table on formation morale page. 5 = +1, +3 for the 3 shaken bases = 4. This is more than the number of bases in the formation, so the formation is spent. |
 |
| The French infantry turn, spent. They will move at normal rate towards their own baseline, hors de combat for the remainder of the battle. |
 |
| Massena removes 1 shaken level from the infantry unit he is in base contact with. |
Turn 4 - Tempo Bidding
Napoleon bids 2 TPs, leaving him with 8. Wurmser bids 8, leaving him with 4.
Turn 4 - Tempo Player Moves Generals & Issues TPs
 |
| Wurmser issues all 4 Tempo points to General Kheil for a total of 12 order points. |
 |
| Gen Kheil moves to lead his unshaken right-hand battalions in person and orders them to attack (2 order points) |
 |
| The Austrian infantry attack the shaken French infantry. Roll: Austrians 1, French 3, -1 for morale, +2 for enemy shaken, +1 for general leading, -1 for skirmish differential, -1 for defender's secure flank,+3 for defender firing at point-blank range. Total: +1, both sides act as ordered. Firing, roll: French 6, Austrians 1, +4 point-blank range, -1 shaken, French win by 8, Austrians break automatically. |
 |
| The routing Austrian infantry fall back plus move normal move (2BW) for a total of 3BW. Rear supporting base falls back (i.e. takes 1 shaken level, moves back 1BW facing the enemy). |
 |
| Austrian general tests for safety, is fine. n.b. I should have moved the victorious French forward at this point, but instead I moved them after the normal Austrian movement. It made no differenc. |
 |
| The Austrian artillery moves onto the bridge (1 order point) |
 |
| The remaining order points are used to remove shaken levels |
 |
| The French infantry is moved forward 1BW. |
Turn 4 - Non-Tempo Player Bombardment
 |
| Rolls 9, +1 for extra base, +1 for additional target = 11: retire or be shaken |
 |
| Austrian infantry retire as a result |
 |
| Massena's artillery bombard, but roll 5, +1 for extra base, -1 for target moved = 5. Cease fire for next turn. |
 |
| Smoke indicates the cease fire. |
Turn 4 - Non-Tempo Player Moves Generals & Issues TPs
 |
| 3 TPs given to Massena (15 order points), 2 TPs given to the independent cavalry brigade, which Napoleon joins in person. |
 |
| 1 TP given to Murat (5 order points) and 2 TPs to Augerau (8 order points) |
Turn 4 - Non-Tempo Player Attacks
 |
| Napoleon himself leads the charge of the French light cavalry down the road into the shaken Austrian infantry. Use "Testing to Charge" and " Cavalry Attack on Infantry" table. Roll: French 4, Austrians 3, +1 Austrian morale, +1 General leading, +2 defenders shaken. Cavalry wins by 5, defending infantry break. |
 |
| French cavalry win, will follow up 1 BW then test to pursue at the end of the round. |
 |
| Massena leads his infantry into another attack on the Austrian artillery using the same table as before. Rolls: French 2, Austrians 3, +1 general leading, +1 poor Austrian morale, +2 artillery shaken, -2 artillery supprted by infantry, +1 attacker supported. Attacker wins by 2, artillery shaken but may fire. Firing, roll: Austrians 4, French 4. +2 for supporting artillery, -2 for two levels of shaken - no effect. Check on outcome - artillery has more shaken levels, breaks. |
 |
| Artillery breaks, causing infantry behind to fall back. Rearmost infantry has already lost 1 shaken from hit by fall back, then gets further shaken level as pushed into further Austrian infantry (very bottom of shot), which also loses a shaken level. Supporting artillery retires 1BW to conform. |
 |
| Remaining French infantry attack Austrian infantry with two shaken levels using same mechanism. Roll: French 1, Austrians 4. +1 skirmish differential, +1 poor Austrian morale, +3 defenders firing point-blank. Attackers win by 2, defender takes shaken level, may fire. |
 |
| Firing, roll: Austrians 1, French 2, +4 point-blakn fire, -2 firer's
shaken levels, +1 defender's shaken level. Result +2, target takes a
shaken level. Outcome, each side has 2 shaken levels: attacker falls back 1BW. Attacker now reaches 3 shaken levels, breaks. Rear-supporting base falls back 1BW. |
 |
| French units routing and retreating. However, French follow-up move (1BW advance) after the defeat of the Austrian artillery brought them into contact with Austrian infantry. New French attack conducted. Roll, French 3, Austrians 3, +1 for General, +4 for defender's shaken levels, +1 for skirmish differential, +1 for poor Austrian morale. French win by 7, Austrians break automatically. n.b. The mechanism here could be interpreted differently - see my comments at the end. |
 |
| French advance again after breaking enenmy - note Austrian infantry in rear support fell back with shaken level. |
 |
| French infantry tried another attack on the Uhlans. This time the cavalry won, so the infantry didn't charge. |
Turn 4 - Non-Tempo Player Movement
 |
| Augerau moves forward his two main brigades, plus his flanking brigade and two bases from his reserve. Murat brings his groups back together. |
Turn 4 - Outcome Moves
 |
| The right-hand Austrian brigade automatically went spent, with 6 points for 3 broken bases and 1 point for the last remaining shaken base, there was no possible morale roll which could save this formation. The other brigade, with 3 points for 3 shaken bases rolled a 5. This added 1 to the score, but 4 does not exceed its initial number of bases, so it remains in the fight. Typically divisional artillery is ignored, becoming spent if the divsion it is attached to is spent. You can incorporate it into a divsion or brigade structure without causing anything to break, however. |
Summary:
I hope that this long walkthrough may be of some use to players who wish to give Polemos Napoleonics a go but feel that they are struggling to grasp the baasic mechanics. Please feel free to ask me any questions and I will try my best to answer, or I will amend the post to show the answer.
If the author or any of the more veteran players want to correct something, please let me know, I'm not precious about changing stuff that I have misinterpreted. I think that this walkthrough does show the many strengths of Polemos as a ruleset, as well as highlighting the weaknesses - primarily bases interacting in ways not fully described in the rulebook, particularly as outcomes of attacks.
Played on a homemade 5'x3' mat, using
Baccus 6mm napoleonic figures and
Total Battle Miniatures buildings.


