Some of this blog's readers may remember I decided to attempt Boardgamegeek's 10x10 challenge i.e. to play 10 games 10 times each in the calendar year of 2017. With just under 6 weeks to go, this is how I am looking (list here):
DBA - completed
Polemos: Napoleonics - completed
Polemos: ECW - completed
WRG 1925-1950: 2 plays left to go
Lone Wolf Gamebooks: 2 plays left to go
Nuts! Final Version: 3 plays left to go
Wargaming: An Introduction: 4 plays left to go
Heroquest: 7 plays left to go
Polemos SPQR: 8 plays left to go (this seems wrong, I think I am missing a game or two here)
either Discworld: Ankh-Morpork or CSI: 10 plays left to go(eek!)
So I am behind schedule, but I still think this is just within reach. There are 39 days left to go and 36 games left to play however, so I will really have to get some good gaming in. Thankfully December should be relatively free for at least giving it a strong go.
Whether I succeed or fail, I will write a summing up blogpost at the turn of the New Year. And then I will be looking forward to re-starting some things which have ended up being put on pause for quite a while, including 3 campaigns! - although one of these could still be tackled using the rules in the challenge. So wish me luck...
Wednesday, 22 November 2017
Neil Thomas' Wargaming an Introduction: A Romans vs Britons Command Challenge
Following on from the last Polemos: SPQR game, I used the same scenario (see link for details) for a game of Neil Thomas' Wargaming: An Introduction.

Orders of Battle:
Britons:
2 units of Light Horse (Light Armour, Javelins, Levy)
2 units of Chariots (Light Armour, Javelins, Elite)
1 unit of Warband (Medium Armour, Elite)
3 units of Warband (Light Armour, Average)
2 units of Skirmishers (Light Armour, Javelins, Levy)
Romans:
1 unit of Cavalry (Medium Armour, Elite)
1 unit of Cavalry (Medium Armour, Average)
1 unit of Numidian Light Horse (Light Armour, Average)
1 unit of Veteran Legionaries (Heavy Armour, Elite)
3 units of Legionaries (Heavy Armour, Average)
2 units of Skirmishers (Light Armour, Javelins, Levy)
1 unit of Archers (Light Armour, Bows, Average)
1 unit of Artillery
Given the extra units on both sides, the break point of each army was raised to 3 units.
The Battle:
Game Notes:
Although giving a broadly similar result to the Polemos SPQR game, there were some telling differences too. I won't re-hash (much!) my previous comments comparing the two rulesets, but rather concentrate on three things:
There are ways for tribal foot to win in SPQR on an open plain - it is really hard to achieve this in W:AI, the melee factors are just too unforgiving. In SPQR, charging in, led by a decent general and double-ranked, they have a decent chance of rupturing that line of legionaries...
Light Chariots are essentially a skirmishing arm in W:AI, but they pack a powerful shock impact in SPQR, which changes the way an Ancient British army is best played
The skirmishing mechanism in each of the rules is surprisingly similar, but they are more effective in W:AI by miles. Why? Because W:AI is a set which favours attrition, SPQR is all about shock. Broadly speaking, W:AI then much increases the importance of light troops. The differences in mechanisms also favour the skirmisher in W:AI, because it is much easier, by judicious use of tempo, to catch skirmishers in SPQR whereas the systemic predictability of W:AI enables a moderately careful player to keep skirmishers just out of reach (generally).
One thing I have found over the last month or so is that there seems to be far fewer good scenarios written for Ancients (pre-Dark Ages) than for other periods - or at least there were in the old wargaming magazines! Obviously there are fewer written records, but it isn't just that. I think partly it is because ancient armies are often more individually distinctive than their opponents, so it limits the ease of transplanting the scenario. I think there used to be more thought given to big battles too in other periods: when considering Leipzig 1813, then there is some recognition that it is going to either need a different rule-set, a lot of bath-tubbing, a big multi-player game, or whatever. But in old articles about, say, Munda or the Sabis, there doesn't seem to be much recognition that the whole thing was apparently not that much smaller than Friedland, and rather bigger than Salamanca. Were people really going to play that on a club night with WRG 5th edition? More on this at a later date...
Anyway, a very good time had by me, using Baccus 6mm and Rapier figures.

Orders of Battle:
Britons:
2 units of Light Horse (Light Armour, Javelins, Levy)
2 units of Chariots (Light Armour, Javelins, Elite)
1 unit of Warband (Medium Armour, Elite)
3 units of Warband (Light Armour, Average)
2 units of Skirmishers (Light Armour, Javelins, Levy)
Romans:
1 unit of Cavalry (Medium Armour, Elite)
1 unit of Cavalry (Medium Armour, Average)
1 unit of Numidian Light Horse (Light Armour, Average)
1 unit of Veteran Legionaries (Heavy Armour, Elite)
3 units of Legionaries (Heavy Armour, Average)
2 units of Skirmishers (Light Armour, Javelins, Levy)
1 unit of Archers (Light Armour, Bows, Average)
1 unit of Artillery
Given the extra units on both sides, the break point of each army was raised to 3 units.
The Battle:
 |
| The toy soldiers line up again to have at it, Britons (bottom) against Romans (top) |
 |
| A closer shot of the central mass of the Britons' warbands (I modified the deployment slightly before starting) |
 |
| And their legionary foes |
 |
| First blood to the Britons - their light troops pin-prick, advancing and retiring to avoid being charged by the heavier Roman cavalry |
 |
| More harassment, from both sides! |
 |
| The red markers indicate that real effectiveness has begun to be lost on both sides |
 |
| Another angle |
 |
| The same type of fighting, but on foot, continues on the opposite flank |
 |
| Finally the Romans trap a unit of Light Horse and have nearly destroyed it! |
 |
| Heavy losses on both sides - the other Roman cavalry unit is down to its last couple of bases as a result of persistent harassment! |
 |
| The state of the battle - the mounted troops of both sides are mainly exhausted; the Britons still have their chariot units in reserve (bottom-right) but the infantry combat has begun and the Romans seem to be coming out on top! (centre) |
 |
| A closer view - better armour and more efficient fighting skills give the Romans their advantage |
 |
| The Britons suddenly switch their chariots to intervene on the other flank! |
 |
| However, the Britons' warbands are crumbling under Roman pressure... |
 |
| And finally the remaining Roman cavalry triumphs opening up this flank - with their left smashed and their centre about to crumble, the chariots were unable to cause enough damage quickly enough to stave off defeat! |
Although giving a broadly similar result to the Polemos SPQR game, there were some telling differences too. I won't re-hash (much!) my previous comments comparing the two rulesets, but rather concentrate on three things:
There are ways for tribal foot to win in SPQR on an open plain - it is really hard to achieve this in W:AI, the melee factors are just too unforgiving. In SPQR, charging in, led by a decent general and double-ranked, they have a decent chance of rupturing that line of legionaries...
Light Chariots are essentially a skirmishing arm in W:AI, but they pack a powerful shock impact in SPQR, which changes the way an Ancient British army is best played
The skirmishing mechanism in each of the rules is surprisingly similar, but they are more effective in W:AI by miles. Why? Because W:AI is a set which favours attrition, SPQR is all about shock. Broadly speaking, W:AI then much increases the importance of light troops. The differences in mechanisms also favour the skirmisher in W:AI, because it is much easier, by judicious use of tempo, to catch skirmishers in SPQR whereas the systemic predictability of W:AI enables a moderately careful player to keep skirmishers just out of reach (generally).
One thing I have found over the last month or so is that there seems to be far fewer good scenarios written for Ancients (pre-Dark Ages) than for other periods - or at least there were in the old wargaming magazines! Obviously there are fewer written records, but it isn't just that. I think partly it is because ancient armies are often more individually distinctive than their opponents, so it limits the ease of transplanting the scenario. I think there used to be more thought given to big battles too in other periods: when considering Leipzig 1813, then there is some recognition that it is going to either need a different rule-set, a lot of bath-tubbing, a big multi-player game, or whatever. But in old articles about, say, Munda or the Sabis, there doesn't seem to be much recognition that the whole thing was apparently not that much smaller than Friedland, and rather bigger than Salamanca. Were people really going to play that on a club night with WRG 5th edition? More on this at a later date...
Anyway, a very good time had by me, using Baccus 6mm and Rapier figures.
Polemos SPQR Romans vs Britons Command Challenge Scenario
The scenario for this game was converted from one of Steve Jones' "Command Challenges", this one published in Miniature Wargames 361.

He set it in the Fifth Century AD but having looked at it, I thought it would do nicely moved 400-500 years earlier on into a Romans against Britons scenario for Polemos SPQR. I omitted the possibility of some lurking tribesmen "rushing to the aid of the victor" which was in the original scenario, but I will definitely include it if I have another go at this scenario!
The Britons:
General Rhodri - Inspiring
2 bases of Chariots (Veteran/Elite)
2 bases of Chariots (Veteran)
3 bases of Light Horse (Raw)
1 base of Tribal Foot (Veteran)
5 bases of Tribal Foot (Trained)
5 bases of Foot Skirmishers (Raw)
The Romans:
General Laurentius - Inspiring
2 bases of Cavalry (Veteran/Elite)
2 bases of Cavalry (Trained)
2 bases of Light Horse (Trained)
2 bases of Legionaries (Armoured, Veteran)
6 bases of Legionaries (Armoured, Trained)
1 base of Archers (Trained)
4 bases of Foot Skirmishers (Raw)
1 base of Artillery
No messing about in this scenario - this is a straightforward set-piece battle, fought until one side collapses...
The Set-Up:
The Battle:
Game Notes:
Quite a straightforward scenario this one given the nature of the ground, so the main interest was in seeing how the different troop types interacted. Some units were much more effective than I expected them to be. In one case, that of the foot skirmishers, it was simply down to freak dice that the Romans so severely worsted the Britons opposing them. Other cases were more interesting: the chariots were more effective in a frontal attack than I had supposed they would be: some of that advantage was down to their veteran/elite status, but not all. Light horse and archers proved quite effective in delaying and stopping attacks from shock troops, although since they can't convert that into destruction easily, in the long-run that favours the shock troops, since they only have to be lucky once. The Roman line was too thin - although they won, it was probably harder and slower than it needed to be; double-ranks of bases is really the way to go for shock foot. As it should be, it was much easier to manoeuvre in this game than in other SPQR battles I have done: terrain plays absolute havoc with ancient-era manoeuvres!!
The only comment I would make really is that the combination of lots of combat factors, plus lots of troop-type factors, probably puts the game beyond easy memorization which will always reduce its speed. In common with Polemos ECW, it may have a few too many factors. They aren't difficult to go through exactly, but they can accumulate quite quickly to make near "sure things" as marginal differences add up very quickly to huge advantage when the basic combat mechanic is an opposed D6 roll. This also places a lot of stress on hoping that the effect sizes of the modifiers are well-calibrated. DBA seems to work a little better in my opinion, by using fewer modifiers and reducing certainty.

He set it in the Fifth Century AD but having looked at it, I thought it would do nicely moved 400-500 years earlier on into a Romans against Britons scenario for Polemos SPQR. I omitted the possibility of some lurking tribesmen "rushing to the aid of the victor" which was in the original scenario, but I will definitely include it if I have another go at this scenario!
 |
| Polemos SPQR |
The Britons:
General Rhodri - Inspiring
2 bases of Chariots (Veteran/Elite)
2 bases of Chariots (Veteran)
3 bases of Light Horse (Raw)
1 base of Tribal Foot (Veteran)
5 bases of Tribal Foot (Trained)
5 bases of Foot Skirmishers (Raw)
The Romans:
General Laurentius - Inspiring
2 bases of Cavalry (Veteran/Elite)
2 bases of Cavalry (Trained)
2 bases of Light Horse (Trained)
2 bases of Legionaries (Armoured, Veteran)
6 bases of Legionaries (Armoured, Trained)
1 base of Archers (Trained)
4 bases of Foot Skirmishers (Raw)
1 base of Artillery
No messing about in this scenario - this is a straightforward set-piece battle, fought until one side collapses...
The Set-Up:
 |
| A relatively flat plain, with only a marsh and a pond to anchor a flank upon. The Britons are approaching from the bottom, the Romans from the top. |
 |
| The Legionaries and the bolt-thrower form the centre of the Roman line. |
 |
| The Roman cavalry are concentrated upon the Roman right flank, |
 |
| A view between the armies, Romans to the left and Britons to the right. |
 |
| The Britons' general is with the chariots, next to the mass of tribal infantry. |
 |
| The same, but from behind. |
 |
| The Briton's light horsemen watch the advance of the Roman and Numidian (left) cavalry... |
 |
| A wider shot |
 |
| The Britons' have halted the Roman advance with their aggressive skirmish tactics |
 |
| The Briton's foot skirmishers and tribal warriors advance towards the main Roman line |
 |
| Can the Britons break the seemingly solid wall of Legionaries? |
 |
| The bolt-thrower causes some casualties amongst the veteran British warriors in the centre of the formation of tribal infantry |
 |
| The Roman cavalry advance pushes back the Britons' mounted javelinmen; the British general takes his chariots forwards to threaten the right of the Roman line |
 |
| The Roman infantry are refusing their right flank and advancing with their left (top-right); the Roman skirmishers seem to be doing very well against their British counterparts |
 |
| As can be seen more closely here - an excellent performance by the Roman light troops has driven their opposite numbers back into the marshes in considerable confusion |
 |
| Both sides continue advancing in the centre... |
 |
| Roman archery checks the Britons' elite charioteers |
 |
| At last the Roman General gets his cavalry forward and pushes back those irksome Light Horse (bottom left)! |
 |
| The main lines clash: despite having taken some losses, the veteran tribal warriors make some progress (left), but elsewhere the legionaries have the upper hand; the Britons' foot skirmishers are in serious trouble now (right) |
 |
| A closer view of the infantry clash |
 |
| The Romans, led by Laurentius, break and scatter the Britons; light horse |
 |
| The continuing effective archery is pinning the Britons' charioteers (left) |
 |
| Further Roman advances increase the pressure upon the Britons' right wing |
 |
| ...and it begins to collapse! |
 |
| Roman cavalry pursue the remains of the Britons' horsemen |
 |
| The Briton's charioteers finally get properly into action and push the Roman legionaries back in some disorder |
 |
| However, this comes too late! The Britons' foot skirmishers are now in full retreat... |
 |
| As are their warriors! The Briton's overall army morale collapsed at this point... |
Game Notes:
Quite a straightforward scenario this one given the nature of the ground, so the main interest was in seeing how the different troop types interacted. Some units were much more effective than I expected them to be. In one case, that of the foot skirmishers, it was simply down to freak dice that the Romans so severely worsted the Britons opposing them. Other cases were more interesting: the chariots were more effective in a frontal attack than I had supposed they would be: some of that advantage was down to their veteran/elite status, but not all. Light horse and archers proved quite effective in delaying and stopping attacks from shock troops, although since they can't convert that into destruction easily, in the long-run that favours the shock troops, since they only have to be lucky once. The Roman line was too thin - although they won, it was probably harder and slower than it needed to be; double-ranks of bases is really the way to go for shock foot. As it should be, it was much easier to manoeuvre in this game than in other SPQR battles I have done: terrain plays absolute havoc with ancient-era manoeuvres!!
The only comment I would make really is that the combination of lots of combat factors, plus lots of troop-type factors, probably puts the game beyond easy memorization which will always reduce its speed. In common with Polemos ECW, it may have a few too many factors. They aren't difficult to go through exactly, but they can accumulate quite quickly to make near "sure things" as marginal differences add up very quickly to huge advantage when the basic combat mechanic is an opposed D6 roll. This also places a lot of stress on hoping that the effect sizes of the modifiers are well-calibrated. DBA seems to work a little better in my opinion, by using fewer modifiers and reducing certainty.
Neil Thomas' Wargaming: A Napoleonic Scenario
I had a go the other day at re-fighting one of the scenarios from Grant & Asquith's Scenarios for all Ages. I would normally use the Polemos Napoleonic rules or Neil Thomas' Simplicity in Practice rules for these types of scenarios, but since Neil Thomas' rules had been mentioned on a thread on The Miniatures Page about the simplest Napoleonic rules, I thought I would give them a go. For clarity, I used the Napoleonic rules in his Wargaming:An Introduction set rather than his later Napoleonic Wargaming book.
The Scenario & Order of Battle:
Both sides are advancing and trying to find a ford to obtain a bridgehead over the river. There are 6 approximately equidistant sites across the length of the river. Adapting the special rules in the scenario, I specified that the first unit within 6cm of a potential site rolls a D6 and a '6' indicates the presence of the ford. If the first five were checked and all turned out negative, then the last site would automatically contain the ford.
A side needs to control both sides of the ford to win; alternatively an army reduced to two units or less would break. I used similar profiles for each side.
French:
2 Dragoon units (4 bases, Heavy Cavalry, Average)
2 Infantry units (4 bases, Close-Order Infantry, Average)
1 Light Infantry unit (4 bases, Light Infantry, Average)
1 Artillery unit (1 base)
Spanish:
2 Dragoon units (4 bases, Heavy Cavalry, Average)
2 Infantry units (4 bases, Close-Order Infantry, Average)
1 Light Infantry unit (4 bases, Light Infantry, Average)
1 Artillery unit (1 base)
If using more closely-themed armies, change one French Dragoon unit to a light cavalry unit instead, and one infantry unit can be Elite instead of average. Reduce Spanish cavalry to Levy, make them fight as Light but move as Heavy Cavalry. Reduce the Spanish infantry to Levy morale and optionally convert the light infantry unit to another close-order infantry unit).
The Battle:
The Battle:
Game Notes:
A very enjoyable game, since both the scenario and the rules are well-written and designed for fun. Although very simple, the Neil Thomas' rules do give a bit of a challenge - the saving roll morale mechanism does keep things nicely unpredictable, especially when the sides are even in numbers. Using these big units does keep things suitably unwieldy too. I was using my 6mm Baccus figures based for the Polemos rules, so basically units were a 100-figures strong with a frontage of 24 cm when in line. I think there isn't supposed to be any interpenetration of units in these rules (there definitely isn't in his other rules, although I don't know if it is explicit in this set), which makes things very unwieldy sometimes! This typifies the Thomas approach: using big broad-brush rules to achieve most of what more complicated rules achieve by more detailed mechanisms. The Spanish in this game particularly suffered from this, getting badly out of shape early on.
It is a very traditional set, done very simply: it is all about the interplay of different arms and formations - sometimes characterized as the "rock, scissors, paper" of Napoleonic warfare. Whilst I am not always very convinced by the analysis behind this, it is part of the dominating narrative of wargaming the period and I prefer this take on it to, say, Black Powder.
I would heartily recommend both rule book and scenario book to the beginner since they are very easy to follow and the mechanisms are very simple, with the idea of tweaking and modifying the rules as players become more familiar with the period and discovering and filling the little gaps in the rules. For myself, I still prefer the even simpler approach in his "Simplicity in Practice" rules, and I prefer Polemos Napoleonics to both. But I do enjoy this ruleset - a kind of distilled essence of old-school wargaming - especially for this type of game with 6 - 12 units per side.
Figures by Baccus 6mm.
The Scenario & Order of Battle:
Both sides are advancing and trying to find a ford to obtain a bridgehead over the river. There are 6 approximately equidistant sites across the length of the river. Adapting the special rules in the scenario, I specified that the first unit within 6cm of a potential site rolls a D6 and a '6' indicates the presence of the ford. If the first five were checked and all turned out negative, then the last site would automatically contain the ford.
A side needs to control both sides of the ford to win; alternatively an army reduced to two units or less would break. I used similar profiles for each side.
French:
2 Dragoon units (4 bases, Heavy Cavalry, Average)
2 Infantry units (4 bases, Close-Order Infantry, Average)
1 Light Infantry unit (4 bases, Light Infantry, Average)
1 Artillery unit (1 base)
Spanish:
2 Dragoon units (4 bases, Heavy Cavalry, Average)
2 Infantry units (4 bases, Close-Order Infantry, Average)
1 Light Infantry unit (4 bases, Light Infantry, Average)
1 Artillery unit (1 base)
If using more closely-themed armies, change one French Dragoon unit to a light cavalry unit instead, and one infantry unit can be Elite instead of average. Reduce Spanish cavalry to Levy, make them fight as Light but move as Heavy Cavalry. Reduce the Spanish infantry to Levy morale and optionally convert the light infantry unit to another close-order infantry unit).
The Battle:
 |
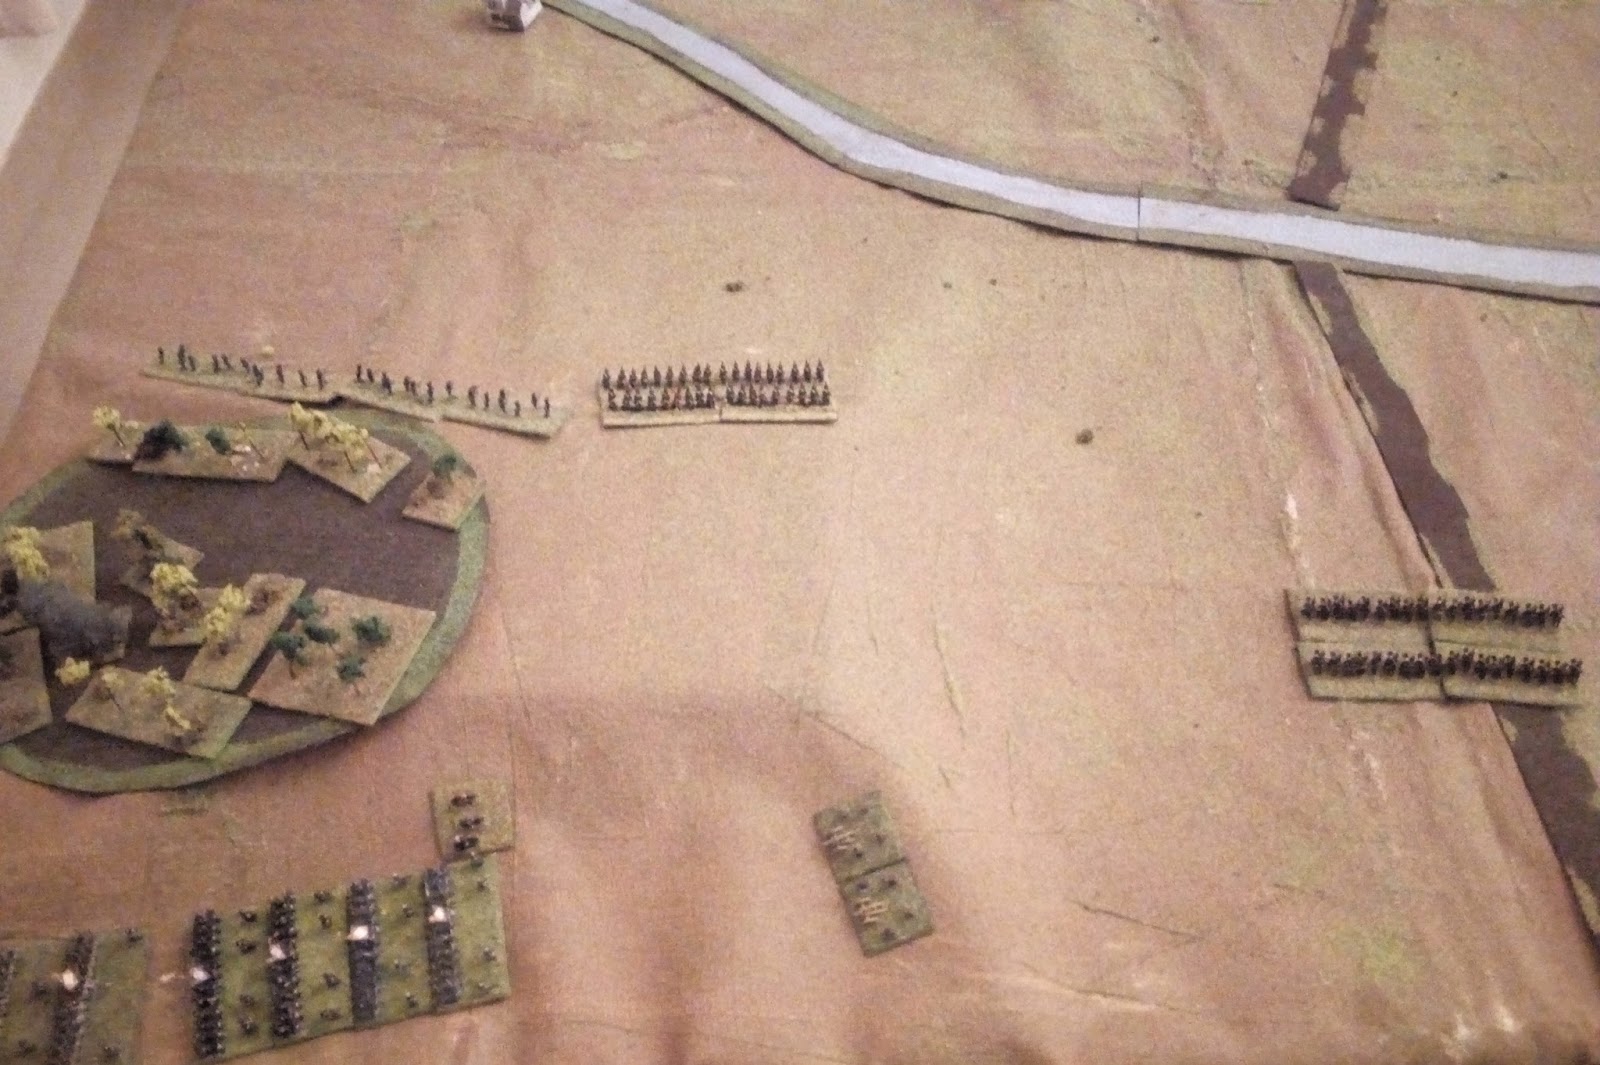
| A river with a hidden ford, with some interspersed woods, hills, buildings and a small marshy area. The roads lead up to the site of a derelict bridge (which might be fordable or not) |
 |
| The Spanish cavalry lead the army's advance from the top-right |
 |
| French cavalry approach the river on the other side, supported by some light infantry (left) |
 |
| The French artillery and infantry follow up behind |
 |
| The French find the ford at the second location they examined. |
 |
| The leading French cavalry gets across the ford and occupies the slopes of some high ground on the other side; the Spanish cavalry approach |
 |
| Both sides rush to reinforce this key point - artillery is brought up in support |
 |
| The Spanish Army tries to come to the aid of its lead cavalry to launch a co-ordinated attack before the French are really ready |
 |
| The French artillery is in a good position to enfilade the leading Spanish cavalry |
 |
| A massed cavalry clash! The Spanish risk a charge rather than be slowly attrited by the French artillery on the other side of the river |
 |
| And a wider shot of the same moment |
 |
| Honours are roughly even in the cavalry melee: one French and one Spanish unit respectively retreat on their supports |
 |
| However, in the next round of fighting, the French gain the upper hand: the previously defeated Spanish cavalry have been eliminated (centre) but the the previously defeated French cavalry (top-left) have turned the tables on the Spanish |
 |
| The Victorious French cavalry drive off the Spanish gunners and take their guns too |
 |
| The wider position - the Spanish are in trouble! |
 |
| The French cavalry do sever damage to the Spanish light infantry, who retreat towards the safety of the woods; musketry fire from the Spanish skirmishers and square has taken its toll on the French horsemen, however |
 |
| The Spanish infantry grimly prepare to hold on against the inevitable French attack |
 |
| Fire from the square destroys the lead French cavalry unit |
 |
| French skirmishers engage the Spanish infantry in the woods, but come off rather worse... |
 |
| The French infantry marches up to attack - the Spanish infantry deploy out of square into line to receive them |
 |
| The view from the French side: skirmishers bicker with the Spanish infantry in the woods to the left, whilst infantry and cavalry move towards the Spanish line (centre) |
 |
| Combined arms! Can the Spanish defy the odds and hold? |
 |
| It was always a bit unlikely...the Spanish retreat, although the French have suffered some loss during the attack |
 |
| Effective volleys take a heavy toll on the French infantry |
 |
| But a second attack destroys the Spanish infantry unit and the Spanish army is broken... |
 |
| Another shot of the moment of victory! |
A very enjoyable game, since both the scenario and the rules are well-written and designed for fun. Although very simple, the Neil Thomas' rules do give a bit of a challenge - the saving roll morale mechanism does keep things nicely unpredictable, especially when the sides are even in numbers. Using these big units does keep things suitably unwieldy too. I was using my 6mm Baccus figures based for the Polemos rules, so basically units were a 100-figures strong with a frontage of 24 cm when in line. I think there isn't supposed to be any interpenetration of units in these rules (there definitely isn't in his other rules, although I don't know if it is explicit in this set), which makes things very unwieldy sometimes! This typifies the Thomas approach: using big broad-brush rules to achieve most of what more complicated rules achieve by more detailed mechanisms. The Spanish in this game particularly suffered from this, getting badly out of shape early on.
It is a very traditional set, done very simply: it is all about the interplay of different arms and formations - sometimes characterized as the "rock, scissors, paper" of Napoleonic warfare. Whilst I am not always very convinced by the analysis behind this, it is part of the dominating narrative of wargaming the period and I prefer this take on it to, say, Black Powder.
I would heartily recommend both rule book and scenario book to the beginner since they are very easy to follow and the mechanisms are very simple, with the idea of tweaking and modifying the rules as players become more familiar with the period and discovering and filling the little gaps in the rules. For myself, I still prefer the even simpler approach in his "Simplicity in Practice" rules, and I prefer Polemos Napoleonics to both. But I do enjoy this ruleset - a kind of distilled essence of old-school wargaming - especially for this type of game with 6 - 12 units per side.
Figures by Baccus 6mm.
Subscribe to:
Posts (Atom)