Miniature Wargames 35 contained a scenario for the famous
Battle of Maldon 991 AD, one of the best known of all early medieval battles as a result of its immortalization in Old English poetry (see translation
here). Attention normlly gets focused on the decision of the Anglo-Saxon commander, Bryhtnoth, to allow the Vikings to cross a narrow causeway from Northey Island.
I used the armies from the appropriate lists in DBA, as follows:
Anglo-Saxons: 3 x Bd (Blades - Thegns), 6 x Sp (Spearmen - Fyrd), 1 x Ps (Skirmishers - Archers), 2 x 7Hd (Hordes - Locals)
Vikings: 11 x Bd (Blades - Warriors), 1 x Ps (Archers)
The Deployment:
 |
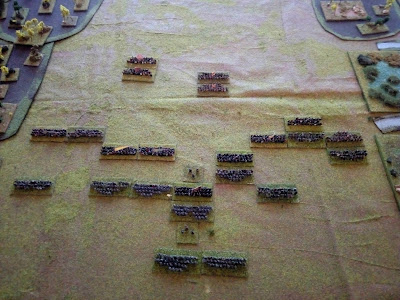
| The Vikings crossed from the causeway (right) and deployed at the bottom of the shot, facing the Anglo-Saxons (top); the Vikings have two elements of warriors in reserve, the Anglo-Saxons have left the local warriors as their reserve; both sides' bowmen are deployed on the far (left) side |
 |
| A shot from the Viking left flank |
 |
| And from behind the Anglo-Saxons; the locals (hordes) are represented by two bases each. |
 |
| A picture of the Viking line |
 |
| And a shot of the Anglo-Saxon line |
The Battle:
 |
| Tactics can be quite simple in this period...both sides advance! |
 |
| Crunch! The lines collide. On the far left, the Voking bowmen have joined the end of the Viking line rather than tackle the Anglo-Saxon bowmen in the wood |
 |
| Same position, but looking along the line |
 |
| The Anglo-Saxon right has generally the upper hand, although one element of Viking warriors has penetrated the shield wall. Bryhtnoth leads his bodyguards personally in combat (right) and pushes the Viking general and his bodyguards back |
 |
| The Saxon shieldwall holds against the Viking right although it is pushed back, except for that element in the middle |
 |
| The Anglo-Saxons fight to restore the shieldwall |
 |
| As they do on the opposite flank |
 |
| The fighting is becoming slightly more scattered, but in general the Anglo-Saxon shieldwall is holding and the Vikings are coming off worse. Brythnoth however is pushing his opponent back so hard he has pushed himself right into the midst of superior numbers of Vikings... |
 |
| Saxon shieldwalls face thinned ranks of Vikings! |
 |
| But Bryhtnoth is attacked on three sides! However, the Viking reserve is being pulled in to the right to make up for losses there |
 |
| The Viking left makes a renewed attack |
 |
| Another view of the fighting in the centre |
 |
| Bryhtnoth and his men succumb to the Viking warriors in the centre! |
 |
| A wider view; the Vikings have lost many more men, but the Anglo-Saxon leader has been killed along with his picked men |
 |
| The Vikings renew their efforts in another furious assault... |
 |
| But the fury merely leads to the Saxons reforming their shieldwall |
 |
| However, another group of thegns goes down in the centre underneath Viking axes! |
 |
| The local Saxon warriors join the line and surge forward with the shieldwall |
 |
| As does the shieldwall on the Saxon left flank |
 |
| The Vikings hold firm in the centre around their leader, but give way somewhat on the flanks |
 |
| A closer view of the Viking left under pressure |
 |
| As is its right! |
 |
| The Viking archers are caught between Saxon spear and bow |
 |
| A closer view of the same |
 |
| And the archers are detroyed; this leads to the collapse of the Viking Army's morale! |
 |
| The view along the line at the end of a hard-fought and bloody battle |
 |
| The Viking general still fighting hard in the centre, but his army his collapsing around him... |
Game Notes:A very close run-thing; the Vikings lost 4 bases, the Anglo-Saxons 2 but including their leader. The Anglo-Saxon shieldwalls basically held in this game, which makes it a bit harder for the Vikings to get any advantage; all their successes came in the blade-on-blade combats in the centre. The Anglo-Saxon successes mainly came from attacking isolated Viking elements, although they need a bit of luck too (generally a 3-point swing on the dice rolls). Anyway, a heroic victory for the Anglo-Saxons in the refight replaces the heroic defeat of legend!
DBA does give a very good game. Whether there are games out there which represent Dark Age warfare better...possibly. I think that it does a good job of representing certain aspects by judicious use of factors and bonuses and there is a lot to be said for a game which you can fight to a finish (or two) every single time. It represents well the importance of timing, since the sequencing of actions is the main thing you can do to try and achieve success. But the lack of genuine attrition as a mechanism is always a concern. Plus one also wonders whether Vikings really fought tactically in a very different (and superior) way from their Saxon opponents. If I recall correctly from the poem, both sides seem pretty similar - not that that is conclusive.
Figures by
Baccus 6mm.


Interesting replay. I quite like the way that the DBA brought out, handled and then developed the Anglo-Saxon success in the centre.
ReplyDeleteThanks Norm. Actually, I didn't realy bring it out in the post, but there was a small but important break-through in this game. I have accused DBA in the past of lacking a little command flavour, in that because the game command mechanism is the same for all armies (i.e. a D6 roll for PIPs (command points), commanding all armies felt quite similar. In this game, when taking the turn of the Anglo-Saxons, I didn't feel like that: I felt the whole time like I was saying "Get in the wall. Stay in the wall. Reform the wall. Get in the wall...". Maybe just maybe, there is a touch in this of a real Anglo-Saxon command problem! I found myself cursing the Anglo-Saxon "blade" troops, because when they force a recoil, they would follow-up and thus break the line - which allowed the Vikings in the centre to find mini-flanks to attack and weakened the strength of the shield wall. Shades of Hastings, perhaps?
DeleteNice report, impressive lines of battle!
ReplyDeleteMany thanks Phil. It does look quite nice at the point of impact!
ReplyDelete