The Battle of Quatre Bras, 16th June 1815
Glenn Pearce, author of the
Polemos Ruse de Guerre ruleset and member of the Napoleonic Miniatures Wargame Society of Toronto invited me to use his orders of battle to refight the
Battle of Quatre Bras on or about the same day that his club was going to refight the same battle. We thought it would be quite interesting to see how the same battle using the same armies and the same rules, but played in very different styles, would turn out.
Glenn sent me the orders of battle and some photos of his club's set up. I used the orders of battle exactly, and then mixed in his set up with the set ups in a couple of old magazines, Miniature Wargames 57, Wargame Soldiers and Strategy 47, and Wargames Illustrated 93, plus the information
in the latest Osprey about the battle, to get the terrain information and even more importantly for this battle, the arrival schedule. The Osprey is very good. The scenario in MW057 is quite good, whereas the one in WI093 is more of an outline (although there are some nice pics with that one). WSS047 contains some useful info, especially on the painting side, but doesn't contain an actual Quatre Bras battle scenario (although there is an interesting mini-campaign for the 15th and 16th of June).
Orders of Battle:
France:
C-in-C: Marshal Ney
II Corps: Gen Reille, 1 base of Heavy Arty
5th Division: Bachelu, 4 bases of Light Infantry, 3 bases of Infantry, 1 base of Foot Arty
6th Division: Jerome, 6 bases of Light Infantry, 4 bases of Infantry, 1 base of Foot Arty
9th Division: Foy, 5 bases of Light Infantry, 3 bases of Infantry, 1 base of Foot Arty
2nd Cav Division: Pire, 2 bases of Lancers, 3 bases of Light Cavalry, 1 base of Horse Arty
11th Cav Division: L'Heritier, 2 bases of Cuirassiers, 3 bases of Dragoons, 1 base of Horse Arty
Guard Light Cav Division: Lefebvre, 3 bases of Guard Lancers
Allies:
C-in-C: Lord Wellington
I Corps: Prince William
1st British Division: Cooke, 6 bases of Infantry, 2 bases of Foot Arty
3rd British Division: Alten, 7 bases of Infantry, 2 bases of Light Infantry, 2 bases of Foot Arty
2nd Netherlands Division: Perponcher, 1 base of Light Infantry, 9 bases of Infantry, 2 bases of Foot Arty
Reserve Arty: 1 bases of Horse Arty
5th British Division: Picton, 1 base of Light Infantry (rifles), 7 bases of Infantry
6th British Division: Best, 4 bases of Infantry
Brunswick Corps: Brunswick, 5 bases of Light Infantry, 3 bases of Infantry, 1 base of Foot Arty
Cavalry: 7 bases of Light Cavalry
Simplified to give only the divisional structures and without troop quality information and similar. Note that the French have a very high proportion of light infantry, many of which are also excellent troops.
Arrival Schedule:
Start: French (Foy & Jamin's Bde); Allies (Perponcher)
1430: Marbais' Bde
1440: Bachelu & Husson's Bde, Pire's Div, Reille
1450: Campy's Bde
1500: Ney, Wellington, Picton's Div
1510: Merlen's Bde
1600: Jerome's Division, L'Heritier & Picquet's Bde; Brunswick troops
1700: Guiton's Bde, Lefebvre's Div, Alten's Div
1800: Cooke's Div
2000: Remaining Allied Cav
Objectives:
The French must take and hold the crossroads, the buildings surrounding it and have cleared the road to the Ligny exit by 9.00 p.m. They can achieve a minor victory by having infantry or artillery within 3BW of this road by the same time.
Terrain:
I ended up setting this game, taking it down then setting it up somewhere else. Domestically, I have a choice between two sub-optimal options: a slightly larger table (5'x3') but in an area of the house that sometimes unavoidably gets busy; or a 4'x3' table (generous!) in the garage, which doesn't get disturbed but is a bit rubbish for photographs. I tried the larger table, but it became apparent that it wasn't going to happen there, so I ended up shifting the game.
In order to reduce the Quatre Bras battlefield for use with the Polemos Ruse de Guerre rules, I have ommitted Piraumont and Thyle. The former was important but I have just assumed that the French roll throught the small number of defenders in the same time it took to do it historically.
Anyway, for the record, here are a couple of photographs of the first set up:
The First Set-Up:
 |
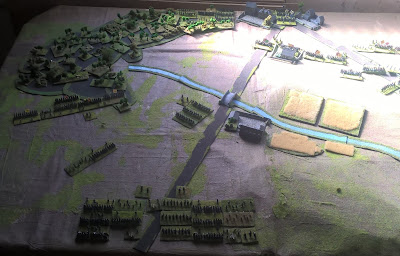
| The Quatre Bras battlefield: Quatre Bras in the distance (top), with the La Bergerie sheep farm just below it and Gemioncourt in the centre by the bridge. |
 |
| A closer look |
 |
| With Perponcher's forces deployed in the woods (top-left), by Quatre Bras (top) and defending Gemioncourt (centre) |
 |
| The leading brigade of Foy's Division of Reille's Corps advancing... |
 |
| Battle is joined around Gemioncourt... |
 |
| The position when I abandoned this game |
The Second Set-Up:
I lost about a foot of table width in transferring tables. I decided to take this entirely from the French left flank, since the fighting seemed less important in this area in real life and I judged that any recreation would simply replicate that: there is no percentage for the Allies in trying to defend the area and no reason for the French to look for victory in the area if they don't.
 |
| A look at the new battlefield. I added in a few more wheatfields in the area that I think they were located in in real life. They did block the view at foot soldier height. |
 |
| A slightly wider shot |
 |
| A shot from a lower angle to get a sense of the relief. The terrain around Quatre Bras is quite difficult to recreate, since it has slopes which weren't particularly difficult military obstacles, but were very important in limiting line of sight and thus the effectiveness of artillery. Artillery is much more effective to the left of the turnpike and towards Quatre Bras than around the stream and the fields. |
The Battle:
(c.2.20pm)
 |
| The leading elements of Reille's Corps (Jamin's Bde of Foy's Division, plus the divisional artillery) arrive; elements of Bijlandt's Brigade occupy the environs of Gemioncourt (top-right) whilst Sachsen-Weimar's Brigade are in the woods(top-left) |
 |
| The view from behind Foy's troops. |
(c.2.40 p.m.)
 |
| Foy deploys his leading brigade in preparation for his attack |
 |
| Foy's attack goes in, led by the 4th Light (centre); meanwhile Foy's other brigade (Marbais') has arrived and is moving to the left; Bachelu's leading brigade (Husson's) arrives (bottom), flanked by Pire's Chasseurs (bottom, by the road) and his Lancers and artillery (bottom-right) |
 |
| Two battalions of the 4th Light attack the Netherlands' infantry defending the farm and its environs... |
 |
| A very fierce outbreak of close-range musketry occurs... |
 |
| Which breaks the Dutch defenders, as the skillful French skirmishers evict them from the farm and fields in short order... |
 |
| But the French pay a heavy price for their victory, with one unit routed and the other suffering heavy casualties (by the farm); note also that the French artillery has suffered under some surprisingly effective counter-battery fire by the Dutch gunners (centre-left)... |
 |
| Which doesn't let up, and the French battery is destroyed! |
(c.3.10 p.m.)
 |
| The French attack is developing nicely; Foy's units, supported by Pire's Chasseurs, are making progress around the farm and are being held back bravely by the remaining units from Bjilandt's Bde (centre); Foy's other brigade (Marbais') is demonstrating against Sachsen-Weimar's Bde in the woods (left); and Bachelu's infantry and Pire's Lancers are pushing up towards and past La Bergerie on the way to Quatre Bras: however, Wellington's reinforcements are arriving just in time: Picton's troops are blocking the road between Quatre Bras and Ligny (top-right) and moving towards the sheep farm, with Merlen's cavalry just arriving at the crossroads too (top) |
 |
| A closer look at the French troops racing forward... |
(c.3.30 p.m.)
 |
| And a series of vicious fights breaks out! Picton's troops' musketry breaks the leading Lancer regiment (right) whilst the infantry of both sides are locked in an inconclusive firefight (centre)... |
 |
| Another view of the fight breaking out around the stream; the French generals are overmatched by the intensity of the combat and do not spare a thought for Pire's Chasseurs around the stream... |
 |
| Dutch artillery does more damage to the French: the flanking unit of Mirbais' Brigade breaks under the fire (left)...* |
(c.3.40 p.m.)
 |
| There are heavy casualties on both sides in the fighting in the centre, but the Netherlanders come off worse...the militia battalion in the centre of the position (centre-left) turns and runs... |
 |
| More heavy casualties in the fighting around the La Bergerie: both sides become disorganized (note the number of shaken markers (the individual soldiers)). Neither side has been able to occupy the sheep farm. |
 |
| Husson orders the 2nd Light forward in a bayonet charge (centre), despite the losses it has suffered, whilst the 61st Line gets into the sheep farm... |
(c. 3.50. p.m.)
 |
| The bayonet charge is completely succesful and the British troops are routed! |
 |
| However, the French troops (Pire's Chasseurs and some of Jamin's infantry) by the stream on the left of the turnpike suddenly break under fire!! Most of the brave Netherlanders are dead, wounded or have fled, but they held on just long enough... |
 |
| The collapse on the French centre-left... |
 |
| After the French lancers withdrew (bottom-right) Picton was able to turn his attentions to Baudin's infantry columns - with some success, as Baudin's leading unit (from the 2nd Light) is routed (bottom-centre) |
 |
| Suddenly a scene of intense combat becomes quite...however, the French infantry is still standing (just about!) and advances across the stream (right) |
 |
| Merlen's light cavalry trots forward to try and restore the situation (centre, left of turnpike), whilst the Highlanders manage to throw the French out of the sheep farm again (centre, right of turnpike) |
(c. 4.00 p.m.)
 |
| The position at around, 4.p.m. Picton's troops were content to pepper the advancing French with long-range musketry and rifle fire... |
 |
| When suddenly the French troops broke and ran (centre-right)! Simultaneously, Merlen's cavalry charged into the 4th Light (bottom-left)... |
 |
| And routed one of those units too! |
 |
| Unfortunately for the French, this led to the morale of both Jamin's and Husson's brigades collapsing...and the mass of French infantry is running! Campy's brigade and the remnants of Wathier's lancers are looking isolated (right). These losses have severely demoralized the remainder of the French army, whose morale is now looking distinctly shaky... |
(c.4.10. p.m.)
 |
| The 95th continue to shoot superbly well, and more French infantry break (centre-left) |
 |
| Meanwhile, Jerome's Division and Picquet's dragoons have arrived to bolster the French at this most dangerous moment. |
 |
| The wider position at this point: only Mirbais' brigade (left) and Campy's and Wathier's brigades (right) are still combat-ready from the original force, so it is all down to the French reinforcements...note that Sachsen-Weimar's troops had started to push forward out of the wood and Merlen's cavalry have moved up to Gemioncourt: Wellington has noted the shakiness of the French army's morale and is hoping to knock it out of the battle quickly. |
(c. 4.20 p.m.)
 |
| Merlen's cavalry charge Mirbais' brigade in the flank, but Picquet's dragoons charge Merlen's troopers in their flank in turn...the French infantry form square in time, but the French Dragoons make no mistake in putting the leading Netherlands' light cavalrymen to flight! |
 |
| The wider position: Jerome pushes his troops forwards towards Gemioncourt again... |
 |
| Wathier's lancers and their supporting artillery have had to move back into the line to hold back the British (centre); despite suffering immense losses (see another routing unit, bottom-centre), Campy's troops (the 72nd Line) are holding on (centre-right) |
(c. 4.30 p.m)
 |
| Picquet's dragoons (left) follow-up their advantage over Merlen's troopers (centre) |
 |
| Brunswick infantry and cavalry push forward to towards the stream to restore the line, although Merlen's cavalry are being badly beaten by the French Dragoons (centre)... |
 |
| Picton orders Kempt's Brigade (right) to charge the surviving infantry of Campy's Bde and see them off with the bayonet... |
 |
| But cool nerve and accurate shooting force the British troops back! |
(c. 4.40. p.m)
 |
| And then follows it up with more accurate musketry, which break the Highland battalion in Kempt's centre. Kempt's brigade is looking shaky, but stays in the field. |
(c.4.50 p.m.)
 |
| Wathier withdraws his lancers and guns (centre-right) out of artillery range; and Campy pulls back too - Ney does not want to risk the collapse of his army by having this weakened flank caved in before the supports arrived. |
 |
| Jerome sets up a defensive line around the stream, waiting to hold off the advancing Brunswickers... |
 |
| The French artillery pounds the advancing British around the bridge...and sends it running! |
(c. 5.00 p.m.)
 |
| Ney's strategy changes: he sends Baudin's brigade to support Maubais' brigade to attack Sachsen-Weimar's brigade in the woods. Ney knows that he must avoid more losses until he has caused some further severe damage to the Allied army, which is looking a bit rattled since the destruction of Merlen's brigade. |
 |
| Elements of Soye's brigade push forward over the bridge (left) to try and outflank the Brunswickers, whilst the remnants of the French right wing regroup |
 |
| The Duke of Brunswick re-arranges his infantry to protect the flanks of his columns |
(c.5.10 p.m.)
 |
| The 1st Light of Baudin's brigade leads the attack on Sachsen-Weimar's brigade in the woods |
 |
| Picton pushes forward with Kempt's brigade |
(c.5.20 p.m)
 |
| The Brunswick troops splash through the stream as they launch what is meant to be the final attack on the French |
 |
| The 1st Light gets into the woods, pushing back their opponents, but the remnants of Mirbais' brigade make no progress, but take heavy losses, in trying to support the attack |
(c.5.30 p.m.)
 |
| Mirbais' troops break under the combined musketry and artillery fire |
 |
| The defending French infantry take heavy casualties in musketry exchanges with the Brunswickers, but hold on...and deal out some punishment too |
 |
| Troops from the 2nd Light rout after receiving effective fire from the Brunswickers over a deadly period of 20 minutes... |
 |
| While Kempt's infantry get the upper hand against the bedraggled remnants of Campy's brigade |
(c.5.40 p.m.)
 |
| Baudin's 1st Line renews its attack in the woods (centre), although Sachsen-Weimar has brought his troops around to threaten the flank... |
 |
| The Brunswickers launch a bayonet charge over the stream... |
 |
| Kempt launches a bayonet attack just as some infantry reinforcements reach the position on the French right... |
 |
| The 1st Light have punched through the defenders in the woods... |
 |
| And in a very creditable victory, the French troops by the stream push back the Brunswickers! |
 |
| However, Campy's surviving troops have now been broken by the British bayonet charge... |
 |
| And French army cohesion finally breaks! |
(c. 5.50 p.m.)
 |
| The position on the left at the point of French collapse - the Lancers of the Guard (centre) have arrived too late to turn the tide of the battle |
 |
| And the position on the right |
*Incidentally, I accidentally gave Mirbais' brigade an additional base.
I removed it when I noticed the mistake. Since it hadn't engaged in
any combat up to that point, I don't think it affected the result too
much.
Game Notes: An exciting game and a reasonable representation of the real battle: different from the events on the day, but not so different as to remove all resemblances. The French were handicapped by having a couple of awful "cohesion loss" rules around 4.00 p.m. which put them within a single die roll of collapsing. As it happens they lasted a bit longer than might have expected as the luck swang the other way, but it affects play when one side is on the brink of defeat. I thought the French might end up pulling off an unlikely draw but it wasn't to be when Wellington managed to develop his attack a bit further. In hindsight, the French Right should have been pulled back even further and the French Left could have handled its masking mission more skillfully. But the dilemma for the French is hard to solve: one needs to take risks early on to try and get a good position, because slow and methodical just means that one will face a pretty much impregnable defence around Quatre Bras.
Quatre Bras is actually quite a test of both scenario and ruleset because so many troops arrive at different times. Even if an author does not want to say how long a turn is, the scenario designer will have to decide, either implicitly or explicitly. I went with 10 minute turns since that seemed the longest time reasonably compatible with the implied ground scale and movement rates. I think it worked fairly well. If the fighting had been slightly less deadly (there was some very good shooting by some of the units!) then I think the game could have lasted as long as the real thing did.
I had been a bit sceptical about the lack of Napoleonic 'chrome' in the ruleset but I was pleasantly surprised as to how little I missed it. Basically, cavalry is cavalry in these rules: it can be better or worse, but that is it. The ruleset therefore avoids having to decide whether the greater skill of French Imperial Guard lancers outweights the bigger horses of British dragoons: just call the unit good, average or poor and have done. Just as controversially, all movement rates are the same for cavalry. Again though, it didn't seem to distort play too much.
Shooting is relatively deadly in these rules, with somewhere between 5% and 10% of firing resulting in immediate rout of the opponents. This feels quite different from the Polemos Napoleonics' set, when it is quite rare for offensive fire to do this kind of damage, and quite different from other rules, since they are typically slower for fire to take effect (since more based on attrition). That said, on a 10-minute turn, it isn't that surprising, perhaps: many rules work on turns of 2-minutes in terms of action (even if they are supposed to represent 30 minutes or so of 'real' time). Since shooting is simultaneous, then you can get situations when both sides units' break at the same time. This happened in the first fighting around Gemioncourt, in which only one unit of four engaged survived the exchange.
Interestingly, higher-level commanders are not rated, but brigade/regimental commanders are. I am not sure if there are any other rulesets which do this. What I did find is that Ruse de Guerre games are less lethal to generals, because the routine is so lethal that there are very few circumstances when it is worth taking the gamble on using them in combat to get bonuses: the bonus isn't big enough, and the risk is too high. I have suffered more casualties using the Polemos: Napoleonic rules precisely because it is generally worth taking the gamble.
I found that compared to some of the other Polemos games, then normally sides have plenty of TPs to do most things they want to do. I am not sure if this is by design, or a problem with the way I play it solitaire: it is possible that there is an emergent logic in non-solo play which dictates very high tempo bids (and thus low tempo scores). Winning the tempo is probably more crucial than in other games of the series, since it allows free (non-attack) moves for the winning side.
I have refought this battle a few times, a couple of them recently enough to appear on the blog: see
here and
here for comparison. Figures as ever by Baccus 6mm, buildings a mixture of Leven and Timecast.


Thanks very much for doing that big write up. This is one of my favourite battles. Everything was intense and I kept looking at the clock, wondering whether the Anglo-Allied reinforcements (Guards - Cooke's Division) would arrive in time.
ReplyDeleteI wonder though, since their arrival was not pivotal (i.e. the high point of the battle came earlier, rather than later) whether the turns of 10 minutes are too short, allowing too much action in the mid game?
Anyway, lovely compact game with a lot of tension.
Many thanks Norm. I have replied to your comment on TWW (https://www.thewargameswebsite.com/forums/topic/battle-of-quatre-bras-a-polemos-ruse-de-guerre-refight/#post-122970)
ReplyDeleteA cracking game and AAR and one that certainly captured the feel of Quatre Bras. Interesting to read your post game thoughts as well.
ReplyDeleteMany thanks Steve, I appreciate that. I have put a couple more thoughts on it in my reply to Norm on TWW too.
DeleteHi JWH, really great AAR and fun game. I'm a regular at Glenn's, though I missed yesterday's game, but we actually have some pretty aggressive players who do throw their officers into combats more often than average (I'm not one of them, till things are desperate). In our games, the free movement for the tempo player is balanced often by the desire to steal to save a force from disaster or take advantage of an attack. It also gives you the advantage of knowing where your opponent is for the shooting phase at the start of the next turn. So there are times when players bid high, but often by the middle of the game it's both players bidding 1 and rolling off.
ReplyDeleteMany thanks CJR. Your comment is really useful, since it is easy for me as a mainly solo player to fall into the habit of thinking that there is only one 'obvious' best way to play. I will definitely re-look at using officers in combat and re-incorporating stealing the tempo. I generally haven't used it in Polemos games since the concept of stealing the tempo for myself seemed a bit odd, but looking back, perhaps I over-estimated the difficulties in using it, so perhaps I will incorporate it again.
Delete