Heretical Gaming is my blog about my gaming life, featuring small skirmishes and big battles from many historical periods (and some in the mythic past or the far future too). The focus is on battle reports using a wide variety of rules, with the occasional rules review, book review and odd musing about the gaming and history. Most of the battles use 6mm-sized figures and vehicles, but occasionally 15mm and 28mm figures appear too.

Sunday, 7 April 2024

The Road to Saint James' Revisited

 I suppose that indirectly, Donald Featherstone's scenario 'The Road to St. James" is one of the contenders for 'things which started it all', as it is one of the scenarios in his War Games. I was looking for a WW2 scenario that was a bit of a break from my normal fare, in order to test a couple of different things out for Gummipanzergrenadier, in particular I wanted there to be some more powerful weapons and crucially, some engineering tasks. The Road to St.James fit the bill for that, since there was some barbed wire defences, but I souped this up a bit by adding a couple of anti-vehicle minefields. This was to have some quite significant consequences...

The original scenario actually looks quite like a Rapid Fire scenario, to my untrained eye. Each company is maybe 10-20 figures strong. A tank company/squadron is maybe 3-5 tanks strong. Anyway, it featured a battalion of British Guards' infantry supported by some Shermans and anti-tank guns, being attacked by a German Regiment supported by some Panthers, anti-tank guns and off-table artillery (undefined). both forces had some mortars and machineguns too.  In my order of battle, I reduced it one level: a British company group of four platoons, supported by a troop of Shermans, a platoon of 6pdrs,  a platoon of mortars and a platoon of Vickers MMGs. One platoon front was protected with wire, and two ploughed areas had anti-tank mines in them.  The German Regiment became a Panzer Grenadier Battalion, with one company in Hanomags and the rest in trucks, with most of the battalion-level support plus 3 Panthers and some 75mm anti-tank guns, with a battery of 4 x 105mm guns in support.

Rather than use my own tactics, I tried to follow the original tactics, or intent, as best I could.

The Set-Up:

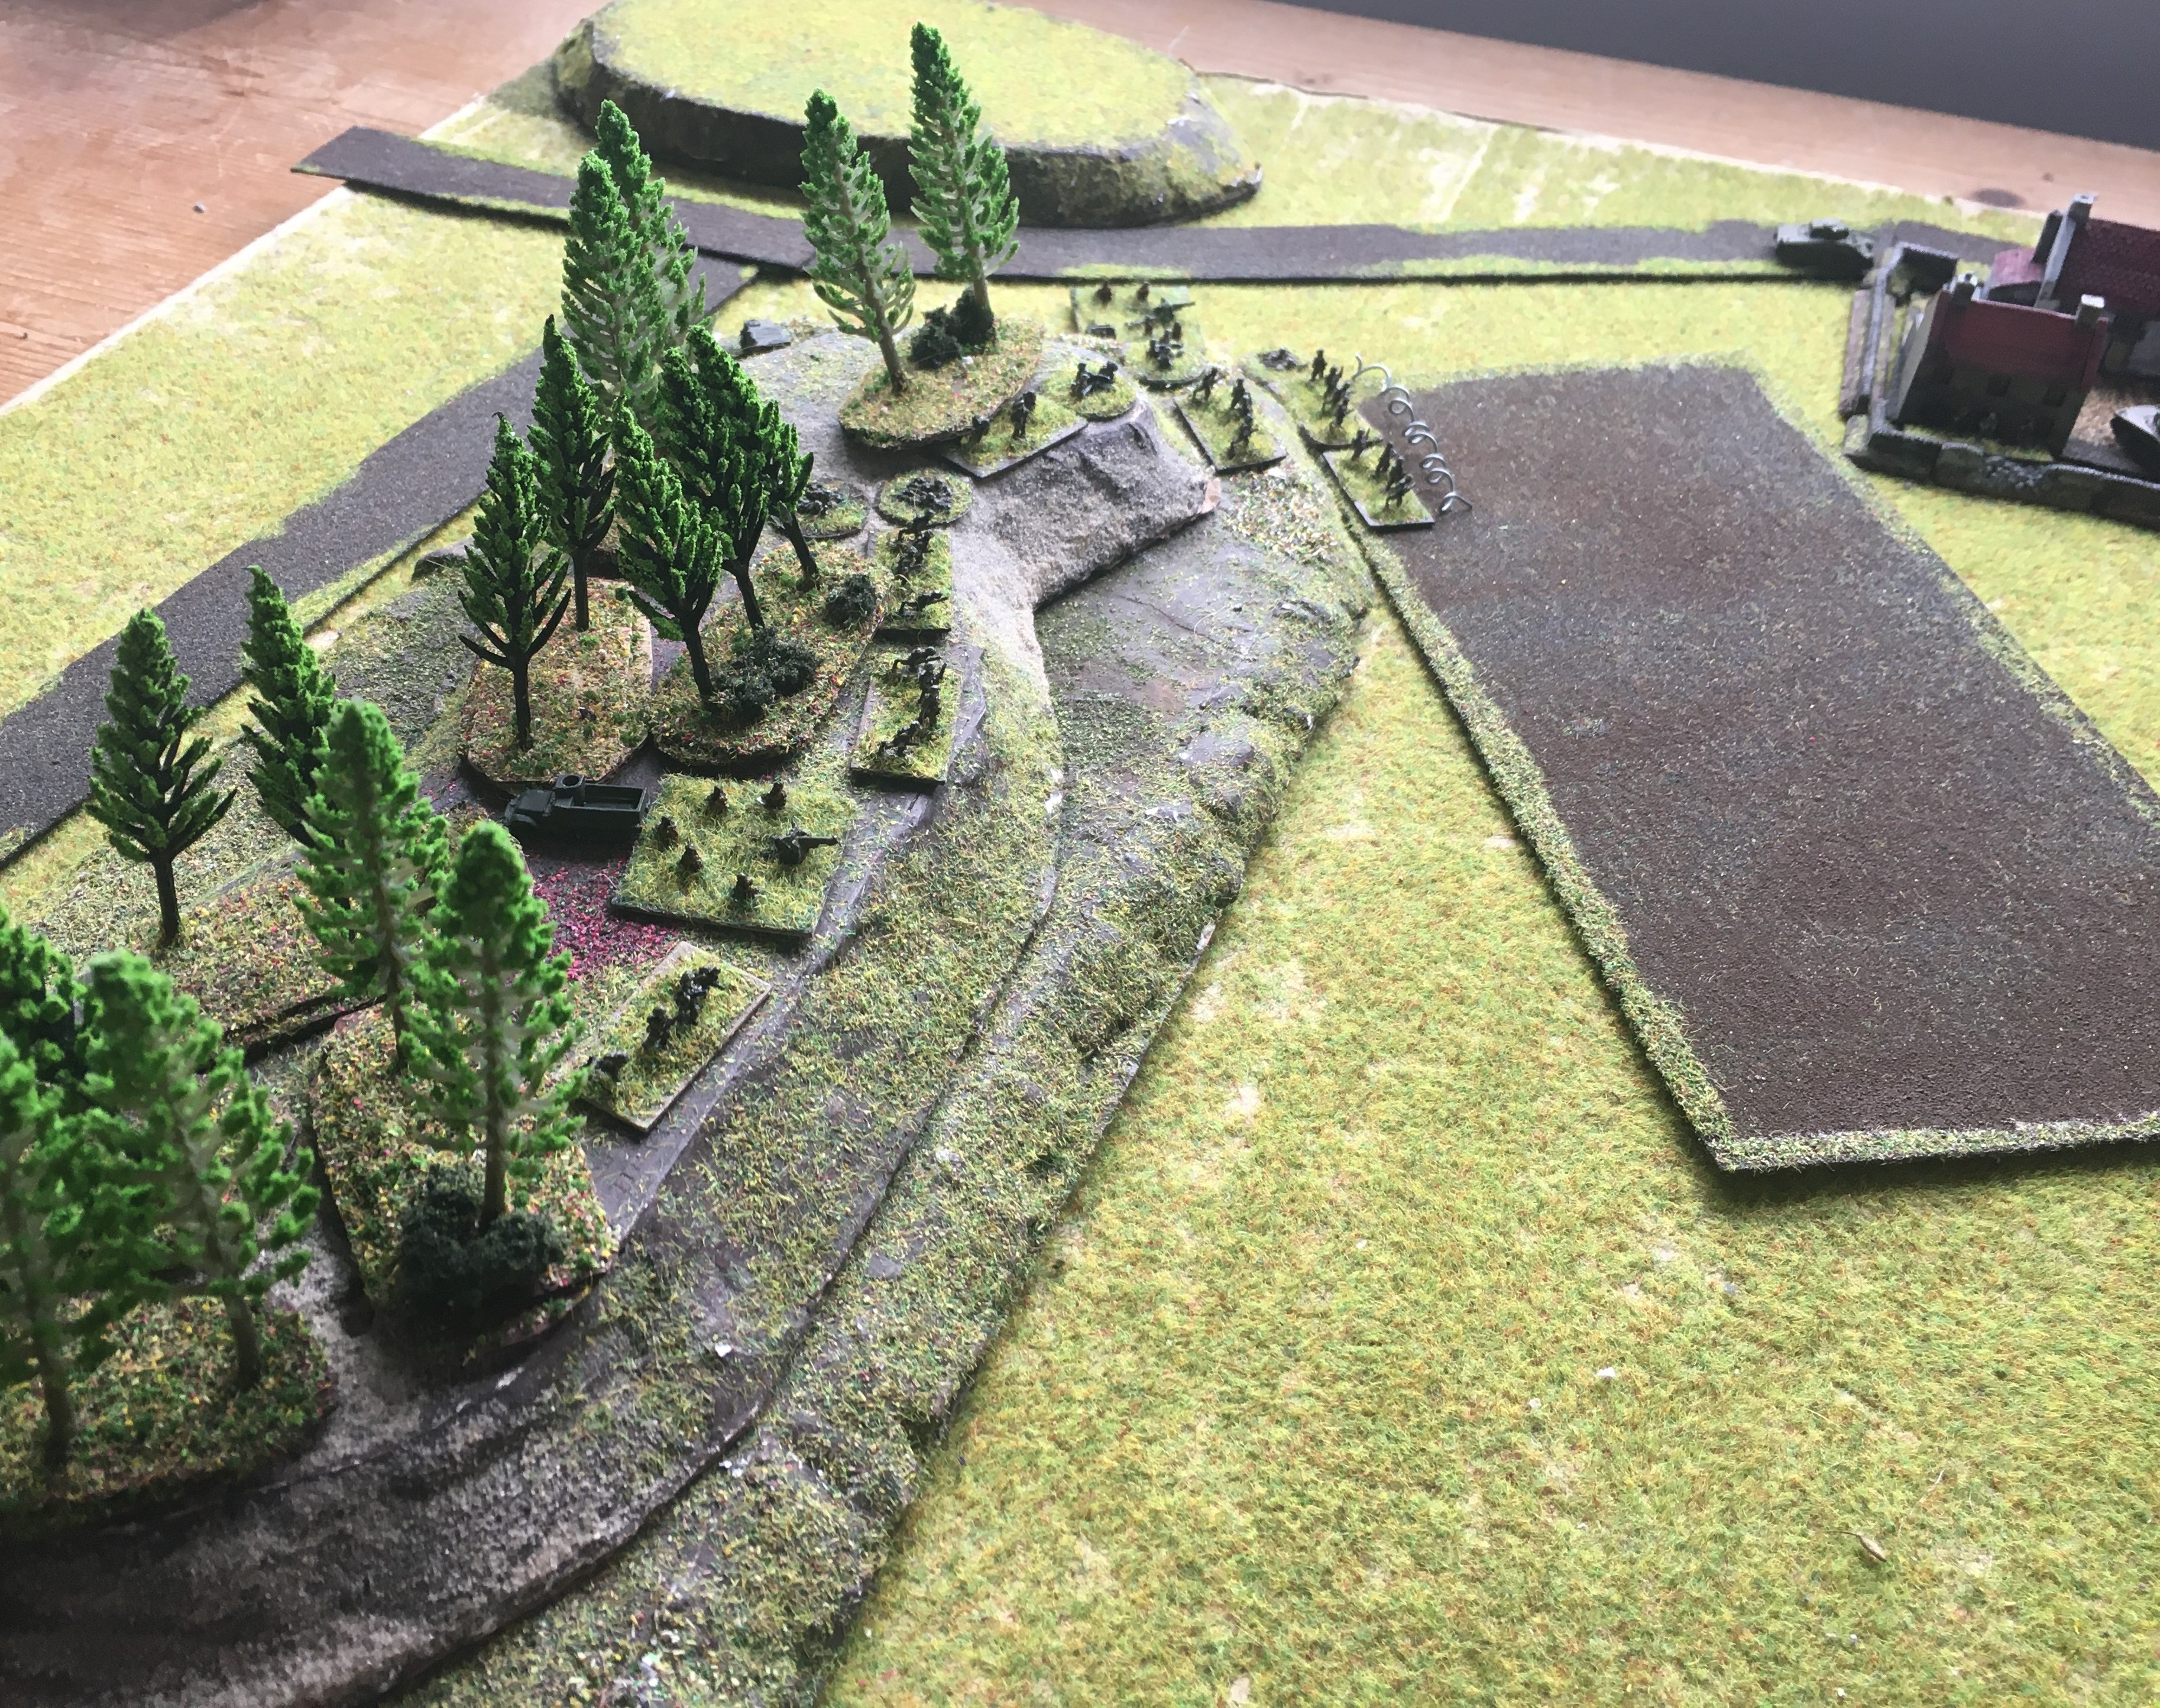
Fir tree hill on the left, Copse hill on the right. The 'embankment' in the original scenario has become Red ridge in this refight (right). Red Farm is at the top, and the village of Charlot (top-right) with a plantation feature in front of it. Because Fir Tree Hill is a somewhat different shape to the original, I added Bald Hill (top-left) to make the terrain a little closer. The whole field slopes downwards a little left-to-right.

Company HQ and 4 Platoon on Fir Tree Hill, with a 6pdr ATG in support; 2 Platoon is in front of the hill beind the wire (top), supported by another ATG.

The view from behind 2 Platoon's position, looking towards Red Farm, occupied by 1 Platoon and 2 Shermans (and commanded by the Company 2iC). The right-hand side of this field contains anti-tank mines.

Red Farm and its defenders.

3 Platoon on Copse Hill, supported by a Sherman (left) and a 6pdr ATG (right); a section of mortars are also in support, with an observer and small team alongside 3 Pl in the woods.

Another view. The near half of this ploughed field contains anti-tank mines.

The Battle:

The Germans led with their armoured stuff on their Right, aiming to concentrate on encircling and taking Copse Hill first, holding back the rest of their force for a later attack on the Left past Red Farm.

"But, before I could say don't drive onto a mine...he drove onto a mine"

The German platoon in the minefield dismounts and advances, whilst the Company Commander moves back out of the ploughed field. He send his second and third platoons left and right flanking, whilst the Panthers hold off. The Brits don't shoot, not wanting to reveal their positions early.

One of the outflanking platoons runs into the barrel of a Sherman, which eliminates it pronto.

The 6pdr on the other side of Copse Hill destroys 3 Hanomags in very short order indeed! The dismounted Panzergrenadiers try to silence it with MG42 fire, but they are in turn silenced very quickly when the Vickers MMG opens up...whose crew are then pinned down by the tripod-mounted MG42 on Red Ridge...

...who in turn get their heads pushed down when the mortar bombs start landing, watched in by the mortar controller in the woods.  Note that the other two Hanomags have retired before they even got into the gunsight of the Sherman... (left). Some German engineers have arrived to try and sort out this minefield too...

They start work, but suffer some accidental casualties and work progresses very slowly

As the right-flanking Panzergrenadiers dismount, they are engaged by British infantry from 3 Platoon, as well as the mortar fire observers...half of the remaining Panzer Grenadiers are cut down in seconds..

I am missing a couple of photos here, not sure why. What happened was that combined HE and machinegun fire from the Panthers, assisted a little by some of the Panzergrenadiers and supports, killed the British mortar control team and persuaded 3 Platoon to pull back into the depths of the wood.

Then everything happened in a few moments: the first Panther cam around to see the Sherman in front of it, which was incapable of harming it. But at that point, the Sherman at the edge of Red Farm opened fire and brewed up the lead Panther! He missed the second Panther though, which promptly despatched the plucky Sherman. At that point, the 3 Platoon PIAT team at the edge of Copse Hill then knocked out the remaining two Panthers in quick succession!

With no-one to spot for them, the British mortars are withdrawing towards Fir Tree Hill (left); however, the Germans are pretty much stuck. Rather than press on and launch the attack with the two motorized infantry companies down the Right (i.e. top), I decided the German commander would probably quit at this point.

Game Notes:

Good fun, and good to get this classic to the table for the first time. A mixture of things did for the Germans, most of which was pure bad luck/good British dice-rolling at key moments. However, there were important structural differences. The most obvious was the minefield, although that was mainly just annoying for the Germans than seriously detrimental.  I think differences in rules philosophy made a more important difference: in Gummipanzergrenadier, anti-tank guns are great because they interact with the observation and accuracy rules in a better way than tanks do. 'Don't be seen' is rule #1 here. Additionally, direct fire weapons are somewhat less powerful than in many WW2 rulesets, whereas artillery is somewhat more useful. This meant that Featherstone's tactics, fairly appropriate for his own scenario, were less good for this game - the Germans should have got their observers into place nice and early (and even better, pre-registered the very obvious targets) in order to make life much more difficult for the British. But that said, there was some good shooting by the British anti-tank gunners, tankers and PIAT operators too!
The engineering rules worked well and were easy to understand. Basically, engineers are 'attacked' by mines and booby-traps (if that is what they are trying to clear) and then roll to succeed with different odds depending upon the difficulty of the task. Trained engineers can therefore do more stuff and are less likely to suffer casualties doing it. Engineering times are only somewhat predictable - they are based on chance, so you can work out how long things might take, but not how long they will take.
Anyway, all good fun and looking forward to giving them another go. What this scenario did teach me is that my WW2 collection is in a bad state; things are mixed up, in the wrong boxes, some stuff I  got second-hand I have never got around to finishing off the painting, the models aren't arranged in meaningful chunks so I can just quickly pull out a company or battalion - this is especially true of the infantry support platoons and companies, I am noticing. I should make some more distinctive FOO and FAC and MFC bases. I am also not quite sure I am organizing things quite right for these rules (my troops are basically configured for WRG 1925-1950). I am not quite sure whether platoon commanders should be 'independent' and attach themselves to a section as and when they need to, or whether one of the rifle sections in a platoon should always be considered a command section. And I need to work out whether a 1944 Panzergrenadier squad should basically be two belt-fed LMGs and a rifle group, or just the LMGs. Anyway, some few modelling things to ponder!

Models were a mixture of Baccus, GHQ and H&R. Buildings were from Leven and Battlescale, with walling from Baccus.


Friday, 5 April 2024

Half-a-Million Views

Sometime today this blog got its 500,000th view. Okay, it was probably a Chinese-based bot rather than real wargamer but still, I know several genuine gamers have read this blog at some point, so we can count that as a win.
Seriously, first of all, very many thanks to everyone who has read any of my posts here, and even more so to those who have also taken the time to comment or link to other parts of the blogosphere. It is very much appreciated, whether it is a kind word, an insightful comment, a recommendation or a correction, or a mixture of them all. And I think, without exception, every comment has fallen into those categories.
 
The Most Viewed Posts have been:
 

I think that gives a fair snapshot of some of the themes that this blog has ended up being about: simple games, small boards, fast play, campaigns, smaller figures for bigger games, solo play, a wide variety of periods, mining old magazines, equal emphasis on new and old rulesets. Some of that was by design, some of that emergent: in particular, the themes of small boards and fast play have partly been a reaction to circumstance, partly to changing preferences, partly to changed foundational ideas. On this blog, the game is the thing: I like the models and the colour and the display, but there are other people out there who do that so much better! But I think overall the aesthetic quality of my games has tended to drift up over time.

I think looking back it is only a pity I didn't get more games in. Some gaps were due to work, a few to illness, a few to family commitments. But a couple of other periods were just dry spells. I think I have got a little better over the years at identifying the things that stop me playing, and overcoming them: because, I rarely get to the end of a game and feel I wasted my time. And that is surely a good sign. Other higher level regrets are that it is clear that my painting hasn't been all that efficient, i.e. although I have been not bad at getting armies finished, not every army has really got to the table enough to justify the efforts on it. Things that stand out here are my 6mm Medieval Arab army, my 6mm Wars of the Roses armies, 6mm WW2 Russians and US, 15mm Moderns, 15mm WW2, 28mm fantasy, 28mm science fiction, 28mm Napoleonics, 1/4800 naval, 1/600 WW2 aircraft...not saying I have never got these things to the table, but I am saying that I probably haven't got enough out of them so far. Perhaps that will change in the future and perhaps I also need to think about what steps will make that happen, and take them. It should in any case make me really cautious about expanding into new periods. As soon as my youngest son is old enough, I should perhaps think of passing some things on straight away, assuming he is still very interested. On the other hand, I have had so much play out of my WSS armies! If I had know then what I know now, perhaps I wouldn't even have bothered with Napoleonics...😊

Are there any 'missing' things? On one level, the answer will always be 'loads' but that matters to me...maybe something colonial? But rather than having lots of separate Colonial-era armies, I think I might just like one or two armies that can be used to proxy for other things. I just have to decide what that might be! Otherwise, I don't really have Chariot Wars armies (although I guess I could use Ancient Britons for these...), or many spaceships, or C20 naval stuff. 

Anyway, what of the future of the blog? For the present, it is steady as she goes, although with some hopes of having a little more writing time in the future, so more games, more reviews, more discussions. Next project I think is to get more of my house rules properly written up and added as pages to the blog, there are a few games or rulesets waiting for this treatment. 

Thanks again for taking the time to stop by, read, comment, link and ecncourage. It has been fun, a nice part of my hobby life and I hope just sometimes a little bit helpful or encouraging to other gamers.

Alcolea - Neil Thomas-esque

As well as a 'proper' test of the Alcolea scenario (see link for more of the background details), I used the base scenario to construct another Neil Thomas-esque scenario. Again, I made this a more 'generic horse & musket' game rather than sticking to its Napoleonic origins. The high-level objectives of the game are the same though: the Franco-Jacobite Spanish forces must either seize the crossing or defeat the opposition army - in this case, a Dutch force. The Dutch force is mainly poorly-trained, with a small cadre of trained troops; the Franco-Spanish forces are trained, with an elite battalion included. 

As usual, I used the Polemos: Ruse de Guerre rules. 


The Forces:

Franco-Spanish-Jacobites: 8 bases of Infantry (1 base Well-Trained), 3 bases of Dragoons, 1 base of 8pdr Foot Artillery
Dutch: 10 bases of Infantry (8 bases Poorly-trained), 1 base of Cavalry, 1 base of 8pdr Foot Artillery

The Set-Up:

Very similar to the 'main' scenario, changed into a slightly more representational terrain on a square 2'x2' board, but otherwise pretty similar I think. The Franco-Spanish are approaching from bottom-right.

The advancing Franco-Spanish

One part of the Dutch force, on the hill to the flank

And the other part, guarding the bridge and town. The barricades are represented by another 'urban area' on the top end of the bridge.

The Battle:

French infantry, supported by artillery, get ready to storm the bridge

A wider shot: Spanish infantry are positioned along the road to help protect the flanks; the Frech Dragoons are switching position and riding down the road (left) to isolate the Dutch on the hill

But considering attack to be the best form of defence, they storm the hill!


The French making slow-going against the Scots and Swiss in Dutch pay by the bridge

However, the Spanish, despite suffering quite heavy losses of their own, including one battalion which has routed, have caved in the Dutch flank on the hill

Still it is a bridge too far for the French...

However, excpet for a knot of infantry and cavalry at the far end of the hill, the Spanish are triumphant and the Dutch are in flight!

And it is only a matter of a few more minutes before the entire Dutch wing is broken

After a little more desultory firing, the Dutch commander withdraws, deciding not to contest the bridge any further since the loss of his Army's right wing.

Game Notes: 

Another Thomas-esque game which worked pretty well. Doing these scenarios back-to-back shows how little one loses in the more simplified scenario. The loss isn't 'nothing', but it is pretty small. The Dutch were a bit unlucky: if they hadn't failed their army morale test, tactically they were still in quite strong position around the bridge, with better troops in a better position. However, c'est la guerre and Polemos is going to punish the 'Spanish' (i.e. the Dutch, in this refight) for having that kind of risky deployment, which allows catastrophic success against a weaker wing to help defeat the stronger. Also, Ruse de Guerre as a baseline makes higher ground less strong a factor than in Polemos: General de Division...although how much that matters also depends on choices you make about troop quality...
In any case, all good fun: I commend this approach to the house!

Figures by Baccus 6mm, buildings by Leven.

Neil Thomas-esque: "The Relief Force" (Rowton Heath re-skinned)

As part of my recent interest in using Neil Thomas' scenario design methods, I gave this very old Rowton Heath scenario, back from Miniature Wargames 001, the Neil Thomas-esque treatment.


This is the scenario I have added as a separate page, so I won't re-hash the actual details here, but will instead have a think about how certain concepts are handled. Additionally, for context, I have played this scenario at least twice before: here, using Polemos: ECW and here, using the Pike & Shot period rules in Neil Thomas' Wargaming: An Introduction book.
 
In One Hour Wargames-type scenarios, the things to note from my point of view are:

Real force composition doesn't matter 'too' much, unless there was something very particular about it i.e. a side must have an artillery battery to win or whatever.
Terrain comes in a limited number of varieties and sizes. This is really useful for a cutting down the amount of terrain you need.
Terrain is entirely functional. Now, this doesn't or shouldn't stop one using pretty scatter terrain, but what it does mean is that if the military effect of say some earthworks and a built-up area are the same, then it doesn't matter which one you use.
Slightly modifying terrain positioning for overall effect is a good thing.

Anyway, just for completeness, a quick run down of the actual playthrough (I used my WSS British and Franco-Jacobites, with the British being the Parliamentarians and the Jacobites naturally supporting the Stuart King!):

The Battle:

The British infantry attempt to storm up the road

After a brief fight, the Irish regiments and French Dragoons rout the leading Scottish battalion

The British re-group for another go

Again the British take heavy casualties on the approach...

But this time, they hold on and their own close range fire pushes back the French Dragoons and Jacobite Horse

However, another deadly exchange of musketry fire in the centre leads to the Irish bloodied, but the Scots are broken!

Which leads to a wider panic!

Some British Dragoons arrive to help outflank the Irish infantry - the odds aren't looking great here though

The battle peters out, and the British withdraw, unable to see a path to victory.

Game Notes: 

The scenario worked okay, although the potential deadliness of Ruse de Guerre meant that the first infantry battle was over before the flanking force could arrive to help them! I think playing the Polemos:WSS rules would have worked better for a horse and musket battle. I should probably have another go at this with the Neil Thomas Pike and Shot rules, or adapt his Simplicity in Practice horse and musket rules for the ECW using his concepts and calibration within the Pike and Shot rules for a game more focused on this size of battle. Anyway, good fun and the scenario seemed to work okay.

Figures by Baccus 6mm, buildings by Leven, fortifications by Irregular.

Just for contrast, here is an image of the set-up for the Polemos:ECW game:

and this is the one for the NT:WAI game


Germanstown - a Thomas-esque interpretation

I am really into the 'Neil Thomas-esque' at the moment: scenarios reduced to some quite bare essentials, played on a small board, but retaining the key features of those scenarios and remaining full of tactical interest despite the small size, optimized for easy set-up and quick play. Recently, I had a go at translating Germanstown into this format.

I used a couple of existing scenarios as the basis for this one: one by Arthur Harman in Miniature Wargames #29, and one by Steve Jones in Wargames, Soldiers & Strategy #89 - some serious scenario writing capability there!

That is a very very nice cover image!

Not that this one is bad!

In contrast to my usual practice, I think it is worth posting a picture of the initial laydown up-front, to aid discussion.

So, a very simplified battlefield and some of the area that the American left came down (i.e. off-table to the right) is omitted; that portion of troops will instead arrive in any unoccupied part of the right-hand table above Germantown at a random point in the game. The objective for the Americans is the camp behind Germantown (bottom). Germantown itself is considered as Woodland for tactical purposes, rather than Buildings. In the scenarios given, this seems to reflect the tactical reality somewhat better. The farm by contrast is counted as hard cover. I could perhaps have added more marshes to the stream, but the woods used would probably suffice I thought.

To reflect the British getting their act together over time, they were limited to a number of force activations equal to the number of the turn, so it will take them some time to get into proper battle array.

The Forces:
The British:9 bases of Infantry (2 Well-Trained), 2 bases of Cavalry, 2 bases of Artillery
 The Franco-Jacobites (for the Americans): 9 bases of Infantry (4 Poor), 1 base of Cavalry, 1 base of Artillery
 
All troops on both sides Trained except where specified.

3 bases of the Franco-Jacobite infantry, the cavalry and an artillery unit would arrive on the right-hand road, 4 bases of infantry and an artillery unit on the right-edge, and the balance by the left-hand road (as seen from the British side)
 
The Franco-Jacobites would arrive periodically by the right-hand road, left-hand road, or on the right edge. In essence a die was rolled each turn, with 3,4 indicating 1 base could be brought on, 5,6 indicating 2 bases.
2 bases of British infantry would arrive by the right-hand road (bottom edge) on Turn 8. This must include at least one of the Well-Trained units.

I used Polemos: Ruse de Guerre as the ruleset for the battle, with my WSS-themed forces for a generic horse and musket action, rather than trying too hard to bring out the specific tactical qualities of the AWI.


The Set-Up:

The British force just coming out of its encampments at the approach of the Franco-Jacobites. There is a detachment in the farm (top-right)

A closer look at Germantown (foreground) and Chew House (background).

The Battle:

The Franco-Jacobite infantry aadvance; Chew House is now supported by the first British brigade - Leven's and Fergusson's Regiments.

More Franco-Jacobites arrive - the Scots regiments deploy to face them

As the battle continues, the Irish units push their Scots' opponents backwards; Chew House still seems fairly secure though, as the regiment opposing it and the artillery don't seem able to get forward.

The two Scottish regiments launch a bayonet charge after the musket volley - Berwick's Regiment is looking shaky...

Berwick's Regiment is routed but Clare's Regiment is holding on, if a bit battered - French Horse comes forward to fill the gap

More British troops being to reach the battle line

Fire forces back the Franco-Jacobite Horse, with loss; Clare's Regiment is still just about hanging on though


Until the pressure becomes too much and it breaks! At least the fire is starting to tell against the lead Scottish battalion (right)

Royal Eccossais now holding the line for the Franco-Jacobites, even if they were disordered by the rout of Clare's men.

Two French regiments arrive on the British flank! That wakes everyone up...

More French units arrive on the opposite flank too

With some very quick thinking, the British manage to get in some kind of order and defeat the French flank attack, after losing one of the Scottish battalions

The Franco-Jacobite attack has petered out, and Lord Berwick calls off the attack


Game Notes:

The scenario worked pretty well, I was pleased and a good vindication of the Thomas-esque approach. The Franco-Jacobites had some struggles but I think a lot of that was more due to bad luck in both the rolling for arrivals and in the combat rolls, rather than a fundamental scenario imbalance past a certain level of advantage to the British. It should be 'difficult' not 'impossible', is what I am going for. Anyhow, it played quickly, looked quite nice, and was easy to set-up. Not much not to like! Ruse de Guerre continues to be very good fun, although with a sneaky suspicion that the firepower effectiveness is just a notch too high and the action point system calibrated a tiny bit too permissively. However, all that is both marginal and highly arguable - they work really well, I guess is the main point.
Figures by Baccus 6mm, buildings a mixture of Leven and Battlescale.