For the next two actions in this re-fight of the TooFatLardies' pint-sized campaign Capturing Caesar's Camp, as the British offensive began to slow, the Germans launch a counter-attack at the village of Villiers-sur-Mareuil. The aim is to force a diversion of British effort and energy to remove this 'thorn in the side' of the advance.
The British are fielding a slightly weakened platoon to defend Villiers - the Germans have a fresh platoon with which to attack. The British are supported by an additional FOO and 3" mortar section, and an additional Vickers MMG and Rifle section.
 |
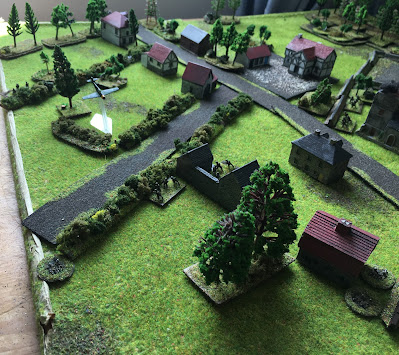
| The British are in a somewhat offset 2-up 1-back defensive position. One section is by the hedgerow by the road on the left;Two section is just in front of the church by the wall; the FOO is actually in the church, along with an additional Rifle section; Platoon HQ is in and around the old barn (bottom-left building); the Vickers MMG is by the bottom junction; and Three Section is in reserve by the hedgerow below the church. Three section is also responsible for guarding the right flank, if uncommitted. |
 |
| One section (left) and Platoon HQ (bottom-centre) |
 |
| Two section (top-centre); FOO (church); Three Section (bottom-right); Vickers MMG (bottom-left) |
The Battle (Action One):
Somewhat giving the game away, there were two actions that took place in quick succession - I have rolled them into the same report.
 |
| Jerry! A German squad is moving down the extreme flank (behind the hedgerow) |
 |
| A better look. |
 |
| The Germans have also managed to get a Pak36 forward too! |
 |
| However, all this is being observed by the FOO - he calls in the mortars! The anti-tank gun's crew become casualties |
 |
| As the mortar fire continues, some of the German riflemen manage to get forward, but the MG34 team is eliminated. The British (bottom) are holding their fire, not wanting to give away their position until they have to. |
 |
| A wider shot |
 |
| More Germans turn up. |
 |
| But just as these Germans try to get forward on the other side of the hedge...the mortars arrive again! |
 |
| Another 8 Germans fall in a few moments. The Germans have still not spotted a single defender. |
 |
| The remaining Germans retreat! |
Understandbly furious, the German company commander throws in another attack!! He also calls for some additional support...
Action Two:
 |
| The Germans push forward another Pak36 (top, just on the far side of the road) |
 |
| Yet again, it is quickly identified and a further 3" mortar strike is carried out |
 |
| But this time...Stuka! No it isn't, it is a 109E Jabo. But still bad news... |
 |
| The very-sharp eyed pilot identifies the British position in and around the church... |
 |
| And neatly lands is bombs into the church tower, eliminating the FOO team and the supporting section! The nearby Two section are suppressed also. |
 |
| The 109E pulls away... |
 |
| Meanwhile, the Germans are again going right-flanking. I assume that their Recce patrols must have spotted the main British position in the centre and are determined to avoid it! |
 |
| The Germans push forward, encouraged by their Platoon commander (base to the rear) |
 |
| Rapid fire!!! |
 |
| Some good shooting by the Camerons - the German squad is entirely eliminated! |
 |
| Less good news - this has attracted the attention of the Jabo... |
 |
| The 109 strafes the British section...thankfully they were more scared than actually hurt... |
 |
| Another pass by the 109 - by now, some of the Camerons are in harder cover; the German platoon commander has managed to slip away into the further field |
 |
| On the 109E's last pass, it gets hit by the Vickers MMG! I would like to report it went down in flames...but it was barely scratched. Still, it aborted its last run. |
 |
| A German sniper works his way forward rather gingerly (by the wooden shed and the three tall trees in the centre of the village) |
 |
| Meanwhile, another German squad appeas, this one going right-flanking, skirting the woods. |
 |
| And then slipping through them |
 |
| The British reserve section's Bren is covering the road |
 |
| A German Kubelwagen turns up?! |
 |
| Some German engineers are poking forward into the edge of the village too. Everyone is busy not spotting each other. |
 |
| The British Bren gunner wasn't napping - as the Germans advance, four of the German riflemen go down! |
 |
| This is followed by a very ineffective exchange of fire |
 |
| But the Germans have shot their bolt - the Platoon Commander knows that there is little point in pressing the attack further, and gives the order to pull back. |
 |
| Scene at the end of the battle - note that One Section on the Left has pushed forward a little - it managed to suppress the German engineer group (amongst the buildings). |
Game Notes:
That concludes the campaign! In the first action, the Germans lost 6 KIA, 13 WIA and the British nothing at all, unsurprisingly, since there were only a few moments where the Germans might have spotted a British soldier. The second action was rather more even: 6 KIA and 14 WIA for the Germans, 4 KIA and 10 WIA for the British. The Germans were a little unlucky in the second game, and the British Bren gunners really earned their pay.
The first action would obviously have been terrible in H2H play, but it was quite satisfying solo: an attack getting hit by mortar fire and failing seems to have been a thing which happened quite a lot in WW2 in France (both in 1940 and 1944). There wasn't anything obviously wrong, or even generally unfair about it, except in that the British tended to have a FOO as potential support in all scenarios, and the Germans didn't. I suspect there might be an element of rules-preference here, which I noticed in the KG Heller campaign too: if the rules a scenario is designed for are slightly more direct-fire than indirect-fire friendly, that same scenario will play out somewhat differently if used with rules which are more support-fire friendly. I would definitely count these rules, and the WRG rules family more generally, as somewhat more support fire friendly.
The second action nicely demonstrated that bombing can be very effective! It should have been a Stuka, but I didn't have a model to hand, so I used a 109E as an early Jabo instead. Air support can be quite effective in these rules, especially with bombs or bigger cannons. Despite early losses, it was worth pressing on - the British were actually not in that great shape after the loss of those four elements in the air strike - both sides were equally shaky, is what I am getting at, so if the last Bren gunner had shot less well, then even a moderately successful German advance on the flank could have 'unlocked' the position. But it really wasn't that kind of campaign for the Germans!
Anyway, despite it not being that close in the end, I hope readers have enjoyed the write-ups. I promised new readers I do lose reasonably often in these scenarios, including once losing the entire campaign! But sometimes, things do go well and I get lucky too...
There have been lots of useful comments and suggestions on the blog and on The Wargames Website and The Miniatures Page. For those, many thanks, and I will look to carry out a few refinements on my solo system before it is next in action.
Models by Baccus 6mm and Heroics and Ros. The 109E is from the Plastic Soldier Company. Buildings are a mixture of Battlescale and Leven. Rules used were
Wargames Rules for Armoured Warfare 1925-1950, aka The Farquhar Version.


