Heretical Gaming is my blog about my gaming life, featuring small skirmishes and big battles from many historical periods (and some in the mythic past or the far future too). The focus is on battle reports using a wide variety of rules, with the occasional rules review, book review and odd musing about the gaming and history. Most of the battles use 6mm-sized figures and vehicles, but occasionally 15mm and 28mm figures appear too.

Saturday, 2 January 2021

Gallic War Campaign Battle 7 - The Battle of Calubriga

 Battle 7: The Battle of Calubriga

Situation: The situation has remained fairly similar into the first half of 55BC: the Romans and their Gallic allies are attempting to clear the Gallic frontier up to the Rhine, whilst the Germans and their Gallic allies try to prevent this by continually instigating revolts.  Ariovistus, having got the Mandubi to abandon the Roman cause and join his own again, has launched another invasion of the Treveri's territory...

The Forces: 
 
The Germans:
Commander: Ariovistus (Inspiring, Steady)

Germans: Commander Zelig (Inspiring, Cautious), 2 bases Trained Cavalry, 8 bases Trained Tribal Foot, 2 bases Trained Skirmishers
 
Gauls: Commanders Biuito (Average, Rash), Andoston (Average, Cautious), 1 base Veteran/Elite Cavalry, 1 base Trained/Elite Cavalry, 1 base Trained Tribal Foot, 3 bases Raw Tribal Foot, 2 bases Raw Skirmishers

The Roman-Aligned Gauls:
Commander: Samo (Average, Steady)
 
Gauls: Commander Lukotrix (Poor, Rash), 1 base Veteran/Elite Cavalry, 1 base Trained/Elite Cavalry, 1 base Trained Tribal Foot, 7 bases Raw Tribal Foot, 2 bases Raw Skirmishers

The Set-Up:

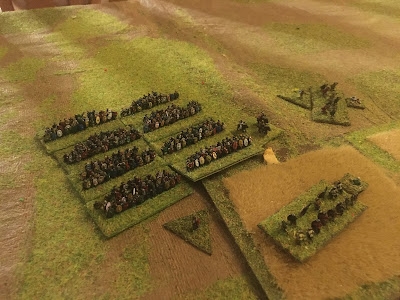
The defending Treveri have a position around a small settlement (bottom) flanked by hills, a wood and some enclosures (centre).  Their youths are in the woods and the enclosures, with their cavalry on the hill (bottom-left) and the foot warriors in the settlement and enclosure.

A wider shot, where one can see the Gallic reserves (bottom); there are also 1000 warriors just out of shot on the hill to the right, defending against the flanking movement.

The Battle:

The battle begins ominously for the Gauls - their youths are surprised by the accuracy of the German youths' spear-throwing and retire deeper into the wood.

Ariovistus moves his troops forward, starting to veer towards the enclosure...

Meanwhile, Ariovistus' Mandubi allies arrive promptly and in good order on the Treveri flank.

Ariovistus leads his warriors into the enclosure in person, sword in hand...

The Mandubi eschew subtlety and charge the small holding detachment of Treveri warriors up the hill.

Ariovistus' charge is successful and the leading Treveri warriors fall under his sword...

Whilst the Mandubi's charge has been equally successful, routing the Treveri foot warriors.

Ariovistus' charge continues and routs the remaining Treveri warriors out of the enclosures; the Treveri youth, in some desperation, try to get around the flank of the advancing Germans (top).

Samo, realizing he faces quick defeat unless he can seize back the initiative, puts himself at the head of the Treveri horsemen and charges the German cavalry: Zelig falls, wounded by a Gallic sword and his comitatus is pushed back (top-right); the other fight is more equal.

Unfortunately, there were a lot of unusable photographs towards the end of the battle, so I will have to summarize events: after a short but sharp struggle, Ariovistus managed to break into the settlement.  The Treveri's reserves counter-attacked, and forced back some of the German infantry and causing severe casualties - but the Mandubi arrived on the flank, Ariovistus restored the situation, and the brave Treveri were surrounded and eliminated - this is the position that one can see now.  Note (top-left) that the leading Treveri reserves actually managed to push the Germans back quite far, but in the end, numbers told...


A wider shot of the end of the battle.  The cavalry are still locked in indecisive combat (left), whilst Samo having led his Comitatus to victory in the charge, has only just managed to get his warriors back in some kind of order, as the rest of his troops are defeated.  The pincer movement is hopefully clear around the settlement, as are the routing Treveri foot warriors from the settlement (bottom). 

Another wide shot.  As is typical, the two skirmish fights were entirely inconclusive (centre, above enclosure; and left, at edge of wood).


Game Results: Despite some brave local fights, the Treveri suffered very heavily, losing c.2200 warriors killed and wounded, and about the same have fled. Both their commanders survived and escaped, however.  The German on the other hand lost only around 600, roughly evenly divided between their foot and horse warriors, although this did include Zelig, who died at the head of the horsemen.  The Mandubi suffered only trivial loses.

Game Notes: The Treveri's fate was more-or-less sealed when the Mandubi turned up right at the beginning of the battle.  As is typical in Polemos:SPQR, the attacker can stack up odds in their favour so heavily as to make them all but certainties.  

There were a couple of points about how the rules played out in this battle.  The rules for skirmishers outside the woods skirmishing with enemy skirmishers at the edge of the woods wasn't particularly clear.  The rules put in range restrictions for ranged weapons in woods but it isn't clear how that applies to skirmishers firing into, and out of, the edge of woods.  Interestingly, javelin-armed skirmishers are typically more effective than archers in these rules.

There were also some interesting interactions in the infantry combat when Tribal Foot break Tribal Foot, when both are in multiple ranks.  I think the intended outcome should be that if attacking charging tribal foot break their immediate opponent, then the immediate opponent is removed and the base behind gets a single shaken point.  The charging tribal foot has to pursue in their next movement phase (p.33).  At this point the originally attacking tribal foot (assuming it isn't attacked first) then has to attack the second defending tribal foot base.  I am not clear whether this should be an advance-to-contact or a charge. 

This kind of thing (i.e. combat outcomes) is the most awkward part of most Polemos sets (excepting Ruse de Guerre, which eliminated most of the issues by eliminating most 'outcome' types of movement).

Anyway, the game was generally fine, the Treveri were always on a bit of hiding to nothing, but the individual combats and general shape of the battle all seemed plausible enough.  

Figures as ever by Baccus 6mm.


Monday, 28 December 2020

Gallic War Campaign Battle 6: Battle of Lonehill Stream

Campaign Battle 6:

The struggle for the key areas of North East Gaul continued into 56BC.  Having started off the campaign season by following Julius Caesar's orders to take over the lands of the Sequani, the (now) Roman-supporting Helvetii joined forces with the Mandubi to invade the Leuci territory and clear the Gaulish bank of the Rhine of German influence.  Ariovistus could not let that happen so despite the heavy losses his warriors had suffered the previous year, he felt compelled to support the unfortunate Leuci with two contingents of his warriors, including his cavalry.

The Forces:
 
The Roman-Supporting Gauls:

Leader: Lostri (Average, Cautious)
Helvetii (2): 1 base Trained/Elite Cavalry, 4 bases Raw Tribal Foot, 1 base Raw Skirmishers
Helvetii (3): Sacrupo (Average, Cautious), 1 base Trained/Elite Cavalry, 4 bases Raw Tribal Foot, 1 base Raw Skirmishers
Mandubii (1): Biuito (Average, Rash), 1 base Trained/Elite Cavalry, 4 bases Raw Tribal Foot, 1 base Raw Skirmishers
Mandubii (2): Labrios (Average, Steady), 1 base Trained/Elite Cavalry, 4 bases Raw Tribal Foot, 1 base Raw Skirmishers
 
 The Germans:

Leader: Adalgard (Average, Cautious)
Germans (1): Adalgard (Average, Cautious) 1 base Veteran Cavalry, 1 base Veteran Tribal Foot, 3 bases Trained Tribal Foot, 1 base Trained Skirmishers
German Cavalry: Widald (Average, Rash) 4 bases Trained Cavalry 
Leuci: Branderix (Average, Cautious) 1 base Trained/Elite Cavalry, 2 bases Raw Tribal Foot, 1 base Raw Skirmishers

The Set-Up:

The centre of the battlefield: the Helvetii (top) and the Mandubi (top-left) face the Germans and the Leuci (bottom), with one flank protected by the hill (top-left) and the other by a stream and pond (right)

The Mandubi contingent take up position on the Romano-Gaul Right, occupying the hill at the confluence of stream and river.

Isolated horsemen and skirmishers of the Helvetii watch the stream and its crossing.

View across the battlefield: The main German thrust must come through the plain in the centre, so the Romano-Gauls are deployed to meet it (left).

The German forces.  The Leuci are deployed on the German Right (top left), the German cavalry is in the centre and Adalgard's own contingent is leading a sort-of echeloned attack (centre-right), with some skirmishers on the other side of the stream discouraging and thoughts of flank attacks.

The Battle:

Adalgard decides there is no time to waste and speed will work better than subtlety, ordering his German and Leuci troops to attack.  Lostri decides to advance to meet Adalgard, since the direction of attack is now fixed.

Another shot.

Adalgard leads the German cavalry charge...and is rather bemused to find that only his own Comitatus has followed him in!!  Perhaps the rest of the cavalry is only used to following the leadership of Widald.

A wider shot, showing the remaining German Cavalry having refused to charge (bottom-centre)!

Perhaps less concerned than he should properly be, Adalgard concentrates on his own sword-strokes, pushing back the Gallic cavalry (centre)

Adalgard's foot warriors and their Mandubi opponents (top-left) have both refused to charge too!

The Helvetii foot warriors display no such shyness, getting stuck in to their Leuci opponents (right)

The Leuci have a slight advantage in skill, but the Helvetii have a rather larger advantage in numbers...

Which initially pays off, forcing the Leuci back with loss

Eventually the German foot warriors and cavalry are both persuaded to charge home, the shock of impact causing some loss and confusion in the Gallic ranks


The Leuci foot warriors are beginning to suffer heavy losses in their fight with the Helvetii, but on the right (centre) they are beginning to push back their foes, despite the odds.


The German foot warriors' charge impetus carries them up the slopes of the hill; meanwhile the Mandubi's cavalry is being worsted by their German opponents (right)

The pressure on the Leuci becomes too much - half of the Leuci foot warriors start running for home!!!

The fight on the main part of the hill is almost over, with the Mandubii warriors in flight and the Germans on the summit, faced only by some skirmishing Gallic youths.

However, the fight here was quite even, with Lostri leading the remaining Mandubi warriors to victory over the other half of the German foot warriors.

The victorious Helvetii reform; they are unable to go back into the continuing melee (top-centre) because of the danger from the German cavalry reserves (off-photo, bottom).

Those same German cavalry charge home!

The battle is becoming very scattered - Lostri tries to rally the Mandubi foot warriors from their pursuit of the German infantry.

The fighting against the Helvetii in the centre-right continues without result as yet.

Just off the hill, Germans rally before the Mandubi, who get routed.

Finally the Helvetii foot start to give way in rout, exhausted by the epic struggle...

And are in headlong flight to the rear (top).

Some of the scattered victorious Helvetii foot rally deep in the German rear.

Whilst Lostri is still trying to rally his victorious Mandubi warriors!

Position at the end of the battle, as the Mandubi and Helvetii finally lose heart - isolated Gallic warriors have pursued deep into the German rear (bottom) but the Germans and Leuci have taken the hill, the centre and outflanked the stream position and have claimed the victory.


Game Result: A close battle, but fortune and skill swung ever-so-slightly in favour of the Germans in this battle. The Mandubi and Helvetii lost around 3000 foot warriors and 1500 horsemen between them, whilst the Leuci lost about 2000 foot warriors; of these, probably somewhere between half and two-thirds fled and deserted rather than died.  Incidentally, there was very high attrition amongst both sides leaders: only two of the German leaders and one of the Romano-Gallic leaders was still standing at the end of the fighting.

Game Notes: Quite an interesting struggle, with perhaps some shades of Sherrifmuir in the mixture of victory and defeat.  Lostri may be one of the few commanders who has led a victorious charge into the centre of his enemies' positions only to find himself on the losing side!  I don't think I had any particular rules struggles (although still not going to swear that I get everything right!)...occasionally the group movement throws up some interesting moments where one base is in charge range but the others aren't, for example; or when one base is contacted and recoiled, what can the other bases do, exactly (this happened when a single German cavalry base charged initially and pushed back one base of the opposing Gallic horsemen).

If anyone is wondering about the relatively unsubtlety of the tactics on both sides, it is just that experience has taught me that trying to do clever outflanking movements over streams and so on leads to disaster if the enemy has any chance of catching you disordered whilst crossing.  To that extent, Polemos SPQR captures exactly why period commanders prefer simple tactics on open terrain.

Figures by Baccus 6mm.


Monday, 16 November 2020

Hobby Update 16th November 2020

 I haven't managed to get as many games in as I might have liked recently, although I have made some steady progress on my Gallic War campaign.  58BC and 57BC have passed, and I am well into 56BC now, so perhaps I am just past a quarter of the way through the campaign now.  I haven't done lots of painting either, a combination of work, education, family and illness.  The education bit should ease off however - I got my Masters degree at the end of October, and although I have another exam on a different subject in December, the slackening off of those pressures should lead to a little more time for games.

What I have managed to finish is a platoon of Soviet WW2 infantry, along with a couple of T-34s to support them:


These were from the Plastic Soldier Company, and they were pretty nice.  I did one T-34/76 and one T-34/85, which more or less suit for the entire war.  I will get some more vehicles to support them in due course, naturally.  I would like a few soldiers with the SVT-40  Along with the 6mm Soviets I got from 2d6 Wargaming, that puts me in a position to do any Platoon-size scenario on the Eastern Front.

Otherwise, I recently celebrated my birthday and got a few gaming-related items, all of them suggested/recommended by people on The Wargames Website:

Firstly, there was Lipscombe's recent Atlas of the War of the Three Kingdoms:

I haven't read it in detail yet, but I have spent a couple of hours browsing and it looks really nice.  It is fairly comprehensive, if not totally so (no map of Tippermuir, for example) but it has most of the actions you would expect in there, and some of the smaller ones.  The campaign movements, accompanying narrative and orders of battle aren't neglected either.  Just like his earlier Peninsular War Atlas, it is a really lovely-looking thing.

I played a game with 'Fire Fight' a few months back, which led to some comparisons and confusion with the contemporaneous boardgame 'Firepower'; I remember wishing I had this in the mid-eighties, and now I have managed to get a copy.  It looks of its time, but still very interesting and I am looking forward to getting this onto the table soon.


I try to think about my next campaigns a year or two in advance of playing them, and I was recommended 'Britannia' as a possible engine for campaigns in Britain set between the last days of the Roman Empire and the Norman Conquest.  This is more of a 'slow burn' project, but I will try to have a proper look over Christmas and see what changes I need to make to convert it into a solo campaign engine.  I believe that a new edition has just come out too.

Tuesday, 10 November 2020

The Gallic War: 57BC

57BC began with Ariovistus planning a combined attack on the Treveri.  Unfortunately, his attack badly miscarried, when his flanking attack failed to materialize at The Battle of the Five Hills.  Ariovistus led the majority of his Germans back into the lands of the Leuci, although his cavalry were forced to retreat across the Rhine instead.

Caesar used the opportunity presented by this rather fortunate victory to re-organize his forces: the XIII & XIV Legions forced march to bolster the Aedui; X, XI, XII Legions and the cavalry moveed to support the Boii; and VII & VIII Legions move to Narbo.

His attempt to win on the battlefield foiled, Ariovistus resorted to diplomacy and skulduggery...which worked fine, inducing the Treveri to revolt against their Roman allies!  Yet again however, Roman pugilism remedied what Roman strategy had lost, beating off the Treveri turncoats. XIII & XIV Legions then force marched to support IX Legion in Treveri territory; meanwhile the Aedui marched to join the Mandubii.  

Realizing his position had become very exposed, Ariovistus called  further reinforcements across the Rhine to join him.  Caesar meanwhile moved his armies further forwards, the X Legion & Roman Cavalry force marching to support the Mandubii; XI Legion, XII Legion & the Boii moving to Aedui territory

Again turning to the pen (and the coin), Ariovistus used diplomacy to bring the Arverni to the Germanic side.  Not to be dissuaded, Caesar attacked Ariovistus in the land of the Leuci, hoping to destroy the revolt at source.  However, Caesar's use of Gallic allies rather than Roman legionaries, as well as Ariovistus use of a strong defensive position, meant that Caesar's attack miscarried with very heavy losses amongst the Gauls.

Despite his victory, Ariovistus army was not really in any position to take the military offensive, so he resumed his diplomatic offensive and recruited the Veneti to his cause; Caesar's military might was temporarily dissipated too however, and he instead used his powers of persuasion to end the revolt of the Averni.


 Game Notes: It was all going so well for Caesar until Ariovistus somewhat unlikely victory.  This has gained the German leader some respite to rebuild his forces, although it is very likely that Caesar will next look to seal off the Rhine frontier and make any further attacks by Ariovistus risky in the extreme.  Ariovistus had some diplomatic successes, although not perhaps large enough to counteract the Romans's military advances.