Esparraguerra was part of the small action known as the
Battle of El Bruch on 6th June 1808.
This post gives a good explanantion of its part in the operations, which were somewhat complicated. Michael Hooper, he of the great Napoleonic scenario books, sent me a selection to try out. This is a slightly modified version of that scenario, although I think it followed most of the essential features. I used
Polemos: General de Division for this, rather than the Polemos: Ruse de Guerre I have been using more recently. This had some consequences for the gameplay, but I will discuss that in the game notes! I also changed one element of the scenario guidelines: the scenario has it that the Imperials can't go on the hills but the Migueletes can. Since Polemos General de Division gives quite heavy penalties for attacking uphill on steep slopes, I felt it fairer to leave the option in, on the grounds that if the Migueletes could get into sufficiently numerous musketry positions to enable effective fire, then the Imperial infantry could probably get at them, if they really tried.

Forces:
Imperial French:
C-in-C:
4 bases Neapolitan Infantry Raw, SK1
1 base Italian Infantry, Trained, SK1
1 base Swiss Infantry, Trained, SK1
1 base Cuirassiers, Trained
1 base Light Cavalry, Trained
1 base 8pdr Foot Artillery, Trained
The above were organized in two brigades.
Spain:
C-in-C:
11 base Migueletes, Raw, SK2
1 base Infantry, Trained, SK0
The Spanish were organized in 3 brigades.
The Migueletes appeared randomly, both in time and on which wooded hill.
There was a possibility for the bridge to be damaged if crossed.
I won't include all the specifics, you can get them in the scenario book when it comes out!
 |
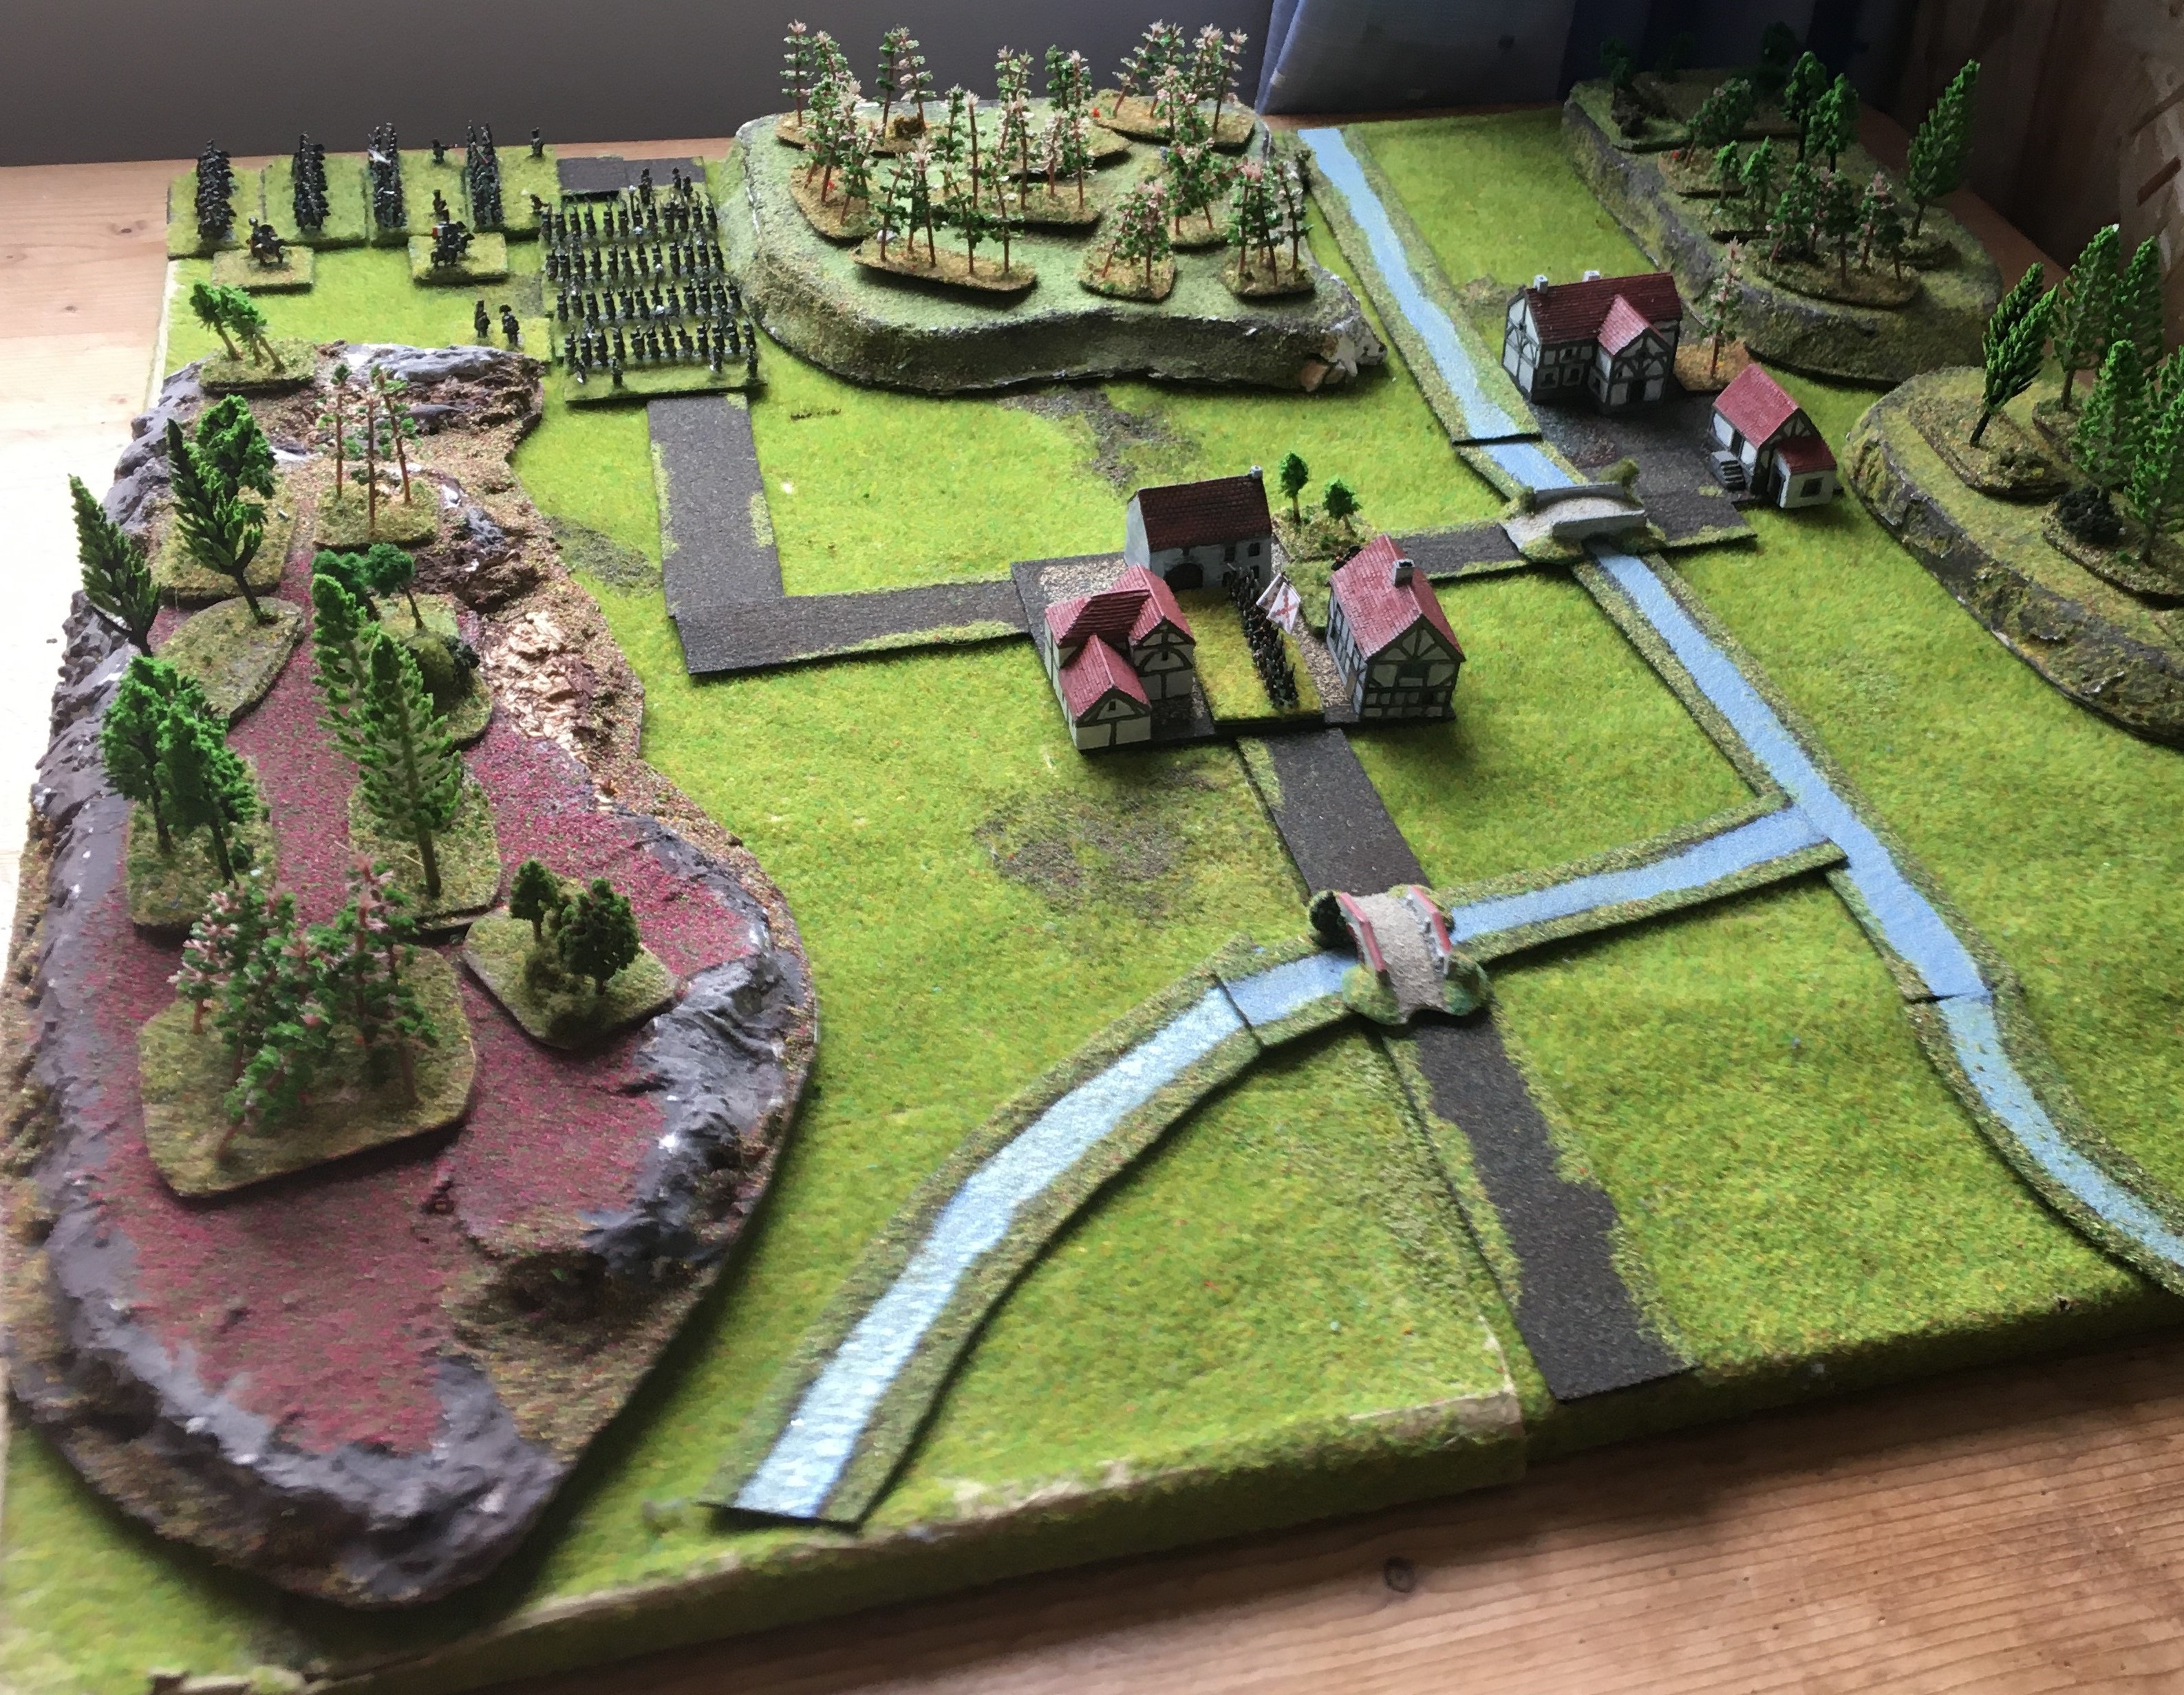
Esparraguerra is the village in the centre; the Imperials are trying to escape over the bridge and take the road
|
 |
A Spanish unit garrisons Esparraguerra, hoping to block the French escape.
|
 |
The head of the Imperials' column - Neapolitan infantry in the lead (distinguished here by not having standards, only the silver horses atop the flagpole); Italian infantry and the cavalry are in the rear, with the precious guns in the rear.
|
The Battle:
 |
| Spanish migueletes advance into the wooded heights |
 |
The action develops: the Neapolitan infantry have had to deploy to try and take Esparraguerra, but the Migueletes are becoming numerous in the woods, opening a (so far) ineffective fire.
|
 |
A first-attack having been beaten off, the Neapolitans are encouraged to go in with the bayonet once again.
|
 |
To no avail, as they are beaten back with loss.
|
 |
The rear half of the column is coming under ever-increasing pressure from the Migueletes' musketry from the hills on both flanks
|
 |
"Miguelets, Monsieur. Des milliers."
|
 |
The situation is getting somewhat desperate now. Another Neapolitan attack is beaten back!
|
 |
Trying to relieve the pressure somewhat, the Imperials deploy all their infantry against the Migueletes on one flank (left) to try and win somewhere
|
 |
The Imperial Cavalry is strong enough in the open to stop the Migueletes from advancing, but the price of this is heavy casualties as the Migueletes use them for target practice...
|
 |
The Imperials' have got their gun into the firing line (centre) to help the assault against the village
|
 |
The Imperials (Italians and Swiss) launch a desperate bayonet charge up the slopes
|
 |
Meanwhile, another (a final assault) goes in on the village.
|
 |
The view from the slopes - note that on the other hill, the Imperial cavalry is slowly but surely being made to come apart...
|
 |
The artillery support made all the difference! The Neapolitan infantry finally expel the Spanish defenders
|
 |
The mad charge of the Italians and Swiss brings some reward, pushing back some of the Migueletes - however, in the background one of the Imperial cavalry regiments is broken...
|
 |
...and they ride off into the distance; given that this is the wrong way to safety, it isn't looking good for the Imperial horsemen...
|
 |
However, the route to safety is in sight - the Spanish infantry try and block the road, but the Neapolitans, flush with their victory, attack once again with the bayonet...
|
 |
...the Spanish have had enough for one day..
|
 |
...and flee!
|
 |
The weak bridge eventually gives way as the Imperials' cross it, although the precious guns were largely across it
|
 |
It has been somewhat close run and hard fought, but it looks like the majority of the Imperials' will escape!
|
Game Notes: It ended up being quite an exciting game! The scenario was pretty evenly-balanced it turned out. I do regret making the change to the scenario rules in allowing the uphill attack, although thankfully it probably didn't make that much change to the overall outcome. It felt like the scenario fitted reasonably well onto a small 2'x2' board - it seemed to restrict/clarify both sides' choices.
Using Polemos: General de Division rather than Polemos: Ruse de Guerre had certain interesting consequences. GdD usually needs forces to close to achieve decisive effects, whilst Ruse de Guerre will let you win threw artillery fire and musketry exchanges in many circumstances. RdG also rewards numerical superiority rather more. Broadly, I think this favoured the Imperials. On the other hand, the scenarios are broadly based on the Shako / Shako II rules as a framework. The Shako rules are quite interesting in that they propose quite a few meaningful divisions at the lower-end of the quality scale for Napoleonic troops: Second Rate - Poor - Unreliable - Raw (IIRC). This is really handy for dealing with the Peninsular War, particularly the 1808 fighting. Both Polemos sets are much less gradated which generally I consider a strength, but for these particular scenarios, it is a weakness. It is somewhat fixable in GdD, which can easily slot in perhaps 3 more grades but harder in RdG - there is just less design space. Basically, your French Legions of Reserve for example are not 'good', but they should be much better than newly-raised Spanish troops. It isn't being pro-French, rather the basic situation of the Legions of Reserve which had at least somewhat trained officers and troops with over a year colour service, and new Spanish troops who had 1 month. In any case, the flatter structures of Polemos helped the Spanish here quite a lot.
Anyway, all good fun and I am looking forward to the book's eventual publication.
All figures by Baccus, I think the buildings are mainly by Leven.


That's a nice scenario with some challenging terrain to fight over, so get's the old grey cells goign compared to more open battlefields. Good post game thoughts too, especially when you need to have some subtle variations in troops quality etc.
ReplyDeleteThanks Steve. I have an idea for a slightly longer post on the subject of troop quality, might get round to it if I ever have enough time to get through the battle report backlog!
DeleteA top looking game and really interesting report. Plenty of challenges with terrain, troops and situation.
ReplyDeleteA few years back we tried General de Division for a game of Bailén. The overall system was good, but it seemed more like a set of 18th C rules with infantry happily (and encouraged) to meet cavalry with fire rather than square. Without many cavalry here it would not have really come up for you, I guess.
Regards, James
Thanks James, appreciated.
DeleteIn regard to cavalry versus infantry action in General de Division...I think the description of the rules gives a wrong impression of the mechanics of the rules. The description seems to imply things like 'line' and 'square' are meaningful concepts in the game, when they are not. Their ony function is as 'narrative outcomes'. What determines the results of cavalry versus infantry combat is essentially: is either side shaken? what is the troop quality? who has more support? (plus a couple of factors that haven't been totally thought through, IMHO). And the *result* of this mechanic can be described as 'the infantry formed square and the cavalry pulled back' or 'the infantry's volleys in line caused enough casualties that the cavalry pulled back'. There are a couple of main advantages of this approach: you don't need a logic for when infantry must/should/could form square on the approach of cavalry; and from a design point of view, you don't need to find that very difficult calibration where it makes any sense for cavalry to try and charge infantry in square and not automatically lose. There are some other minor plus points, and a couple of negative ones, but that I think is the essence of it: the description and visuals give a wrong impression of what the mechanics are doing.