Heretical Gaming is my blog about my gaming life, featuring small skirmishes and big battles from many historical periods (and some in the mythic past or the far future too). The focus is on battle reports using a wide variety of rules, with the occasional rules review, book review and odd musing about the gaming and history. Most of the battles use 6mm-sized figures and vehicles, but occasionally 15mm and 28mm figures appear too.

Wednesday, 11 August 2021

Siege of Oxford 1142 - A DBA Refight (I)

The Siege of Oxford (1142), which took place during England's Anarchy, and perhaps most famous for the escape of the Empress Matilda in the snow, covered by a white cloak, was preceded by a sharp action outside the gates of Oxford.  In essence, a surprise attack by King Stephen's troops resulted not only in victory, but enable them to capture the city of Oxford in the confusion of the rout.

Stephen Simpson wrote a scenario for this engagement in his series on Anglo-Norman battles in Wargames Illustrated 30.  

The Scenario:

I think the scenario, even taken abstractly, is quite interesting.  A small Rebel infantry force has pinned the Royal infantry vanguard by the riverbank with archery fire.  Stephen's mounted troops have found a ford however and are able to move and begin crossing it before the Rebels can react.  The Rebel cavalry is near Oxford, not expecting to go into action.  The Rebel Army can try and defeat the Royal Army (unlikely) but its aim is to get enough elements back into Oxford without being routed.

The Forces:

The Royal Army: 1 x General (3Kn), 5 x Knights (3Kn), 6 x Spearmen (Sp)
The Rebel Army: 1 x General (3Kn), 3 x Knights (3Kn), 3 x Spearmen (Sp), 1 x Archers (3Bw)

The Rebel Army is split into two groups: the knights are in the rear, by the bridge into Oxford.  The spearmen and archers are by the river, facing King Stephen's vanguard.  The knights can only move after a 5 or 6 are rolled at the beginning of each Rebel move.

The river counts as an obstacle, except at the ford, which can be crossed at normal speed but is only 1 base width wide.

The break point for the Rebel Army is 3 bases, the break point for the Royal Army is 4 bases.  The Rebel Army does not lose any extra bases if its general is eliminated.  

The Rebel Army must get 6 bases back into Oxford without being broken first to win.

The Set-Up:

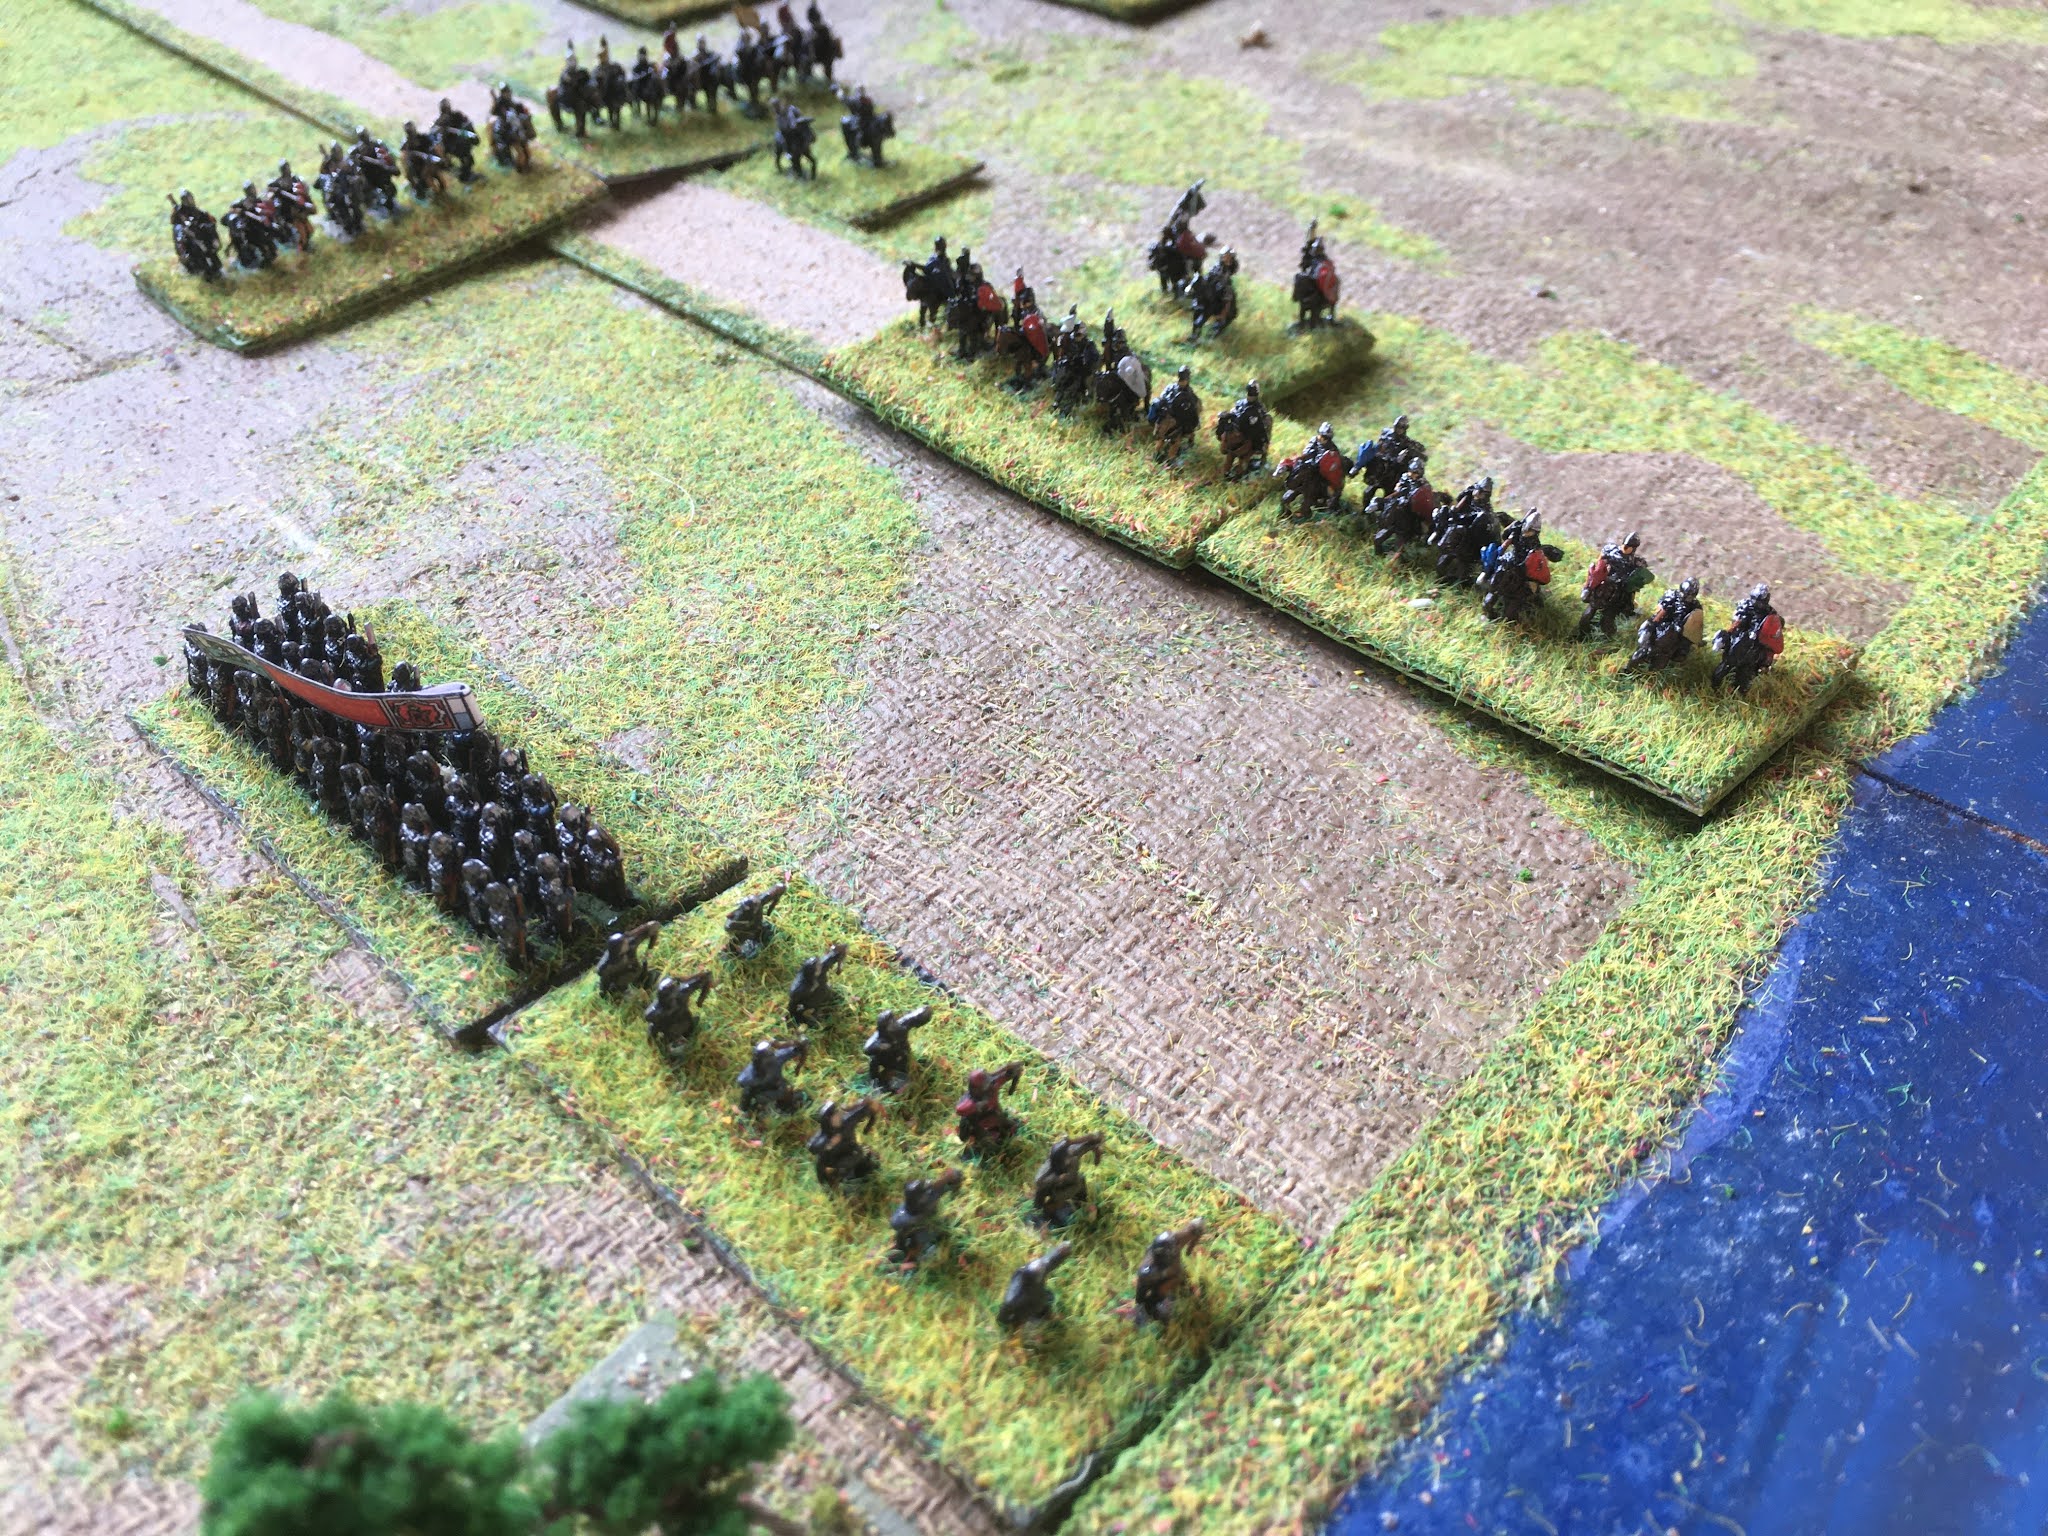
The battlefield: the Rebel and Royal infantry face-off over the river (bottom-centre), with the Rebel Knights currently sitting it out in the rear by Oxford (top); King Stephen is leading his knights and an infantry contingent over the ford (bottom-right)

Another view.


The Rebel Knights just outside Oxford.

The stand-off over the river.

King Stephen's troops ready to cross at the ford.


The Battle:

King Stephen leads his knights across the ford; some of the rebel infantry try to form a flank to stop the infantry being rolled up.

A closer look

King Stephen concentrates his leading knights in a line and charges the flank of the Rebel infantry (centre-left); his other knights trot towards the Rebel knights (top-left), who are hastily trying to get into some kind of order.

A closer look at King Stephen's charge


Aided by some spearmen wading across the river


King Stephen routs the spearmen in front of him (centre), but other rebel spearmen throw back the assault across the river, aided by the cavalry on the flank

By now the Rebel knights have got into gear and are charging forward - some of King Stephen's knights turn to face them (centre); the remaining Rebel infantry have formed a line (left), apart from one plucky band still fighting around the original position (centre-right, far bank)


That plucky band cannot hold out much longer however, and is put to the sword or to flight by the knights (centre-bottom)


King Stephen leads his knights in another charge against the Rebel infantry (bottom-left); whilst the remainder of his knights charge the Rebel knights (top)

A closer view of the latter.

King Stephen's knights are firmly repulsed by the determination and skill of the Rebel infantry

However, some of the Rebel knights start to flee as the Royal knights' charge proves irresistible, this leads to the disintegration of the Rebel force


Game Notes: A short but interesting game with some fascinating choices early on for King Stephen interacting with the DBA 'PIP' mechanics.  Because the total amount of 'activity' for each side is determined randomly by a D6 roll, then it isn't clear to King Stephen how much his troops can do.  He has four broad options: quickly attacking the infantry, quickly attacking the cavalry, quickly attacking both or concentrating on building up his forces on the other side of the ford for a set piece attack.  Except for the third option, all are possible even with low activity rolls.  On the other side, the commander of the Empress' forces can choose how much effort to expend on retreating the foot versus attacking with the cavalry; this is made more difficult since it isn't certain at what point the Empress' knights will be ready to get into the action.  So, a quick game (because DBA is a quick game and this is a small battle, even for DBA) but one with a great deal of interest in.  As a wargame scenario, the calculations above will change depending upon the rules, particularly in how the command rules work, the exact movement rates and how easy or difficult it is to retreat infantry in the face of mounted opponents.
 
 I am sure that no DBA players will need this mentioned, but for others DBA has a distinctive take on the odds of mounted knight versus spearman combat: the latter is more likely to win, but the cost of loss is low; if the latter loses, the defeat is catastrophic (the DBA 'quick kill'). 

Figures by Baccus 6mm, buildings by Leven and Timecast, rules were DBA 3.0.


Sunday, 8 August 2021

Battle of Lincoln 1141 - A DBA Refight

The 1141 Battle of Lincoln was one of the larger battles of the so-called "Anarchy" period of civil war as the throne of England was contested by King Stephen and the Empress MatildaAs the Polemarch has noted on his blog, this is somewhat of a neglected wargaming period.  There was however a very interesting series of articles in Wargames Illustrated which covered the period, written by Stephen Simpson, who is the same person behind the "Simple Rules for the '45" Jacobite rebellion rules that I have been using recently for that conflict.  He did some very interesting rules for this period of Anglo-Norman conflict too, but they need a little work by me to adapt them to my basing system (which is more designed for DBA/Polemos/Impetus type games) so I didn't use them for this refight, but I did adapt the scenario for the Battle of Lincoln, which was published back in Wargames Illustrated 29.

The Scenario:

A slightly larger 'Rebel' force of around 6000, under the Empress' half-brother Robert of Gloucester, confronts a 'Royal' force of around 5000 under King Stephen himself just outside of the city of Lincoln.  The King's forces had been besieging Lincoln Castle and Robert's army was relieving it.

The Forces:

The Royal Army: 1 x General (King Stephen) (Sp), 6 x Infantry (Sp), 1 x General (3Kn), 5 x Knights (3Kn)

The Rebel Army: 1 x General (Robert of Gloucester) (Sp), 6 x Infantry (Sp), 2 x Welsh Infantry (3Ax), 1 x General (3Kn), 5 x Knights (3Kn)

All 'General' bases act as generals, but only King Stephen's base counts as a double-loss.  The Royal Army move first, and its two groups of Knights have to charge straight forward if the Royal Army has enough PIPs to do so (i.e. 2); if the Royal Army only has 1 PIP to begin with, toss a coin for which group charges.  The Rebel Army's knights are just out of charge range at set-up, but the Welsh contingent are within range of the Royal Knights closest to Lincoln.

The Royal Army's break-point is 4 bases, the Rebel Army's is 5.

No troops from either side can enter into Lincoln or the castle during the battle (or optionally, the castle has a Rebel garrison and the remainder of the city a Royal garrison).

The Set-Up:


The Rebel Army (bottom) is deployed on the low ground just north of the Foss Dyke, facing the Royal Army on the high ground (top), with the city of Lincoln to the East (right)

A view of Lincoln (a very stylized representation!)


 The Royal Army on the high ground.  King Stephen is with the infantry (centre); William of Ypres leads the force on the Royal left (right), whilst the right is a motley collection of hard-fighting but undisciplined earls.


The Rebel Army is deployed in similar formation, except that its Welsh levies are quite exposed in the front-right (right); Earl Ranulf leads the Rebel knights behind them; Robert of Gloucester leads the infantry in the centre (bottom); whilst the knights on the left are the 'disinherited' - those nobles disinherited by Stephen and thus compelled by interest to fight for Mathilda.

Another view, from the ford on the Foss Dyke - a tenuous escape route for the Rebels if one should be needed!

The Battle:

William of Ypres' force charges the Welsh foot

Whilst Stephen's earls charge 'The Disinherited'


The Royal knights make relatively short work of the Welsh, but are then confronted by Ranulf and his knights.

A wider view

Robert of Gloucester hurries his men forward in the centre to support the rebel knights on the wings: the cavalry fight on the Royal Left (right) has become quite a swirling fight.

Easier to see in this view, as the dynamics of the cavalry fight on the Rebel right (right) has led to some gaps in the centre.

A similar phenomenon occurs on the Royal Right (left), but 'The Disinherited' have gained the upper hand on 'The Earls', who appear in some disarray.

Although less decisive, William of Ypres' knights seem to have the advantage over Ranulf.

Stephen has been slow to get his main battle into the fight, but Robert of Gloucester's troops have imposed themselves in the centre.

The fight on the Royal right ebbs and flows...

As it does on the other flank...

Robert of Gloucester's infantry lend valuable support to the knights

And the Royal Earls are looking outnumbered and outfought.

However Ranulf's knights are not prospering against William of Ypres' horsemen - luckily for the Rebel Army, its foot is in support.

The main infantry action in the centre begins, with Stephen fighting at the front of his men (centre)

And all of a sudden the line is fragmenting and the Royal Army is being pushed back or destroyed

A wider view: individual details are complex, but the broad picture is that the Royal Army is being pushed back and starting to break apart.  There seems relatively little that Stephen can now do apart from cross his fingers...

A slightly wider shot


The 'story' of the battle can be seen here: 'The Disinherited' have performed strongly against 'The Earls' (right), William of Ypres' knights have perhaps performed better than Ranulf's knights (left), but the latter have been succoured by the Rebel infantry; the Rebel infantry have pushed forwards successfully in the centre.

A shot showing the situation on the Royal Left, with increasing infantry support to Ranulf (centre-bottom) turning the tide...

The Rebel Left, although the intense fighting continues, definitely has the upper hand on the Royal Right.

And as 'The Earls' flee or are killed, 'The Disinherited' push forward to outflank the Royal Army.


A wider shot - the King is still fighting with great valour (centre), as is William and his knights (right), but the battle has inexorably swung towards the Rebels.

Accumulated losses have demoralized the Royal Army, which breaks at this point.


 Game Notes: Good fun and close enough to the historical outcome to make one feel that the scenario and the rules coped okay.  The 'breakpoint' army morale system actually worked out quite well for this battle: although the rule that the Royal Army 'must' charge is imposed to enforce historical behaviour on the part of the King's knights, since this is likely to lead to the destruction of the Welsh infantry in short order, this actually is a reasonable move for the Royal Army, since it makes the odds even (13 bases: 13 bases) but with the Rebel Army closer to its break point than the Royal Army.  The battle seemed to last a little longer than the original but this was fair enough, reflecting the fact that the Royal general (i.e. King Stephen) didn't get captured in the fighting.

I should probably have made the general's foot base on each side 'Blades' rather than 'Spearmen' but I forgot: I don't however think that it made any real difference.  I didn't use any skirmishing archers on each side (since the scenario doesn't really include them) but one base of Spearmen could easily be so replaced.  I did have a strange crisis of confidence that I had got the rules regarding eliminating recoiling units wrong, and I may have done it wrong once or twice in the game, but I'm not sure it made a difference: in any case, I couldn't tell you which side it disadvantaged.

In retrospect, this game serves as a memo-to-self to get an order into Leven or Total Battle Miniatures for a more Norman-looking castle and a few more Medieval buildings!

Figures by Baccus 6mm, rules were DBA 3.0.  Buildings a mixture of Leven and Timecast.