Heretical Gaming is my blog about my gaming life, featuring small skirmishes and big battles from many historical periods (and some in the mythic past or the far future too). The focus is on battle reports using a wide variety of rules, with the occasional rules review, book review and odd musing about the gaming and history. Most of the battles use 6mm-sized figures and vehicles, but occasionally 15mm and 28mm figures appear too.
Showing posts with label Miniature Wargames. Show all posts

Tuesday, 14 May 2024

The George Gush Napoleonic Northern Italy Campaign - Campaign Report

 I (as umpire) and my two heroic players have just completed a refight of George Gush's Napoleonic campaign, set in Northern Italy and as detailed in Miniature Wargames 31: an earlier post gives an outline.


And first up, I really do want to thank my two players - as someone doing this kind of thing for the first-time, they were absolutely amazing: enthusiastic, and patient. Couldn't have asked for, or even imagined, better! I hope they had fun.
I have three elements I want to cover. The 'technical' side of the rules and so on, I will add as a separate page of the blog, so I will cover the story of the campaign, and then some thoughts about the whole affair, what worked, what sort-of-worked and what really didn't.
 

The story of the campaign.

The full orders of battle will be in the campaign page, but in brief:
The French Army is commanded by General Sauret, who has 4 divisions: those of Renault, Panis, Arnoux and Villeneuve. Arnoux's division is somewhat weaker than the other those of Renault and Panis, Villeneuve's Division is a cavalry division.
 
The Austrian Army is commanded by Marshal Altenburg, who has 2 'wings' (those of Liechtenstein  and Sachsen-Coburg, with 7 infantry brigade and 3 cavalry brigade equivalents). A couple of those brigades are broken up into garrison forces.

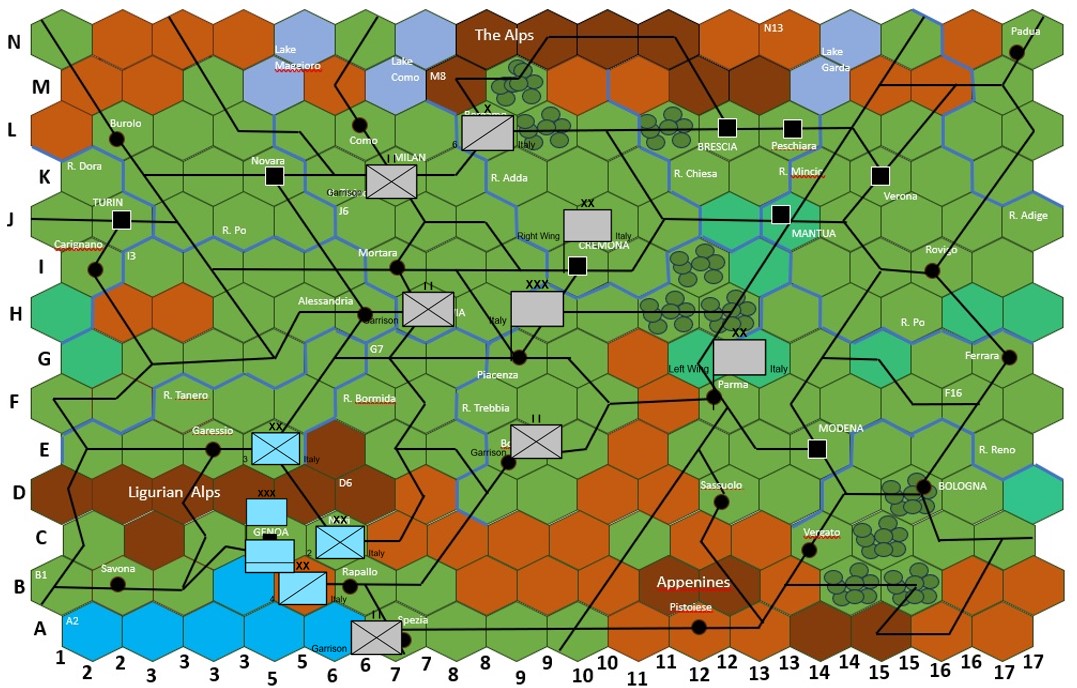
Starting Deployment:

The French commander has decided on a 'Southern'-focused deployment just in front of Genoa, with the Ligurian apls to protect his left; the Austrians are in a more central positionin the Piacenza-Cremona-Parma triangle, with some forward detachments a little further forward to give warning of French intentions. These detachments were mainly the Austrian militia battalions. There is a little risk-reward element here: isolated militia battalions are fairly likely to be overrun if attacked - but that might happen to any isolated detachment, and you don't care as much about losing a lowly militia battalion (compared to say, a precious cavalry regiment).

We are a couple of days in now. The advancing French overwhelmed the isolated militia battalion in Spezia and are advancing up the E-W road to the South. Apart from some tiny affaires des postes in the Ligurians as Austrian cavalry patrols and French light infantry skirmish, that is it really. The Austrians do not yet have any indication of what the French are up to.


By Day 5, the French attack is developing. The Austrians are aware of the Spezia incident and Liechtenstein's wing is marching towards the crossroads in A10 to intercept the French, unaware that the French main body has passed. The French have in fact nearly reached Modena and Bologna, two game-winning objectives. On the other hand, the French cavalry patrols which have just spotted Liechtenstein's advance are not going to stop Liechtenstein's force cutting off the French lines-of-communication...


And the predictable situation the following day: the French have captured the two objectives, which if they can hold until day 29, then they win the game. On the other hand, their supply lines have been cut. This can cause quite a lot of damage quite quickly to an army.

We are now at Day 8. General Sauret knows there is no way his forces can hold out for weeks with no supplies, so he sets his forces in motion back to the crossroads. Keeping in mind his orders to keep is forces as concentrated as he can, he doesn't try to leave strong forces guarding his objectives. The 'scattering' effect behind the French columns moving back West is from units dropping out to look for food etc and then re-organize. Because the battalion/regiment/battery is the lowest unit in the game, then straggling and losses etc. are effectively modelled by whole units becoming disrupted - or destroyed - rather than each unit losing a percentage of their strength. Once you get to thinking of a unit as an 'Army strength point', it works really well. But more to say on this in the notes. The Austrian commander, has moved forward to reinforce Liechtenstein - things not looking great for the French!

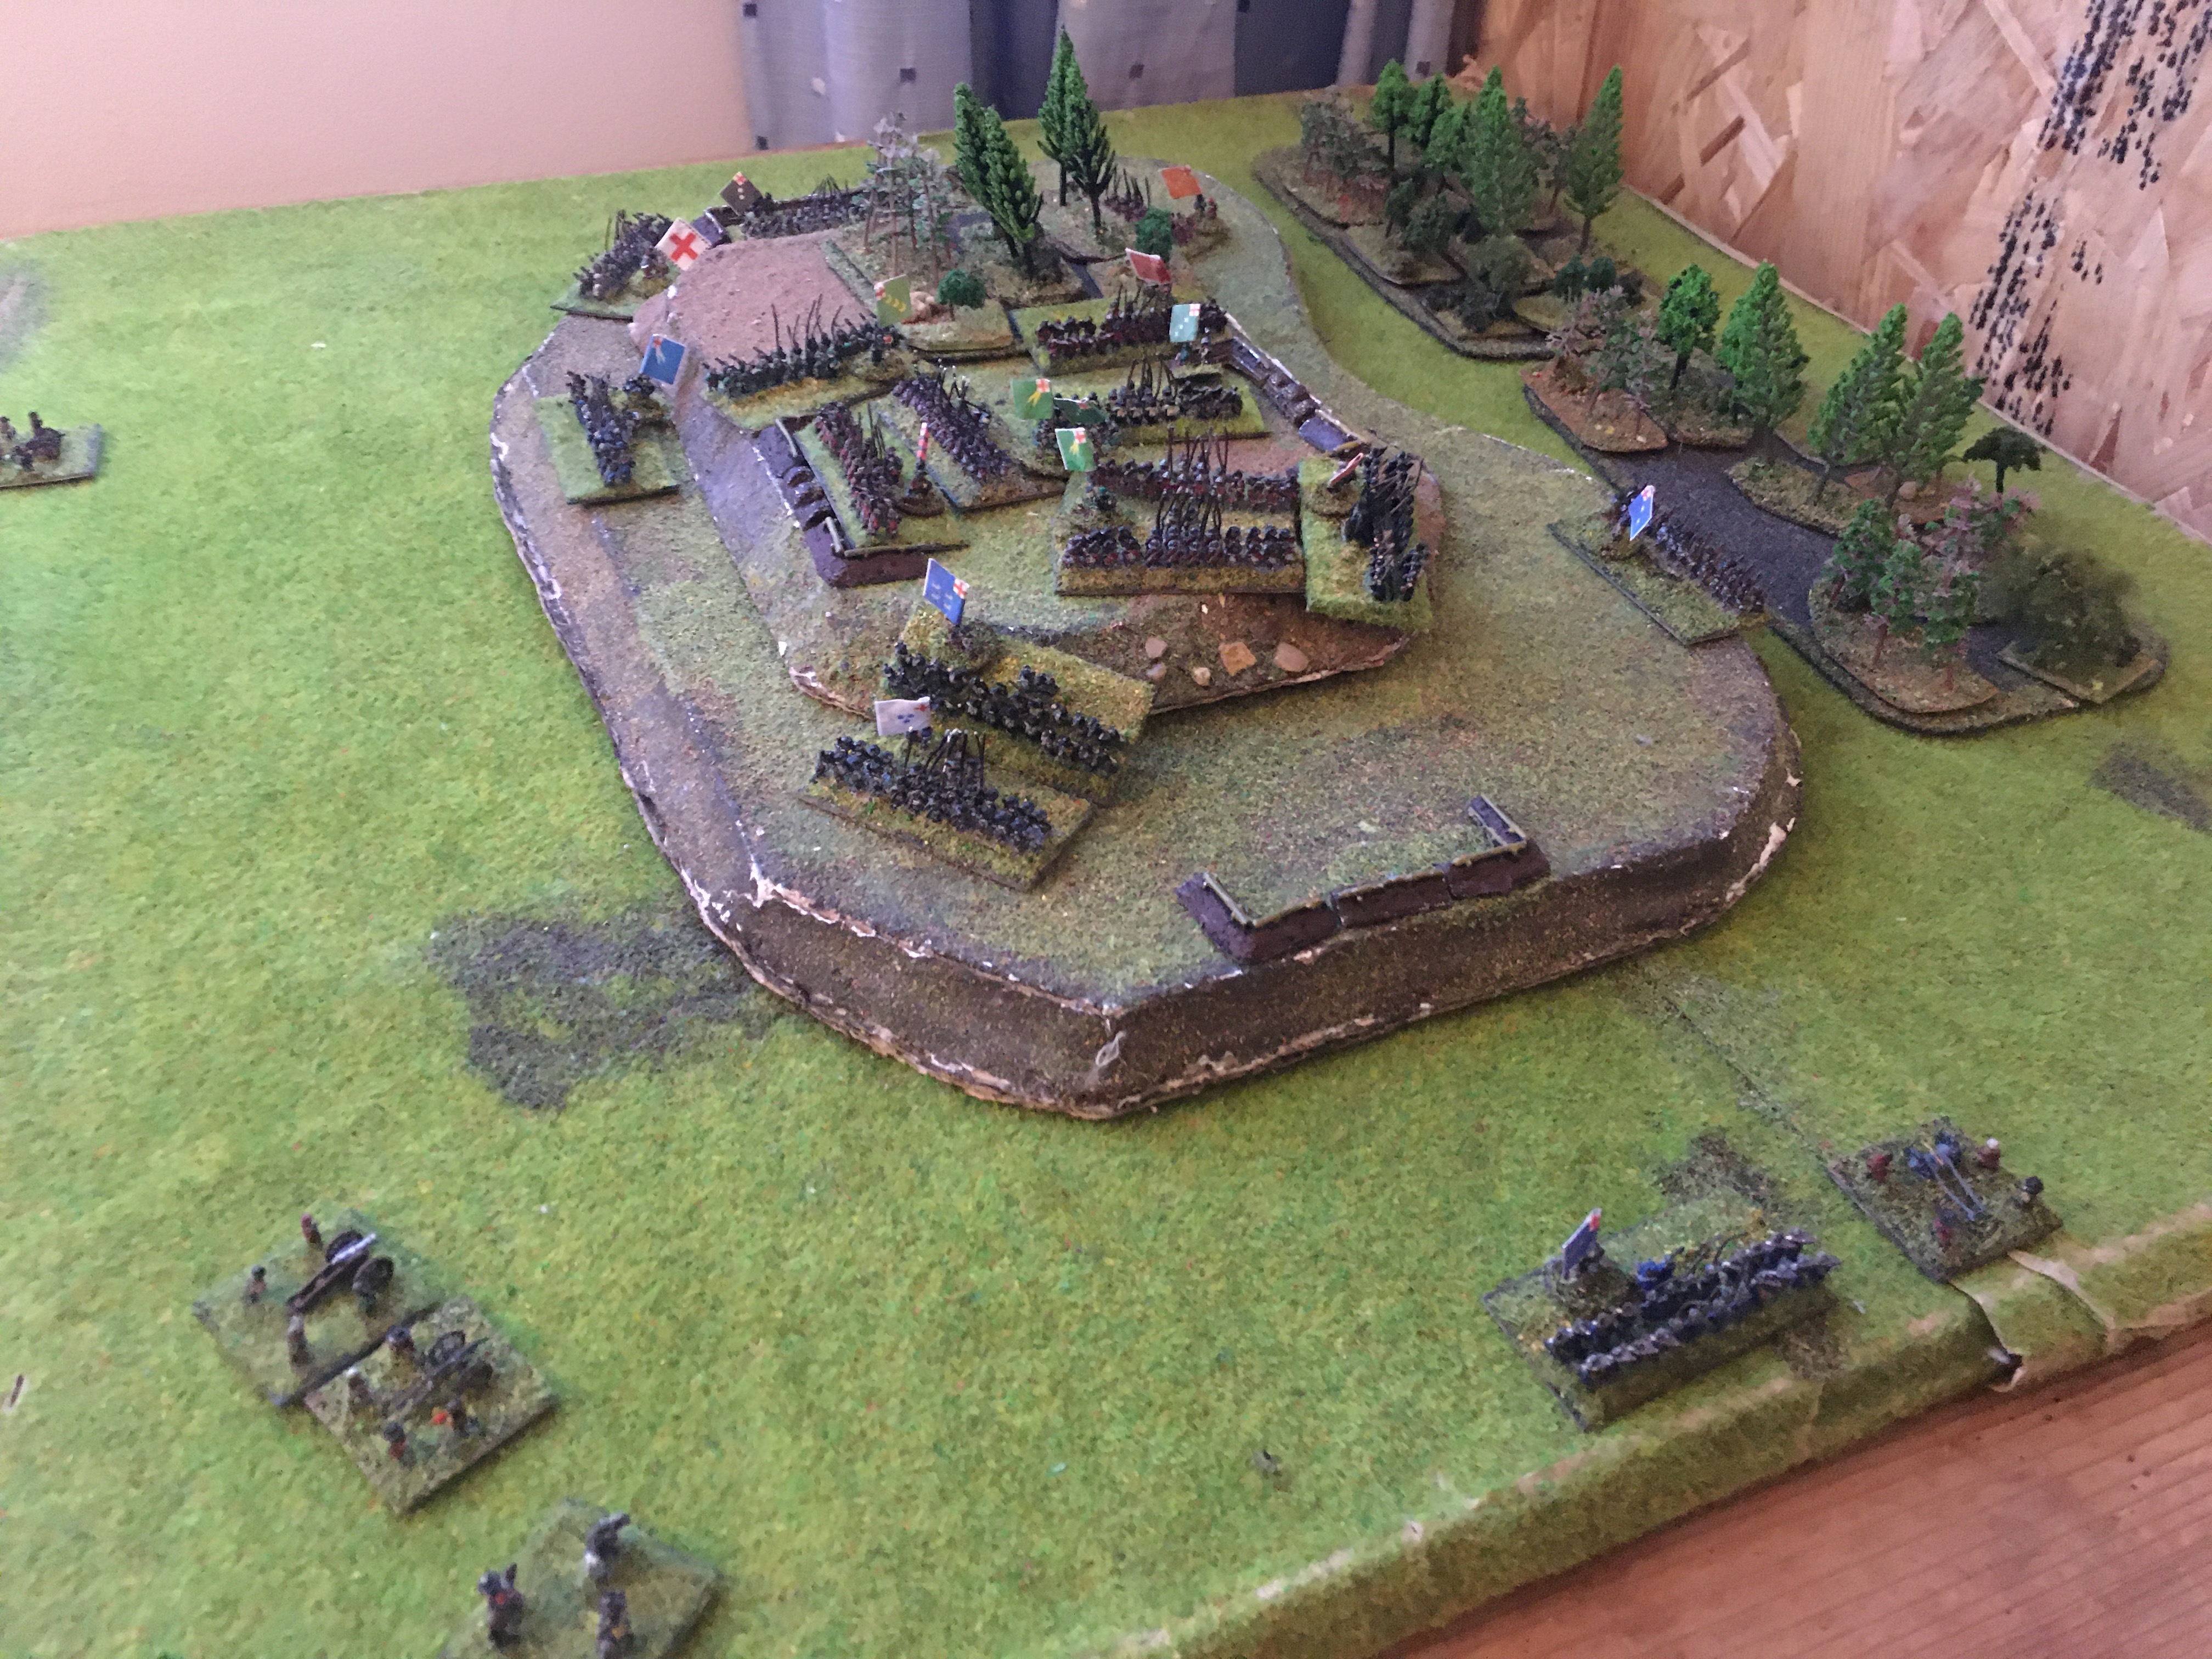
The first major battle of the campaign is now fought - it is an Austrian victory! The French suffer heavy losses and are pushed back. The Austrian casualties are somewhat lighter but not negligible.

This is the position after the battle. Sauret is in a slightly desperate position! However, some reinforcements (a new brigade, currently in Spezia) is coming forward to reinforce him.

There is a lot of fog-of-war happening at this point. The Austrian commander is aware of Modena and Bologna falling, but is not aware of what is happening around the southern crossroads. He therefore orders his Army to retire and concentrate on Modena, unaware that the French are really in a hugely difficult situation.

Day 10. Another battle is fought around the crossroads, and this time the French, being stronger (they have brought in new units to replace their losses in the previous battle, at the cost of great disorganization, but the Austrians have no supports in range) gain the victory. Their losses were somewhat greater, but very unfortunately for the Austrians, their army commander, Marshal Altenburg, is captured during the action!! Not only have the French managed to escape the trap, their opponent is disorganized and outnumbered at the key point of action. The French player commander is a truly Napoleonic high-priest of concentration, and despite the heavier losses he has suffered to this point, reaps the rewards here.

Day 12. Prince Liechtenstein, temporarily in command of the Army Reserve along with his own remaining troops of the Left Wing, retreats towards Modena and occupies it. Sachsen-Coburg's lead elements are in Parma, but the French troops are advancing fast towards the junction of the two armies (slight shades of the 100 days here?!)

Prince Liechtenstein was faced with a very difficult tactical choice here. He could defend Modena itself in strength - but then the Austrian main army would be surrounded and besieged, and would be unlikely to last out until the end of the game. He could leave a smaller force in Modena and try to concentrate with Sachsen-Coburg - but Modena would likely fall quite quickly, with the main French army between the Austrians and Modena and Bologna - probably losing conditions. Or he could fight outside Modena - stopping the French for two days would allow reinforcements to come, and he would then be in a position to strongly garrison Modena and maintain a potent field force. But losing the battle would mean that Modena would fall without fighting...

For better or worse, he chose the latter option. It did not go well, the outnumbered Austrians were defeated and the French occupied Modena.

The positions by Day 14. The French have captured Modena and are concentrated in front of it. Not an easy situation for the Austrians!

Day 17: The French have also taken Bologna, and re-established a line of communication that goes through Pistoiese rather than near Parma; Sachsen-Coburg's troops manage to ambush and defeat the rear of the French column as it moved past, causing some losses to the French but not fundamentally changing the situation.

Day 20: The Austrians under their new commander, Prince Hohenzollern, make another attack and take Modena - but with very severe losses. It is now very doubtful that they can really stand up to the French if the French should re-concentrate. The Austrian commander is no longer very confident that his army can stop the French.

Day 22: Sauret has re-grouped his forces. Liechtenstein withdraws slightly, leaving some troops to garrison Modena, which the French commander places under siege. He takes it by storm the following day, with only modest losses.
Day 24: The main Austrian army has withdrawn North, to defend its other cities and supply lines and depot. A small raiding force (an Austrian Grenzer battalion) causes quite a rumpus in the French rear around Rapallo, cutting off supplies to the main French army for a couple of days. Arnoux's Division is converging on it however, and destroys it the following day. Indirectly however, that Grenzer battalion caused really quite serious damage through the straggling, desertion and illness which resulted!
Day 26, and the last day of campaign action (the game rolled on for a couple of days, but nothing happened - neither side's troops had any orders which could affect anything). The French have succeeded in taking their objectives, despite the rather heavier casualties they suffered.

Game Notes: 

That was really interesting, and a lot of fun - at least for me! I think the players seemed to enjoy it mostly, and found it interesting. It was a hard game for both of them: the set-up is that the twop players (Napoleon and the Archduke Charles) are just 'off-table', issuing orders but can't get involved directly in the action. So as the action moved further from the SW corner (for the French) and from the NE corner (for the Austrians), news took 2-3 days to arrive, and subsequent orders took 2-3 days to reach the respondents, so the fog of war and confusion was particularly heavy. I made tactical decisions for the local French commanders and Austrian commanders as best I could, given their previous orders. Where there were two or more options, I let the dice decide. For example, the French cavalry regiment guarding the crossroads on Day 6 could have plausibly retreated East (on his main force) or West (onto his LoC). The commander decided to do the latter. I also used a similar mechanism for dealing with intelligence information from prisoners. The fog of war and delays prevented the Austrian commander from ever knowing quite how close he was to victory during the second week of the campaign.
 
The reason for doing it this way was to prevent commanders being unable to influence events at tactical battles they were actually present at. Of course, this is a very gnarly problem for every campaign. Let me summarize:
 
1 - Each player fights all the battles, commanding their own troops in F2F battles. Issue: when commanding battles, there is implied telepathy between the tactical commander and the overall commander. In this case, 'Grouchy' at Wavre would 'know' what 'Napoleon' wanted him to do at all times.
 
2 - Each player only fights the battles the overall commander is present at. Okay, but this means that a 3rd party, or the umpire has to control the opposition. This may be sub-optimal for all kinds of reasons, even if it could be practically done.

3 - Neither player fights any of the battles. But then, the tactical commander may totally 'get wrong' what the player-general would be able to literally shout in his ear, because they are co-located.
 
4 - Neither player fights any of the battles, because their persona can never be present. But this means that they are always days away from the scene of the action, which is almost anathema to actual Napoleonic generalship.

I went for #4. but probably in retrospect I should have gone for #3. So the players were in effect in a situation in real-life represented the situation on the wings: for example, Napoleon in relation to the Northern and Southern armies in 1812, or King Joseph and Jourdan in the Peninsular (possibly the closest comparison), or Napoleon and his detached corps in 1813 and 1814. So it certainly was done this way, but without the option to be at the vital point.
 
The hardest tactical decisions for me concerned cities and how many troops to garrison with. This is because the solution is mathematically computatable if you know what the enemy might do. This made it hard for me, since I did in fact know! So I am still unsure whether Prince Liechtenstein (i.e. me!) made the correct decision outside Modena, since my internal deliberations would have to be 'known' to General Sauret, in some sense.

I think the campaign rules worked generally pretty well. The stacking limits were pretty harsh and unrealistic, but I think if we think of a battalion representing a brigade, it sort of makes more sense. Northern Italy is quite a big place for the size of forces stipulated in the scenario. On the other hand, they did make it easy to administer the action and made sure that I could always set up the tactical actions quite easily. Rolling for terrain is sometimes a bit unintuitive (Liechtenstein's terrain rolls for the Modena battlefield were awful!) but seems to be more achievable than the alternatives.

The out-of-supply rules were a bit harsher than I perhaps intuited when I was modifying the rules. I used a simple mechanism of an out-of-supply unit receives the equivalent of a normal musket shot. This gives units perhaps a 1-in-10 chance of being eliminated. It is impossible to eliminate units in towns this way, but the odds are worse for units in rough terrain. There is somewhat more chance of them being 'shaken'; this only means they have to rally the next day, which is normally fine, except then there is a 1-in-10 chance of being eliminated at this point too. So perhaps this was overall a little harsh, although it did also seem to work quite well at the army level. I need to number-crunch the odds a bit more though.
 
I deliberately just wanted the players to concentrate on the commanders' roles. I didn't want them to do any staff work, I took that on. It felt both more fun for the players and more realistic really. I will be interested to know if players wanted to do more of the organizational work or if they were happy that they didn't need to do it, or if they wanted more visibility of it (e.g. more morning states) without necessarily doing it more.
 
We took the campaign at a reasonably leisurely pace, which worked well for 1 umpire and 2 players. I think it would be difficult to increase the number of players too much though without much more formal and demanding systems.  However, I think I could maybe run a couple of these campaigns simultaneously, without too much trouble. I learnt a lot about the mechanics of running the campaign, so I think I now have a decent system for running these things, after a few moments of awkwardness early on. I also have some ideas about how to run it faster, but with more colour and atrmosphere too, if I do any more.
 
I will put out the camapign notes as a separate page soon, perhaps with a sample of the reports and orders sent, to give a feel for that. I will do the battle reports themselves at some point and link to them, but I wanted to get the campaign summary out first. 

I am really pleased that, at least once, I have run a wargames campaign in the 'classic' style of Barker, Grant, Featherstone et. al. It wasn't as hard as I imagined it might be - the blogging of Paul Leniston has really helped over the years work out where the difficult bits actually lie and how you overcome them - and I would recommend giving it a try - it really is quite thrilling to be part of it all unfolding in ways you wouldn't have imagined yourself.


Friday, 5 April 2024

Neil Thomas-esque: "The Relief Force" (Rowton Heath re-skinned)

As part of my recent interest in using Neil Thomas' scenario design methods, I gave this very old Rowton Heath scenario, back from Miniature Wargames 001, the Neil Thomas-esque treatment.


This is the scenario I have added as a separate page, so I won't re-hash the actual details here, but will instead have a think about how certain concepts are handled. Additionally, for context, I have played this scenario at least twice before: here, using Polemos: ECW and here, using the Pike & Shot period rules in Neil Thomas' Wargaming: An Introduction book.
 
In One Hour Wargames-type scenarios, the things to note from my point of view are:

Real force composition doesn't matter 'too' much, unless there was something very particular about it i.e. a side must have an artillery battery to win or whatever.
Terrain comes in a limited number of varieties and sizes. This is really useful for a cutting down the amount of terrain you need.
Terrain is entirely functional. Now, this doesn't or shouldn't stop one using pretty scatter terrain, but what it does mean is that if the military effect of say some earthworks and a built-up area are the same, then it doesn't matter which one you use.
Slightly modifying terrain positioning for overall effect is a good thing.

Anyway, just for completeness, a quick run down of the actual playthrough (I used my WSS British and Franco-Jacobites, with the British being the Parliamentarians and the Jacobites naturally supporting the Stuart King!):

The Battle:

The British infantry attempt to storm up the road

After a brief fight, the Irish regiments and French Dragoons rout the leading Scottish battalion

The British re-group for another go

Again the British take heavy casualties on the approach...

But this time, they hold on and their own close range fire pushes back the French Dragoons and Jacobite Horse

However, another deadly exchange of musketry fire in the centre leads to the Irish bloodied, but the Scots are broken!

Which leads to a wider panic!

Some British Dragoons arrive to help outflank the Irish infantry - the odds aren't looking great here though

The battle peters out, and the British withdraw, unable to see a path to victory.

Game Notes: 

The scenario worked okay, although the potential deadliness of Ruse de Guerre meant that the first infantry battle was over before the flanking force could arrive to help them! I think playing the Polemos:WSS rules would have worked better for a horse and musket battle. I should probably have another go at this with the Neil Thomas Pike and Shot rules, or adapt his Simplicity in Practice horse and musket rules for the ECW using his concepts and calibration within the Pike and Shot rules for a game more focused on this size of battle. Anyway, good fun and the scenario seemed to work okay.

Figures by Baccus 6mm, buildings by Leven, fortifications by Irregular.

Just for contrast, here is an image of the set-up for the Polemos:ECW game:

and this is the one for the NT:WAI game


Germanstown - a Thomas-esque interpretation

I am really into the 'Neil Thomas-esque' at the moment: scenarios reduced to some quite bare essentials, played on a small board, but retaining the key features of those scenarios and remaining full of tactical interest despite the small size, optimized for easy set-up and quick play. Recently, I had a go at translating Germanstown into this format.

I used a couple of existing scenarios as the basis for this one: one by Arthur Harman in Miniature Wargames #29, and one by Steve Jones in Wargames, Soldiers & Strategy #89 - some serious scenario writing capability there!

That is a very very nice cover image!

Not that this one is bad!

In contrast to my usual practice, I think it is worth posting a picture of the initial laydown up-front, to aid discussion.

So, a very simplified battlefield and some of the area that the American left came down (i.e. off-table to the right) is omitted; that portion of troops will instead arrive in any unoccupied part of the right-hand table above Germantown at a random point in the game. The objective for the Americans is the camp behind Germantown (bottom). Germantown itself is considered as Woodland for tactical purposes, rather than Buildings. In the scenarios given, this seems to reflect the tactical reality somewhat better. The farm by contrast is counted as hard cover. I could perhaps have added more marshes to the stream, but the woods used would probably suffice I thought.

To reflect the British getting their act together over time, they were limited to a number of force activations equal to the number of the turn, so it will take them some time to get into proper battle array.

The Forces:
The British:9 bases of Infantry (2 Well-Trained), 2 bases of Cavalry, 2 bases of Artillery
 The Franco-Jacobites (for the Americans): 9 bases of Infantry (4 Poor), 1 base of Cavalry, 1 base of Artillery
 
All troops on both sides Trained except where specified.

3 bases of the Franco-Jacobite infantry, the cavalry and an artillery unit would arrive on the right-hand road, 4 bases of infantry and an artillery unit on the right-edge, and the balance by the left-hand road (as seen from the British side)
 
The Franco-Jacobites would arrive periodically by the right-hand road, left-hand road, or on the right edge. In essence a die was rolled each turn, with 3,4 indicating 1 base could be brought on, 5,6 indicating 2 bases.
2 bases of British infantry would arrive by the right-hand road (bottom edge) on Turn 8. This must include at least one of the Well-Trained units.

I used Polemos: Ruse de Guerre as the ruleset for the battle, with my WSS-themed forces for a generic horse and musket action, rather than trying too hard to bring out the specific tactical qualities of the AWI.


The Set-Up:

The British force just coming out of its encampments at the approach of the Franco-Jacobites. There is a detachment in the farm (top-right)

A closer look at Germantown (foreground) and Chew House (background).

The Battle:

The Franco-Jacobite infantry aadvance; Chew House is now supported by the first British brigade - Leven's and Fergusson's Regiments.

More Franco-Jacobites arrive - the Scots regiments deploy to face them

As the battle continues, the Irish units push their Scots' opponents backwards; Chew House still seems fairly secure though, as the regiment opposing it and the artillery don't seem able to get forward.

The two Scottish regiments launch a bayonet charge after the musket volley - Berwick's Regiment is looking shaky...

Berwick's Regiment is routed but Clare's Regiment is holding on, if a bit battered - French Horse comes forward to fill the gap

More British troops being to reach the battle line

Fire forces back the Franco-Jacobite Horse, with loss; Clare's Regiment is still just about hanging on though


Until the pressure becomes too much and it breaks! At least the fire is starting to tell against the lead Scottish battalion (right)

Royal Eccossais now holding the line for the Franco-Jacobites, even if they were disordered by the rout of Clare's men.

Two French regiments arrive on the British flank! That wakes everyone up...

More French units arrive on the opposite flank too

With some very quick thinking, the British manage to get in some kind of order and defeat the French flank attack, after losing one of the Scottish battalions

The Franco-Jacobite attack has petered out, and Lord Berwick calls off the attack


Game Notes:

The scenario worked pretty well, I was pleased and a good vindication of the Thomas-esque approach. The Franco-Jacobites had some struggles but I think a lot of that was more due to bad luck in both the rolling for arrivals and in the combat rolls, rather than a fundamental scenario imbalance past a certain level of advantage to the British. It should be 'difficult' not 'impossible', is what I am going for. Anyhow, it played quickly, looked quite nice, and was easy to set-up. Not much not to like! Ruse de Guerre continues to be very good fun, although with a sneaky suspicion that the firepower effectiveness is just a notch too high and the action point system calibrated a tiny bit too permissively. However, all that is both marginal and highly arguable - they work really well, I guess is the main point.
Figures by Baccus 6mm, buildings a mixture of Leven and Battlescale.

Sunday, 18 February 2024

Stratton: A Polemos ECW Refight

The Battle of Stratton took place in Cornwall in 1643, and was a significant victory for the Royalist cause in the South-West of England. It was written up as a scenario in a very early issue of Miniature Wargames, number 13. 

The issue is quite an interesting one historically, as it contains Paddy Griffith's The Case Against Toy Soldiers, which seems to have caused quite a stir at the time. It also contained this Battle of Stratton article, by Paul Eaglestone. This in turn was paired - and in the pdf scan I have, which seems to have reflected the genuine published magazine, it got jumbled up with - an ECW terrain article, which was written by Ian Weekley, a long-time contributor to Miniature Wargames. Was he the first regular 'terrain guru' in a wargames magazine? It felt like that to me reading magazines in retrospective, although of course that impression could be very wrong. In any case, he did sometimes include a scenario with his terrain piece, so one might have confused the authors quite easily here!

Anyway, back to the scenario. The set-up is tactically very interesting: a larger army on a hill and partly entrenched is surrounded by a smaller army. In most rules, that is one of the hardest obstacles to overcome so it is quite a good test to see by how much troop quality, leadership and good tactics can overcome some of the worst tactical modifiers troops are likely to incur. I played it with Polemos: ECW.


The Forces:

Royalists:
C-in-C: Hopton (Decisive)
1 base of Musketeers (Shot only, Trained-Elite)
5 bases of Foot (Pike Heavy, Trained-Elite) 
4 bases of Artillery

Parliamentarians:
C-in-C: Stamford (Poor)
11 bases of Foot (Shot Heavy, Raw)
5 bases of Artillery (Raw)

Obviously a lot of this is very arguable! In this scenario, I trialled an authorial suggestion to revise the artillery to make it somewhat more effective than in the book - more on this in the game notes.

The Set-Up:

The Parliamentary forces on the hill, the Royalist forces surrounding it. The Royalist musketeers are in the woods. The entrenchments were not particularly extensive or effective, so are only considered a '-1' piece of linear terrain, rather than proper earthworks.  The slope to the East (i.e. right) is steep, the other slopes are gentle.

A closer look at the bottom of the hill: Hopton looks on (bottom-left)

And from a bird's eye, from the West looking East. Note the blue flag of the Royalist Musketeers' in the woods (top)
The Battle:
Apart from an artillery exchange, in which one of the Royalist units suffered some losses (top-left), the main action was with the musketeers at the edge of the wood (right); after wearing down their Parliamentary opponents, the musketmen see them wavering and charge in

A closer look - can the musketeers take advantage of the Parliamentary Foot's discomfiture?

One of the Royalist regiment's endures more casualties from the Parliamentary guns on the hill

The Parliamentary pikemen reform and send back the Royalist musketeers - the musketry exchange resumes.

Feeling that he must get a move on before the Parliamentary artillery fire hurts too much, Hopton orders two more columns forward...

Elan carries the Royalists up the slope, despite the intensity of Parliamentary fire

Meanwhile, the Royalist musketeers are causing more losses on the right

Parliamentary foot moves into a better position to resist the advancing Cornishmen...

The Royalist musketters make another rush forward, after seeing the Parliamentary regiment wavering once again

The main Royalist column has struggled to get forward for a while, held back by the intensity of the fire, which was ferocious without ultimately being that damaging - but eventually the Cornishmen get moving again

The Royalist Foot on the other side of the hill manage to carry out a neat simultaneous attacak which leaves the Parliamentary Foot somewhat flat-footed, and then the Royalists are on them!

Eventually, the Parliamentary Foot at the South of the hill gives way, both flanks more or less simultaneously - on the crowded position, two more regiments immediately joint the flight!

Although the Parliamentary Foot on the other side of the hill managed to hold off one attack, the flank attack proved decisive, and the regiment breaks...

Very shortly, regiment after regiment breaks and runs for the gap in the ring to the North-East, abandoning guns and equipment as they flee

Organized resistance collapses

Game Notes:

Quite a fun, neat game. Given the more-or-less historical result, perhaps my judgements about troop qualities weren't so far off. The behaviour of closely packed troops in the Polemos ECW rules does allow for the kinds of collapse which seem to have happened in reality, which is good.
The artillery did actually become a little too effective perhaps. The original rule is that artillery fire incurs a -1 for each base width of range beyond the first. The problem here is that artillery basically becomes entirely useless, since the best it can hope for is maybe a single maybe-effective shot. Incidentally, it is a lot more effective against pike-armed troops than musketeers, which is interesting! So David Heading suggested not introducing the penalty until after 4BW. But this then allowed plenty of fire against attackers. I had retained the generic +1 to all musket fire, since otherwise pikes are just too much better than muskets to be credible.
This stable of Polemos rules (ECW, SPQR, Counter-Reformation) I think is one level harder to play than the other stable (General de Division, Marechal de l'Empire, Ruse de Guerre, WSS). It is hard to work out why exactly but I suspect it is partly that the modifiers and attack sub-routines just seem a little bit harder too manage - perhaps there are just a few more factor to deal with. But noticeable nonetheless, especially compared to Ruse de Guerre, which is a lot smoother. But that said, a fun game and a convincing result, in both senses of that.

Figures by Baccus 6mm, earthworks from Irregular.