Heretical Gaming is my blog about my gaming life, featuring small skirmishes and big battles from many historical periods (and some in the mythic past or the far future too). The focus is on battle reports using a wide variety of rules, with the occasional rules review, book review and odd musing about the gaming and history. Most of the battles use 6mm-sized figures and vehicles, but occasionally 15mm and 28mm figures appear too.

Monday 28 March 2016

TFL Scottish Corridor Campaign: Battle 01 "Encounter at Le Valtru"

I have started to have a go at the next TooFatLardies' Pint-Sized Campaign, The Scottish Corridor.


The first battle is an encounter battle between elements of SS Kampfgruppe Weidinger and the 7th Seaforth Highlanders.  I used the WRG 1925 - 1950 rules along with the Threat Generation System from Miniature Wargames 373.

I took the Scots and used the cards to randomaly generate the German forces.

British Orbat:

1 Platoon of British Infantry
2 additional rifle squads
1 Churchill VII

The Battle:

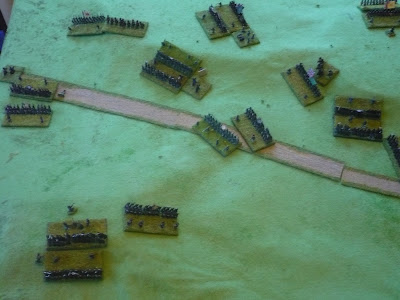
The village of Le Valtru in the centre; British approaching from the right with the Churchill on the road


View from behind the British platoon

Same, from the other side of the road

A Pak40 advances down the road, is fired at but missed by the Churchill and sets up at the corner of the village; the British infantry poke gingerly towards the centre of the village

One can see the various British rifle squads advancing in this shot (some are in the houses); the Churchill is at the edge of the bridge

A Tiger I turns up! Luckly for the Scots, the cool British tankers despatch the Tiger with one frontal shot!


British infantry working around the flank start firing on the German anti-tank gunners

Same position, wider context; the German crew was quickly eliminated


A small group of German engineers ambush British infantry moving through the church, eliminating a rifle group

 
The Scots suppress and eliminate the German engineers in short order, but a German grenadier squad then repeats the process on another British squad moving into the last building in the village (closest); extremely accurate MG42 fire eliminates another British rifle group


The Scots pour down fire on the German grenadiers and bring up the Churchill to support them; accurate rifle and Bren fire kills the German machine-gunners
A textbook infantry assault eliminates the last German infantry; the Churchill VII then brewed-up an advancing Flammpanzer III (just below-left of the crossroads) and the game ends


Outcome:
The Scots lost two rifle groups (8 men) killed and wounded, whilst the Germans lost a Tiger I, a FlammpanzerIII, a Pak40 anti-tank gun, two rifle groups and two machine gun groups (12 men).

Game Notes:
A relatively easy victory for the British, as the random generator generated the German vehicles coming in dumb up the road, whilst no German infantry was generated until the British had already secured the village and occupied excellent defensive positions.  When the Germans did get to fire, they were extremely effective!  But luckily for the Scots, they were generated in such a disjointed way that I didn't feel the result was in much doubt unless the Scots' dice rolling was truly awful.
I think I do need to have a think about how the generation system works in this kind of encounter battle to make sure the Germans have a fair go in this scenario.  I need to consider how much of this game was just bad luck for the Germans and how much (if at all) the system was against them.  Obviously all the Germans can't be generated straight away, because that is an attack/defence game rather than an encounter battle.  Off the top of my head, it may be better to give the British two or three free moves (on the proviso that they don't advance further than 150m - i.e. three infantry moves) but then maniuplate the threat deck to permit a much higher chance of activating hostile forces.

Played on a 3'x2' table, the game took about 35 minutes.

Sunday 27 March 2016

Peninsular War Campaign Summary - end of March 1809

Situation at the end of March 1809:


Summary of Events:

Portugal: The main focus of events was on the Imperial pursuit of Wellington and his Spanish allies into Portugal along the North bank of the Tagus.  By dint of very hard marching and the acceptance of high levels of sickness and desertion, the French were able to catch the two Spanish armies and inflict great losses upon them at Zereira.  Wellington was unable to reach his Allies in time and knowing that the Spanish must collapse and surrender if caught again, concentrated his forces around Abrantes.  Joseph, despite the dire supply situation, continued the pursuit and the two armies fought a huge battle, with the Allies achieving the victory in the end, as Wellesley made use of his "rear slope" deployment to shelter from the French artillery then launched a counter-attack, which proved decisive.  The French were forced to quickly withdraw to the Spanish side of the border around Coria, whilst Joseph quickly called forward a few uncommitted divisions to bolster his battered army.
At the end of the month, the Anglo-Spanish fleet re-deployed Cervellon's Army of Valencia back to Cadiz, ready to re-fit after being reduced to the size of a weak division only (many of the remaining troops were transferred into the Army of Andalusia instead, which is still in Lisbon).

Galicia & Leon: Mahy kept a safe distance away from Soult until news of Abrantes reached both sides, when Soult withdrew to Zamora, with the intention of being able to support Astorga or provide a rallying point for Joseph, if this should be necessary.

Catalonia & Aragon: Junot maintained his recent run of successes by defeating the combined armies of Cuesta and Palacio at Amposta in which Palacio was killed and subsequently replaced by General Sarsfield.  In order to save the structure of the armies, the Anglo-Spanish navies transported both Sarsfield's and Cuesta's armies to Cadiz, whilst leaving strong detachments to garrison Tortosa and Tarragona.  St-Cyr has moved into the area too, preparing for a French advance down towards Valencia in the near future.  Unfortunately for him, his attempted coup de main at Tarragona was unsuccessful.  Napoleon, pleased with Junot's recent performance has informed him "he will find his baton in Tortosa and Tarragona".


Andalusia: Elio has finished concentrating 25,000 men and has begun to march northwards towards Madrid (which is still in Spanish hands, as the Imperials have not actually been able to spare any troops to occupy it yet.

Orders of Battle

Note just how many of the forces have been severely mauled in the last couple of months.

Imperial Forces:

VIII Corps (Junot): 3000 Infantry, 1000 Cavalry, 24 Guns at Tortosa
Travot's Div: 5000 Infantry at Tarragona

II Corps (Soult): 20000 Infantry, 4000 Cavalry, 24 Guns at Zamora

Army of Spain (Joseph): 11000 Infantry, 14000 Cavalry at Coria and west of Coria
Merlin's Bde: 1000 Cavalry at Pamplona

I Corps (Suchet): 8000 Infantry, 3000 Cavalry, 36 Guns, west of Coria

IV Corps (Lefebvre): 3000 Infantry, 12 Guns, west of Coria

III Corps (Moncey): 2000 Infantry, 1000 Cavalry, 36 Guns, west of Coria

VI Corps (Ney): 13000 Infantry, 36 Guns

V Corps (Mortier): 9000 Infantry, 36 Guns

VII Corps (St-Cyr): 17000 Infantry, 2000 Cavalry, 36 Guns
Souham's Div: 6000 Infantry
Chabot's Div: 3000 Infantry

Garrisons:
Perpignan: 13000 Infantry
Barcelona: 1000 Infantry
Gerona: 1000 Infantry
Figueras: 3000 Infantry
Bayonne: 5000 Infantry
Valladolid: 5000 Infantry
San Sebastian: 2000 Infantry
Pamplona: 4000 Infantry
Astorga: 2000 Infantry
Burgos: 2000 Infantry
Tudela: 1000 Infantry
Zaragoza: 7000 Infantry

 Spanish Forces:

IV Army (Elio): 20000 Infantry, 4000 Cavalry, 12 Guns, SW of Valdepenas

Army of Andalusia (Castanos): 8000 Infantry, 2000 Cavalry, 12 Guns in Lisbon

Army of the Centre (Cuesta): 5000 Infantry, 3000 Cavalry, 12 Guns in Huelva

Army of Galicia (Mahy): 29000 Infantry, 24 Guns in Ponferrada

Army of Valencia (Cervellon): 3000 Infantry, 24 Guns in Cadiz
Adorno's Division: 1000 Infantry in Lisbon

Army of Catalonia (Sarsfield): 3000 Infantry, 12 Guns in Cadiz

Garrisons:
Cadiz: 8000 Infantry
Seville: 6000 Infantry
Malaga: 2000 Infantry
Granada: 1000 Infantry
Ciudad Rodrigo: 2000 Infantry
Badajoz: 6000 Infantry
Coruna: 2000 Infantry
Cartagena: 4000 Infantry
Murcia: 2000 Infantry
Valenica: 1000 Infantry
Tarragona: 4000 Infantry
Hostalrich: 3000 Infantry
Tortosa: 3000 Infantry

Anglo-Portuguese Forces:

The British Army (Wellington): 40000 Infantry, 4000 Cavalry, 96 Guns at Abrantes
Hamilton's Div: 2000 Infantry at Lisbon

Garrisons:
Gibraltar: 6000 Infantry
Almeida: 1000 Infantry


Friday 25 March 2016

English Civil War / Wars of the Three Kingdoms Battles for Polemos

A while back I made some notes on the sizes of battles in the ECW (I'm using this acronym because it is well-known but believe that Wars of the Three Kingdoms is a much better title).  The basic idea was to work out which battles could be fought with the Baccus 6mm basic armies and Polemos ECW rules and which would need reinforcements.

The contents of a starter army are:

8 bases of foot (4000 foot)
12 bases of horse (1500 horse)
2 artillery bases (4 guns)

Numbers are given below for troops or number of guns, figures in brackets indicate the number of bases according to standard Polemos ratios viz.
1 base foot = 500
1 base horse = 125
1 base dragoons = 250
1 base artillery = 2 guns

I have quite a laissez-faire attitude about using troops in different areas, so I'm perfectly happy to reset Auldearn for English armies (or reset Stow-on-the-Wold for Montrose and Covenanters, if I were to paint up those armies).  Essentially this means that if I have two armies with eight bases of foot each and a scenario calls for one side to have six and the other ten, I will simply transer two regiments to the other side.  It feels quite appropriate for this period!  And it also limits how many extras I need.

The numbers are taken from wikipedia or from published wargames scenarios and are not the last word in accuracy.  The only purpose of this guide was to indicate to me the sort of numbers required for refighting each battle.  Any additional information would be very welcome. So, for the first civil war

PLAY FROM THE BOX 

Powick Bridge: Royalists 1000H (8); Parliament 1000H (8)
Braddock Down: Royalists c.4500F (9), 500H/D (4), 2G (1); Parliament c.3500F (7), 500H (4), 2G(1)
Leeds: Royalists 1500F (3), 500H (4); Parliament 3000F (6), 900H(7)
Chalgrove Field: Royalists 1000H(8); Parliament 1000H(8), 150D(1) (proxy dragoons with horse whilst mounted, foot while dismounted; or just treat them as poor horse)
Gainsborough: Royalists c.1000H?(8) Parliament 1200H(10)
Stow-on-the-Wold: Royalists 3000F(6), 500H(4); Parliament 2500F(5), 600H(5)

PLAY FROM THE BOX WITH A COUPLE OF ADDITIONAL PACKS PER SIDE

Hopton Heath: Royalists 100F, 1000H(8), 4G(2); Parliament 1500, 4G (including at least 1 base of dragoons)
Stratton: Royalists 2400F(5), 500H(4), 8G(4); Parliament 5400F(11), 200H(2), 13G(6)
Nantwich: Royalists 2000F(4), 1800H(14); Parliament 4500F(9), 1800H(14), 500D(2)
Shieldfield: Royalists 3000F(6), 500H(4), 250D(1), 2G(1); Covenanters 4000F(8), 375H(3), 250D(1), 8G(4)
Cotes: Royalists 1000F(2), 1000H(8); Parliament 500F(1), 2100H(17)
Montgomery: Royalists 2800F(6), 1400H (11), 300D (1); Parliament 2500F (5), 1500H (12)
Tippermuir: Royalists 2000F(4), 150H(1); Covenanters  7000F(14), 800H(6)
Auldearn: Royalists 1300F(3), 250H(2); Covenanters 3600F(7), 300H(2)
Alford: Royalists 2000F(4), 300H(2); Covenanters 2000F(4), 600H(5)


MEDIUM BATTLES, REQUIRING ONE OR TWO BOOSTER PACKS PER SIDE

Lansdowne: Royalists 4000F(8), 2000H(16), 300D(1), 16G(8); Parliament 1500F(3), 2500H(20)
Roundway Down: Royalists 2000F(4), 1800H(14), 2G(1); Parliament 1800F(4), 2500H(20), 8G(4)
Winceby: Royalists 3000H(24); Parliament 2000F(4), 3000H(24)
Storming of Bolton: Royalists 6000F(12), 2000H(16); Parliament 4000 (mainly F)
Rowton Heath: Royalists 3500H(28); Parliament 1500F(3), 3350H (27)
Kilsyth: 3000F(6), 500H(4); Covenanters 7000F(14), 800H (6)


BIG BATTLES REQUIRING THREE OR MORE BOOSTER PACKS PER SIDE

Edgehill:
Royalists 9100F(18), 2500H(20), 800D(3), 16G(8) (therefore need 10 extra foot bases, 8 extra horse bases, 3 dragoon bases, 6 artillery bases)
Parliament 12000F(24), 2300H(19), 700D(3), 7G(3) (need 16 extra foot bases, 6 extra horse bases, 3 dragoon bases, 1-2 artillery bases)

Turnham Green:
Royalists c.13000, proportions roughly similar to Edgehill
Parliament: c. 24000, proportions roughly similar to Edgehill, but increase by 40%

Adwalton Moor:
Royalists: c.10000
Parliament: c.3500

Aldebourne Close:
Royalists: 5000H(40)
Parliament: 10000F(20), 4000H(32), 20G(10)

1st Newbury:
Royalists: 7500F(15), 7000H(56)
Parliament: 8000F(16), 6000H(48)

Relief of Newark:
Royalists: 3000F(6), 3500H(28), 3G(2)
Parliament: 5000F(10), 2000H(16), 13G(7)

Cheriton:
Royalists: 3500F(7), 2500H(20)
Parliament: 6500F(13), 3500H(28)

Cropredy Bridge:
Royalists: 4000F(8), 5000H(40)
Parliament: 4000F(8), 5000H(40), 11G(6)

Marston Moor:
Royalists: 11000F(22), 6000H(48), 14G(7)
Parliament: 6000F(12), 5000H(40)
Scots: 11000F(22), 2000H(16), 500D(2), 40G(20) (I might consider reducing the number of these very light guns)

Second Newbury:
Royalists: 5000F(10), 3500H(28)
Parliament: 1200F(2), 7000H(56)

Naseby:
Royalists: 3300F(7), 4100H(33)
Parliament: 7000F(14), 6000H(48), 500D(2)

Torrington:
Royalists: 2000F(4), 3000H(24)
Parliament: 10000


The Battle of Abrantes mid-March 1809 - Peninsular Campaign Battle #21

The Battle of Abrantes, mid-March 1809

General Situation: King Joseph continued to urge the greatest activity on his Corps commanders, who, despite severe losses in sick and deserters, caught up with the Allied armies of Wellington and Castanos near Abrantes.  Although the two Allied generals could have evaded, they chose to engage, feeling that they were in a reasonably strong position and that a decisive victory could throw the French pursuit - in fact, the whole French plan of campaign, into disarray.  The scene was set, then, for a decisive clash.

Orders of Battle:

The Imperial Army:

I Corps
C-in-C Suchet (Decisive)
 Ruffin's Div: 6000 Infantry
Villatte's Div: 4500 Infantry
Treillard's Div: 3000 Cavalry
Artillery: 24 guns

IV Corps
C-in-C Marshal Lefebvre (Capable)
Sebastiani's Div: 3000 Infantry
Leval's Div: 1500 Infantry
Artillery: 12 guns

III Corps
C-in-C Marshal Moncey (Decisive)
Gobert's Div: 1500 Infantry
Morlot's Div: 1500 Infantry
Wathier's Bde: 1000 Cavalry
Grouchy's Div: 1000 Cavalry
Clausel's Div: 1500 Infantry
Musnier's Div: 3000 Infantry
Barbou's Div: 3000 Infantry
Artillery: 60 guns

VI Corps
C-in-C Marshal Ney (Decisive)
Bisson's Div: 6000 Infantry
Maransin's Div: 6000 Infantry
Mermet's Div: 4500 Infantry
Artillery: 36 guns

V Corps
C-in-C Marshal Mortier (Capable)
Rey's Div: 6000 Infantry
Gazan's Div: 4500 Infantry
Artillery: 12 guns

Totals: 52500 Infantry, 5000 Cavalry, 144 Guns

The Allied Army
C-in-C Wellesley (Decisive)
Anstruther's Div: 7500 Infantry
Spencer's Div: 6000 Infantry
Hope's Div: 6000 Infantry
Baird's Div: 12000 Infantry
Paget's Div: 3000 Cavalry
Lecor's Div: 1500 Infantry
Ferguson's Div: 3000 Infantry, 12 guns
Craddock's Div: 7500 Infantry
Otway's Bde: 1000 Cavalry
Artillery Reserve: 48 guns

Totals: 43500 Infantry, 4000 Cavalry, 60 guns

The Spanish Army
C-in-C Castanos (Capable)
Venegas' Div: 3000 Infantry
Coupigny's Div: 3000 Infantry, 12 guns
Espana's Div: 1500 Infantry, 12 guns

Totals: 7500 Infantry, 24 guns

So very similar forces on both sides, except for the French artillery advantage

Deployment:

The Allies deployed on the reverse sloe of a long ridge dominating the position (top); the French approach from the south.

Showing more of the French right flank: Suchet's I Corps is around the woods (bottom-right), opposing the Spanish on the hills (top-right); Moncey's III Corps faces the division of Baird by the road; Lefebvre's small IV Corps is bottom-centre, between wood and the road.

Same position, but this time including more towards the French left: Mortier's Corps can be seen towards the left, then some of Ney's artillery and infantry (extreme bottom left); on the Allied side, at the top from the left in reserve are Lecor, Otway, Craddock, Paget and Ferguson; in the front-line, from the left, are Spencer, Hope and Baird; elements of the Anstruther's Division, opposing Ney, can be seen occupying the isolated hill on the left

View of the Allied right from behind Mortier's Corps

View of the Allied Left from behind Suchet's Corps

Ney's VI Corps on the French Left Wing opposed to Anstruther's Division occupying the advanced hill
 Ney's First Assault:

Marshal Ney personally leads the assualt from the front (where else should he be!); leading elements of Bisson's and Maransin's Division straight up the hill, whilst Mermet's troops go right-flanking

Same position, seen from behind Mermet's troops

Bisson's attack (left, just out of shot) was bloodily repulsed, but Ney, personally leading Maransin's infantry, have routed a British brigade and captured 12 guns, and are pursuing the retreating British down the hill!

As mentioned above, Anstruther managed to hold onto part of the hill - the summit and the forward slopes by chasing Bisson's infantry back past its starting point
 The Central Attack - Moncey and Lefebvre:

Moncey's IIIC orps and Lefebvre's VI Corps advance to test and pin the Allied centre.  (Lefebvre on the French right)

After a short but intense fight, the British light infantry rout the attacking Wurzburgers of LEfebvre's Corps.  Initially this looked like it was going to go the other way!  But the British got their act together and led by the 43rd , defeated the Germans.

Sebastiani's troops defeat the British Guards!  They flee to the rear...

A very strange result: Sebastiani's troops defeated Ferguson's counter-attack...but then pulled out themselves having lost too heavily and being in too exposed a position, as Moncey's troops were too slow to support him

Same position, different shot

Ferguson's troops, battered and broken, in full retreat

Lefebvre in full retreat too: still, the French are well ahead on the exchange, an excellent opening to the battle
 Ney's Second and Third Assaults

Ney simply needed to clear that hill in order to bring his powerful artillery into play: therefore he prepares another assault

The French suffer heavy losses and a beaten-off assault but clear the hill in the end; the British and Portuguese troops on the far side of the valley have repulsed Maransin's attempts to exploit this however (note the casualties)

Moncey's Central Assault and the Great Counter-Attack

Moncey advances, but Wellington leads elements of Hope's Division and Paget's cavalry into a disrupting counter-attack: the French are thrown back and the British Dragoons capture 12 French guns


Mortier's V Corps advances to support Moncey's left flank; the remainder of Hope's Division looks dangerously exposed

A wider contextual shot: III Corps and V Corps continue their attack (note Morlot's Division climbing the hill just left of the road); but the remainder of Moncey's Division is under heavy pressure from the British (right, along the road)

The attack of Mortier and Moncey advances up the slopes      

And is crowned with success!  The ridge is taken at its central point, and Hope's troops are repulsed.  Baird's reserves approach from the right to try and restore the situation

Spencer's Division (left) has managed to hold on...but will it be hit in the flank when Moncey and Mortier reform their troops?

But on the central road, the British have enjoyed complete success, as Gobert's and Barbou's Divisions are both routed and the French artillery is at the mercy of the British brigades; the French centre has been pierced and Suchet is split from his comrades

Wellington's reserves restore the situation in his right-centre: the French are thrown back and the ridge is again in Allied hands

This defeat proves too much for Moncey's III Corps, which collapses and flees the field
Suchet's Attack

Suchet leads his troops forward to attack Castanos' Spanish on the Allied left flank

Leading the assault in person, Suchet routs Espana's Division and throws Coupigny into confusion

Some of Baird's British Brigades arrive to stabilize the flank after Coupigny is defeated too

Venegas (centre-right) gains some glory for Spanish arms by repulsing then routing Villatte's Division!

Close-up of Villatte retreating; Treillard's Dragoons (left) are recovering after being hit by Baird's infantry
 
 The Final French Attack

Ney and Mortier prepare a huge - and hopefully decisive - blow against the Allied right

Same position, but this time including Mortier's right-hand units (on the slope of the ridge)

Mortier's attack - one last effort against that damned ridge!

Mortier's troops gain the slope and defeat Spencer's units!!  Can they hold on?  Some of Gazan's troops try to fend off Wellington (right)

Ney in trouble:  the combined British-Portuguese force (from Anstruther, Lecor and Otway) have broken the attack by Mermet, whose troops are now in full retreat; Ney's artillery and reserves are now turning to face the threat of British troops advancing after the defeat of Moncey (extreme bottom-right)

Mortier is pushed back:  Hope and Craddock's toops - the last British reserve - push Mortier off the ridge for the last time

but the collapse of Ney's Corps and Gazan's Division spells the end of the battle.  Anstruther's troops collapsed but in a fine showing by the newly-trained Portuguese, they defeat Bisson's Division and Ney's troops fled the field..;
 End of the French Right

Suchet was able to mount a classic combined arms attack on two British brigades trying to fend him off; one British brigade was routed, the other retreated onto its cavalry support

Troops from the British centre outflank Suchet's open flank: he is left with no option but to retire after his attempt to force the British back fails
 Results:
 The scale of losses was huge:  the Spanish army lost 2100 infantry and 12 guns; the Allied army c.6750 infantry and 12 guns, a combined loss of 8850 infantry and 24 guns.  The Spanish General Espana was captured in the fighting.  On the Imperial side the scale of the casulties was even greater 19250 infantry, 125o cavalry, 24 guns.  General  Leval was killed, Generals Barbou, Morlot and Musnier were captured  The casualty figures are slightly lopsided as a result of the defeat, rather than its cause as over 6000 of the casualties were prisoners taken in the very last stages of the battle or in the pursuit.
The strategic effects are also incalculable at this stage: this was potentially a campaign-winning battle for the French.  Their defeat throws into question the French ability to maintain their position in the Iberian peninsula at all.

Game Notes:
A truly titanic struggle!  This game took around 4 hours of playing time to complete (I played it in a couple of stages).  One aspect of the game worth noting is that there wasn't a commander-in-chief on either side, there being two "co-operating" army commanders on the Allied side and no less than five on the French side.  Basically, each individual commander bids for tempo separately and then one commander - chosen at random - bids for the side as a whole,  This can produce "interesting" effects, and reflects a structure much less efficient than that of an Army commander directing separate Corps.
The French came very close to  winning this one a couple of times, for two reasons.  Partly, they distinctly had the best of the dice rolls, but the other reason was their greater number of commanders: this allowed the French to make many more "+2 attacks" (you get a +1 bonus for attacking and an additional +1 bonus for a general leading the attack); if they lead the French Legere units, that can end up being +3.  The defenders may get a +1 for some kind of terrain, but overall this means that the French can expect to organize multiple successful attacks.
In terms of the campaign game, the key to this successful battle for the Allies was the extenisve campaign attrition inflicted on the French forces over the last few months.  Wellington's army was retreating down a prepared route, with logistic depots at appropriate points whereas the French were pursuing him down a very barren terrain without the opportunity to arrange such support and lost sufficient men to make the Allies accepting battle a realistic possibility.
The table was 5' x 3'.  Figures as ever from Baccus 6mm.