Miniature Wargames 009:
Miniature Wargames 123
Wargames Illustrated 114
Wargames Illustrated 142
Scenario Notes:
Surprisingly for such a popular battle for magazaine article authors, Barnet is a really hard battle to do justice to. All of the scenarios bring out the key factors, which are:
1. The dense fog prevented both sides from accurately determining their enemies' positions.
2. This led to each side having its left flank outflanked and defeated in the original battle.
3. Each army operated very much by individual battles. The Lancastrian left-wing battle defeated its rival, but then disappeared to loot the town of Barnet.
4. Suspicions of treachery appear to have played some part in the Lancastrian defeat.
All of these factors pose difficulties for a standard table-top recreation! I certainly didn't try to solve them outright, but I did incorporate various suggestions from the published scenarios to try and reflect something of the original conditions. I plumped for using DBA v3.0 over Ancient & Medieval Wargaming.
Special Scenario Rules:
1. Visibility (for bow and artillery fire) was limited to 2BW.
2. Both sides were constrained to use their PIPs to move groups in order from the Yorkists' left first until the first combat.
3. Morale/victory was based on individual battles. Regardless of exact strength, a battle was considered defeated when it had lost 2 or more bases. The remainder would then run at 3BW for their baseline. Oxford's battle only would have to pursue its opponents at normal move rate off the board. The first army to have two of its three battles be defeated would lose the battle, as would the killing of the Lancastrian or Yorkist general.
4. On the turn after pursuing any enemies off the board, Oxford's troops could return on the roll of 4-6 on a D6.
4. Any of Oxford's troops
The Orders of Battle:
The Lancastrians:
Earl of Warwick's Battle:
1 x Blades (w/General)
4 x Bowmen
1 x Artillery
Earl of Oxford's Battle (Right):
3 x Blades
2 x Bowmen
Duke of Exeter (Left):
3 x Blades
3 x Bowmen
The Yorkists:
Edward IV's Battle:
2 x Blades (1 x w/General)
3 x Bowmen
1 x Psiloi (handgunners)
Duke of Gloucester's Battle (Right):
1 x Blades
3 x Bowmen
Lord Hastings' Battle (Left):
2 x Blades
2 x Bowmen
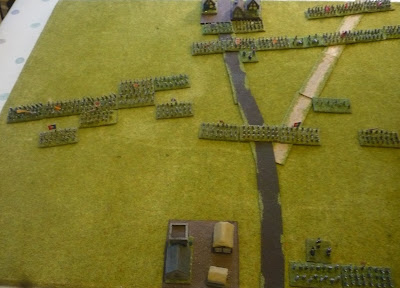
The Set-Up
 |
| The Lancastrian Army: Oxford's battle on the left, Warwick's battle on the centre, Exeter on the right |
 |
| The Yorkist Army: Gloucester on the right, Edward in the centre, Hastings on the right |
 |
| As specified in the scenario rules, Oxford's Battle ploughs straight forward |
 |
| Oxford's troops engage Hastings', with that telling overlap... |
 |
| The fighting begins in earnest, with the battle lines quivering... |
 |
| A slightly wider shot of the same situation |
 |
| After a few bounds of fighting, Hastings' Battle is as soundly defeated as it was on the day |
 |
| Hastings' troops on the left run. In a departure from history however, Edward's troops contact Warwick's in the centre, although he himself remains in reserve. |
 |
| The to-and-fro of the central struggle: some good shooting helped the Yorkists gain an early advantage here... |
 |
| Whilst good Lancastrian shooting eliminated the Yorkist bowmen of Gloucester's command on the left side of the hedge |
 |
| Same position, closer in. |
 |
| The Lancastrian reserves tip the balance and now the Yorkists in the centre are in trouble. Edward leads his reserves forward in person to restore the situation |
 |
| The battle line restored and again the battle is in the balance. |
 |
| The Yorkists on the brink of victory! Warwick's battle has collapsed and some of Gloucester's bowmen have hit some of Exeter's dismounted knights in the flank as they seek to restore the situation, |
 |
| Some of Oxford's troops have been gathered, reformed and re-enter the battle |
 | |
| A much reduced but victorious Lancastrian Army holds the field! |
Slightly bigger than the average game, and despite my initial misgivings, it did make quite a good game! All the scenario special rules seemed to work out fine, so many thanks to the various scenario writers that I cribbed ideas from! Funnily enough, what I really missed - and it is a thought I have had before - of having some visual way to represent the fog, or indeed other weather conditions. Maybe dry ice?! Or exotic light bulbs?!? I don't know. But I think the main problem with "foul weather" games is that the atmosphere is wrong.
Game played on a 3'x2' table, buildings mainly by Timecast and figures all by Baccus 6mm. I think this one took about an hour, played in two stints. Blades are very hard to kill! A thing I have noticed with these rules is that a sudden bow-on-bow kill happens much more often (because of the way the combat factors interact with the combat results) and can change a situation quite rapidly.


Nice looking battle!
ReplyDeleteThanks very much. I think, being self-critical, it would have been better if I had gone for a slightly larger table and have a bit more space on the left flank.
ReplyDelete