During February 1644, King Charles I had left the main North-South road to crush an isolated Parliamentary detachment of 2000 Foot, considering that the elimination of 2000 Foot without the risk of serious loss was a a worthwhile triumph that would be hard to equal in a battle or siege. This was achieved but at some loss of position. The Parliamentarians exploited this in two ways. Firstly, Fairfax's smaller army was enabled to march on York and besiege it, knowing that the King could not come to its aid before the end of March. More dangerously however, Manchester calculated that he could advance his army to a covering position around Lincoln and the King would be trapped on the East coast and would need to fight his way out or bring another force from either the North-East or the Welsh marches to force his passage: operations which might take two months, in which time the King's army could be destroyed and defeated or at least, grave damage done to the Royalist cause in the denuded areas.
Boldly, King Charles decided to attack, realizing that inactivity or the slow march of a relief force would probably be as disastrous to his cause as a defeat. His army came across the Army of the Eastern Association blocking his route just off the Brigg Road...
The Royalist Army:
C-in-C: King Charles (Average)
Generals:
Byron (Average)
Astley (Good)
The Horse: 24 bases of Veteran Horse (S), 16 bases of Raw Horse (S), 1 base of Raw Dragoons
The Foot: 14 bases of Veteran Foot (SH), 2 bases of Raw Foot (SH)
The Artillery: 4 bases of Guns
The Army of the Eastern Association:
C-in-C: Manchester (Poor)
Generals:
Cromwell (Good)
Hampden (Average)
Foppington (Poor)
The Horse: 30 bases of Veteran Horse (D), 4 bases of Raw Horse (D), 1 base of Raw Dragoons
The Foot: 4 bases of Veteran Foot (SH), 16 bases of Raw Foot (SH)
The Artillery: 5 bases of Guns
The Set-Up:
 |
| The set-up: Royalists to the east (bottom), Parliamentarians to the west (top); the village of Wrawby lies top-right, Brigg is off the table, behind the Parliamentary right flank. |
 |
| A look at Manchester's left flank, commanded by Foppington. |
 |
| 2000 Parliamentary Foot and a couple of guns guard the main crossing point of the stream |
 |
| Some horse, foot and guns form an immediate tactical reserve in the rear of the Parliamentary Left. |
 |
| The Parliamentary Right: Cromwell leads the Horse by the stream |
 |
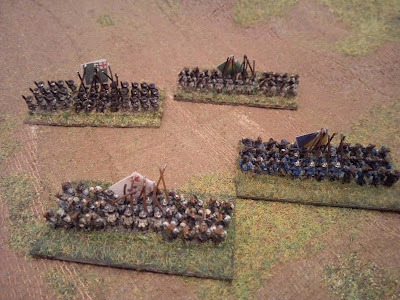
| The King's Army: from Left flank (bottom) to Right (top) |
 |
| The front of the Royalist army. |
 |
| Astley's Foot on the Right, facing Hampden's foot over the stream. |
 |
| The extreme Parliamentary left faces some Royalist Horse, Dragoons and Guns (right) |
The Battle:
 |
| Parliamentary guns do some damage to the advancing Royalist Foot, under the eyes of the King (bottom-right) |
 |
| Astley's Foot (bottom) approaches Hampden's Foot protecting the stream and its main crossing point |
 |
| More of Astley's Foot approach the stream below the bridge |
 |
| The musketry exchange begins; the Royalist Foot has some effect on the defending Parliamentary Foot |
 |
| The Royalists wade through the stream in disorder, trying to get to grips with their opponents |
 |
| Confusion and casualties around the bridge... |
 |
| First blood to Parliament! The first Royalist attack across the stream is beaten back with loss |
 |
| Nearer the bridge however, Astley's men have managed to get firmly across the stream |
 |
| A close-up of the action |
 |
| The west side of the bridge is held by Parliament |
 |
| But the Royalist Foot triumph on the bridge and on the other side; and some of Hampden's Foot are in rout (centre) |
 |
| A wider shot. Notice that the Parliamentary Foot are still resisting strongly to the west of the bridge (centre-left) |
 |
| However, the other brigade of Astley suffers heavily under the intense musketry fire |
 |
| Some Royalist Horse on the right push over the stream to pin this flank |
 |
| Progress is slow on the other flank, partly from the difficulty in co-ordinating the movements of such great masses of men, partly from the effects of Parliamentary artillery fire. |
 |
| Some of the Parliamentary Foot counter-attack across the stream hoping to profit from the Royalists' disorder |
 |
| A wider shot of the same |
 |
| Seeing the progress of the Royalist Foot, Cromwell launches an attack on the Royalist Horse facing him; there was even the possibility of taking the King himself (bottom-left)! |
 |
| However, in the to-and-fro of battle Cromwell himself is captured by Royalist troopers! The King himself throws himself successfully into the melee (left)... |
 |
| Parliamentary Foot and Horse try to rope-off the Royalist bridgehead over the stream |
 |
| The remaining Royalist Foot on this flank rally and beat off one of the Parliamentary battalia (centre-top); the combat continues elsewhere (centre)... |
 |
| ...resulting in the rout of one of the Royalist Foot units (bottom-centre) |
 |
| The fighting around the bridgehead continues... |
 |
| The cavalry combats continue in the centre. On balance, the Royalists have the upper hand... |
 |
| Note the routing units of Parliamentary Horse in the centre, as the King looks on in some triumph (bottom-left)... |
 |
| The King had a very lucky escape - seeking to capture the enemy guns (left), the fighting was harder than expected and the King only narrowly escaped!! |
 |
| Some of the Royalist troopers have had enough of taking musketry fire and run for the rear! |
 |
| Royalist Foot tries to throw the Parliamentary Foot back across the stream |
 |
| Veteran Royalist Foot cause heavy casualties amongst containing Roundhead Horse |
 |
| And the remainder of Aspley's Foot break their opponents and advance towards Wrawby! |
 |
| To the west of the bridge, the Parliamentary Foot hold on |
 |
| Parliamentary Horse attack some isolated Parliamentary guns... |
 |
| Parliamentary Horse, having been reinforced, try to renew the attack in the centre |
 |
| The infantry fight in the centre begins! Veteran Parliamentary Foot get the upper hand... |
 |
| The cavalry combat in the centre continues... |
 |
| Manchester orders his Right Wing to come into action, needing to crush the Royalist left in order to delay the advance of its Right |
 |
| Part of the Royalist Foot in the centre is heavily shaken under the pressure of the Parliamentary Foot... |
 |
| The cavalry combat on the Royalist Left: more mixed fortunes, with perhaps a little |
 |
| Overview of the central infantry combat: Royalist troops in the brink of collapse (bottom-right) |
 |
| The King takes part in another charge! |
 |
| A reserve Royalist Horse brigade is moved up to contain the advance of the Parliamentary Horse in the centre |
 |
| Slowly, but surely, Astley's foot inexorably deepen and widen their bridgehead (centre) towards Wrawby (top) |
 |
| The King succeeds again!! |
 |
| More and more of Astley's Foot get across the lower part of the stream and put pressure on the defending Horse |
 |
| The wild cavalry fight on the Royalist left continues as each side throws further troops into the fray |
 |
| The right of the Royalist Foot in the centre gives way and runs! |
 |
| But Royalist Horse has turned back the breakthrough in the centre |
 |
| The King and his troopers have reached the last Parliamentary reserves in the centre |
 |
| Royalist Foot climb the rise to drive off the opposing Horse |
 |
| Outflanked and then outshot and outfought, the Parliamentary Foot are driven from the West side of the bridge (centre) |
 |
| Fierce combat continues on the slope beyond the stream, although the superior Royalist musketry is beginning to tell... |
 |
| On the extreme Parliamentary Left, its Foot defeats its opponents and crosses the stream |
 |
| More confused cavalry fighting in the centre-rear of the Parliamentary position on the plain |
 |
| Advancing Parliamentary Foot attack the Royalist reserve Foot |
 |
| The Royalists bring forward another brigade (bottom) to stem the Parliamentary Horse on their left |
 |
| The slow advance to Wrawby continues... |
 |
| And towards the west too...Foppington looks on (top-left) in despair... |
 |
| The Parliamentarians' defence starts to collapse on this flank... |
 |
| More and more Parliamentary units break... |
 |
| Only on the Royalist left are things going well for the Roundheads... |
 |
| Another Royalist Horse brigade is thrown into action in the centre to contain the advance of the Parliamentary Foot... |
 |
| The remaining Parliamentary Foot is pushed back a little, but is still fighting hard |
 |
| Foppington advances a battalia of Foot over the stream in a distracting counter-attack on Astley! |
 |
| The raw Foot on the extrem Parliamentary Left complete a deserved triumph here, driving off the Royalist dragoons |
 |
| The Parliamentary Left has more or less ceased to exist, otherwise... |
 |
| The greater Royalist reserves of Horse have told in the centre... |
 |
| And the previously victorious Parliamentary Foot in the centre have been routed in a counter-attack |
 |
| The Parliamentary Horse on their right is still on balance getting the better of the combats, but isn't achieving the kind of decisive success which would change the overall picture of the day's events... |
 |
| Stability on the centre, allied to victory on the Royalist Right, achieves the King's aims for the day... |
Game Results: The Royalists suffered heavily...but nowhere near as badly as the Parliamentarians. The King's Army lost c.1000 Foot, 900 Horse and 2 Guns whilst Manchester lost c.2400 Foot, 1250 Horse and 4 Guns, and Cromwell was a prisoner in the hands of the King! Most importantly, victory has enabled the King to escape the trap and is free to move back towards South Yorkshire and relieve York.
Game Notes: The quality of the Royalist Foot told here, despite the difficulties of the terrain. Although the initial attack across the stream was slow, the King's calculation, accurate in the event, was that with some luck the attack would be successful
somewhere along the front and this initial success could be exploited. This seemed a better bet than chancing everything upon the attack on the flat plain, which would be at best a 50:50 proposition and because of Parliament's qualitative advantage in Horse, might be a worse bet than that. Once that initial success was made, and the pinning attack on the other front had been more-or-less effective, the balance of the battle swung the other way: could Manchester defeat the Royalists on the plain quickly enough to save his Foot behind the stream. It was close, but in the event, not...
My opinion of these rules is more or less set now, so I don't have much to say about them. Mainly excellent, I have the odd issue with calibration (particularly of musket fire), complexity (the use of 'combat' shaken and 'terrain' shaken, and over-fussy rallying and morale rules. That said, they do seem to give a pretty accurate result (now that I have made the musketry literally a notch more effective). Comparing this to my recent Polemos Napoleonics game, I think one of the fundamental principles in the rules family works better for the ECW than the latter period: the focus on disruption rather than attrition. I do suspect that Napoleonic warfare cannot really do without it, whereas TWotTK really can...
It was really great to get back into the battles of this campaign and I am already looking forward to the next one!
Polemos ECW rules,
Baccus 6mm figures, buildings by Baccus and
Leven, I think.


No comments:
Post a Comment