I suppose that indirectly, Donald Featherstone's scenario 'The Road to St. James" is one of the contenders for 'things which started it all', as it is one of the scenarios in his
War Games. I was looking for a WW2 scenario that was a bit of a break from my normal fare, in order to test a couple of different things out for
Gummipanzergrenadier, in particular I wanted there to be some more powerful weapons and crucially, some engineering tasks. The Road to St.James fit the bill for that, since there was some barbed wire defences, but I souped this up a bit by adding a couple of anti-vehicle minefields. This was to have some quite significant consequences...

The original scenario actually looks quite like a Rapid Fire scenario, to my untrained eye. Each company is maybe 10-20 figures strong. A tank company/squadron is maybe 3-5 tanks strong. Anyway, it featured a battalion of British Guards' infantry supported by some Shermans and anti-tank guns, being attacked by a German Regiment supported by some Panthers, anti-tank guns and off-table artillery (undefined). both forces had some mortars and machineguns too. In my order of battle, I reduced it one level: a British company group of four platoons, supported by a troop of Shermans, a platoon of 6pdrs, a platoon of mortars and a platoon of Vickers MMGs. One platoon front was protected with wire, and two ploughed areas had anti-tank mines in them. The German Regiment became a Panzer Grenadier Battalion, with one company in Hanomags and the rest in trucks, with most of the battalion-level support plus 3 Panthers and some 75mm anti-tank guns, with a battery of 4 x 105mm guns in support.
Rather than use my own tactics, I tried to follow the original tactics, or intent, as best I could.
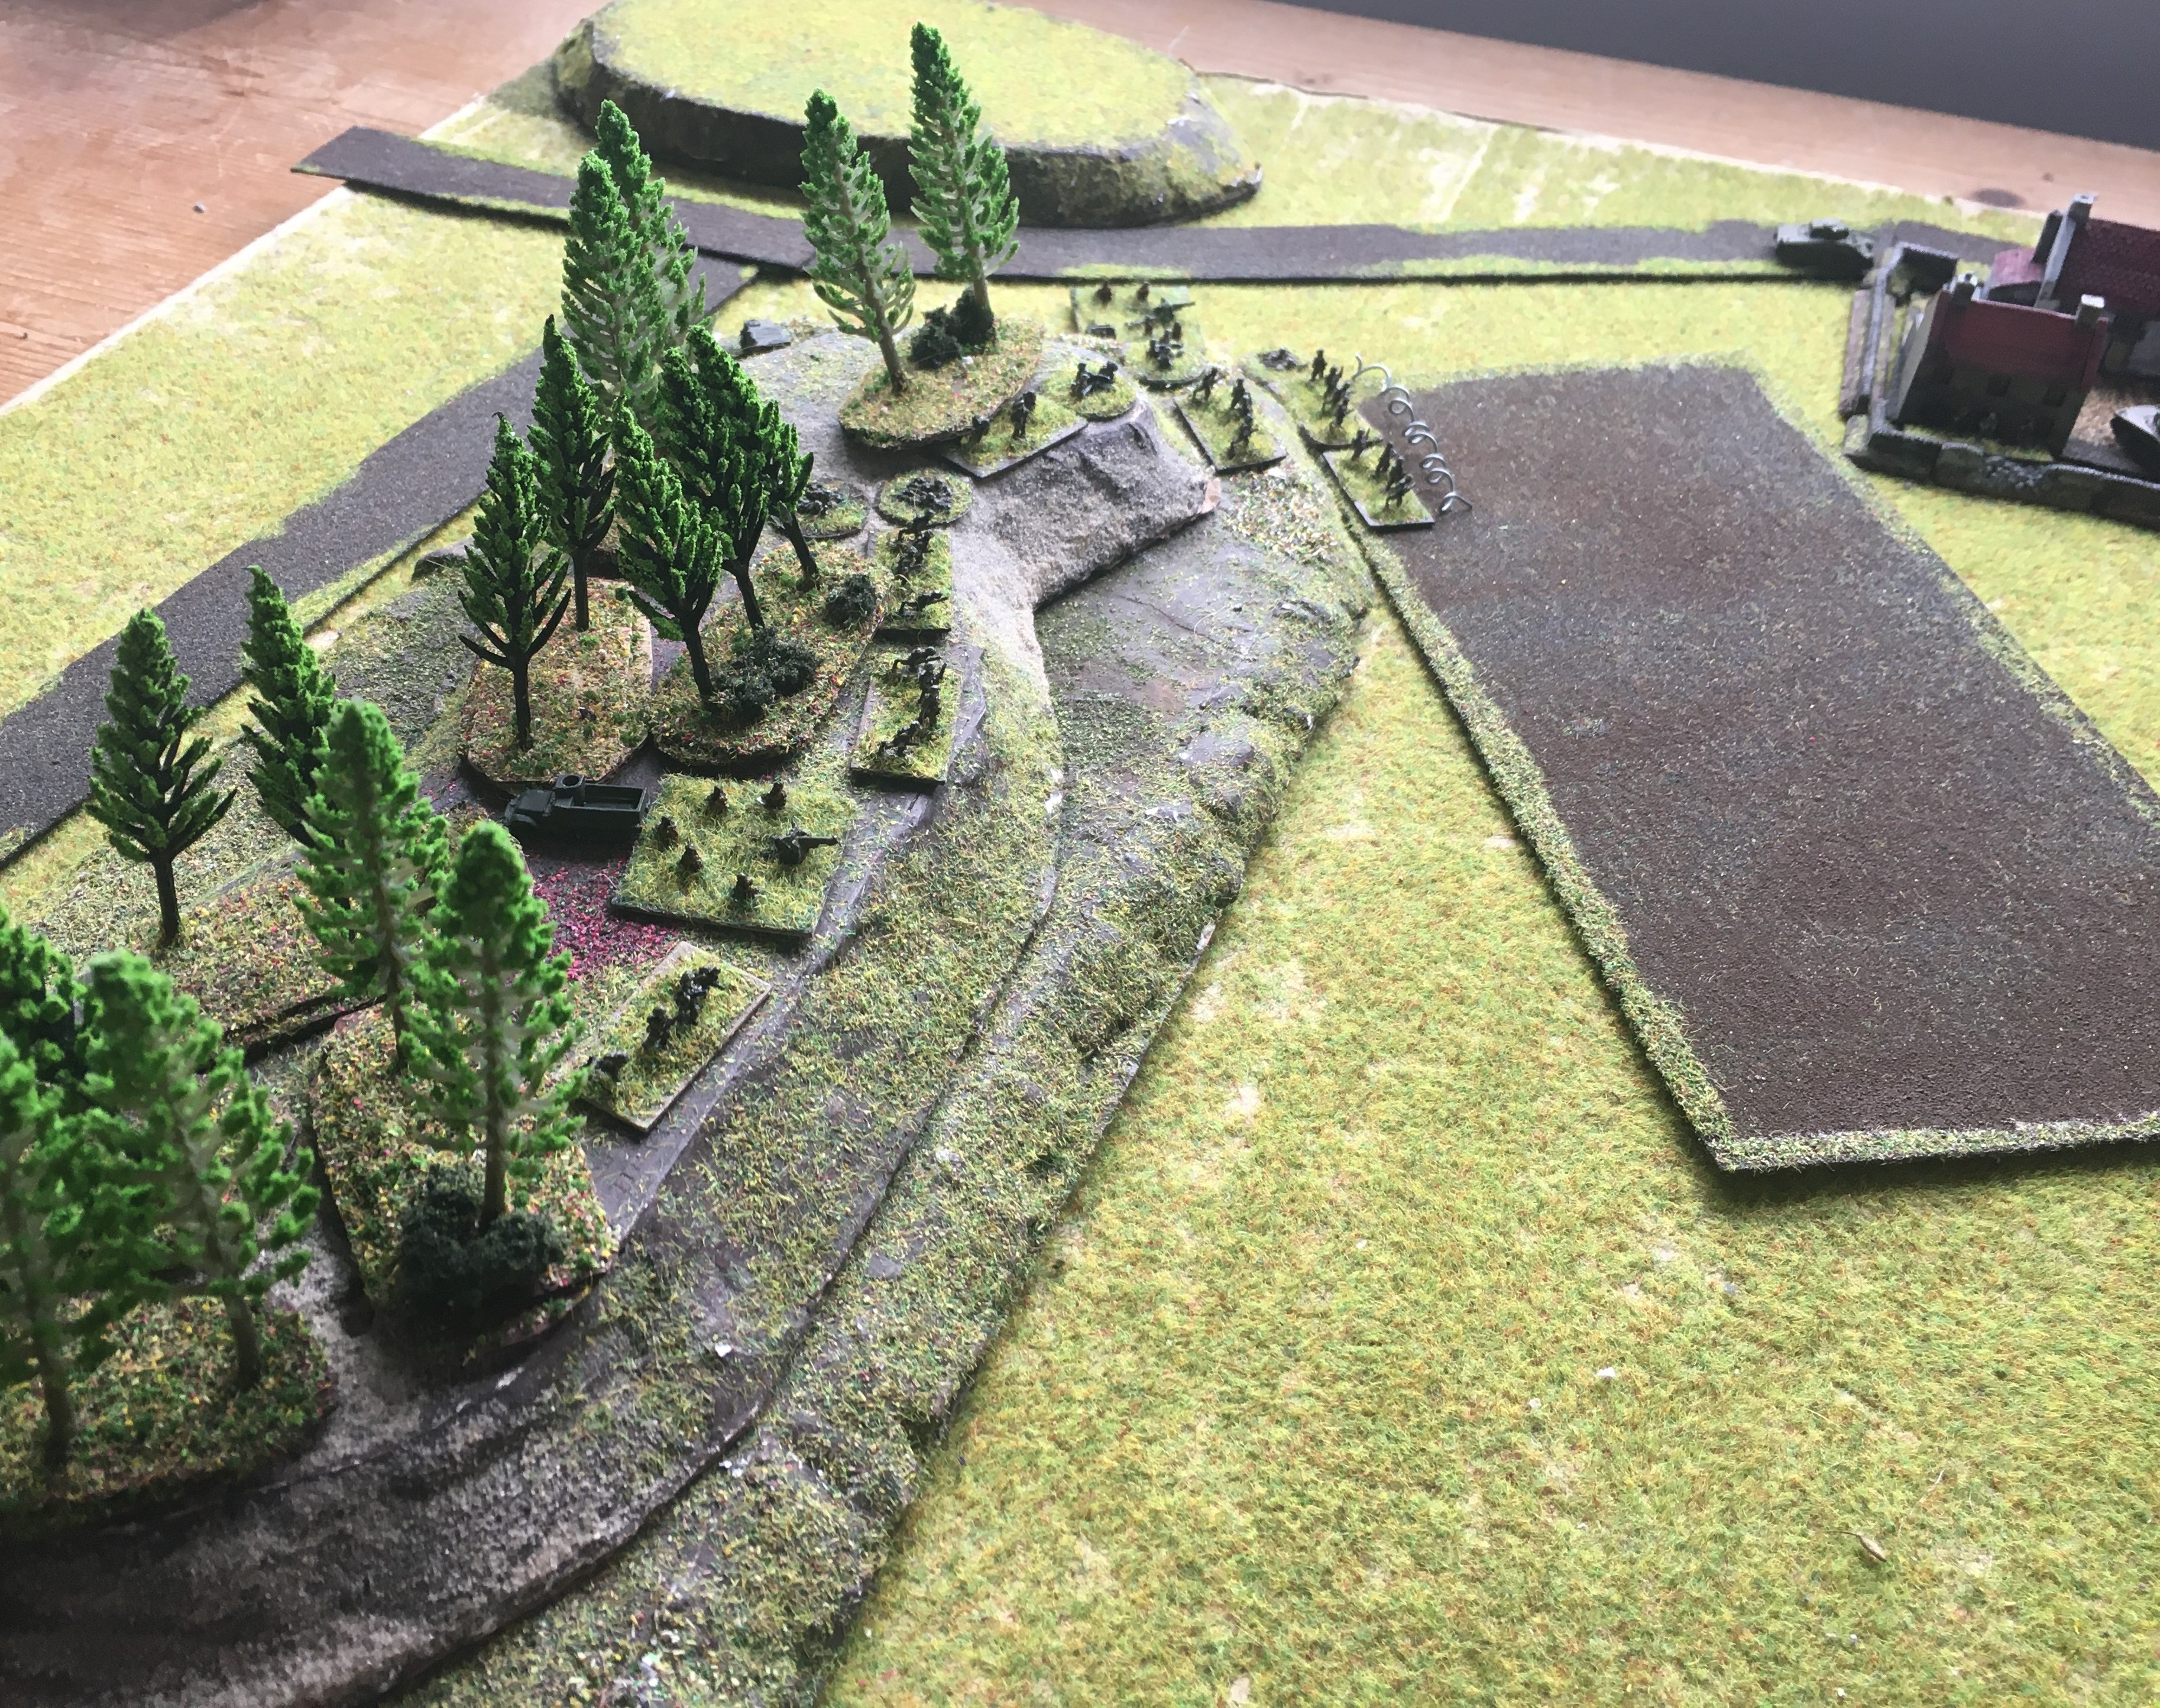
The Set-Up:
 |
Fir tree hill on the left, Copse hill on the right. The 'embankment' in the original scenario has become Red ridge in this refight (right). Red Farm is at the top, and the village of Charlot (top-right) with a plantation feature in front of it. Because Fir Tree Hill is a somewhat different shape to the original, I added Bald Hill (top-left) to make the terrain a little closer. The whole field slopes downwards a little left-to-right.
|
 |
Company HQ and 4 Platoon on Fir Tree Hill, with a 6pdr ATG in support; 2 Platoon is in front of the hill beind the wire (top), supported by another ATG.
|
 |
The view from behind 2 Platoon's position, looking towards Red Farm, occupied by 1 Platoon and 2 Shermans (and commanded by the Company 2iC). The right-hand side of this field contains anti-tank mines.
|
 |
Red Farm and its defenders.
|
 |
3 Platoon on Copse Hill, supported by a Sherman (left) and a 6pdr ATG (right); a section of mortars are also in support, with an observer and small team alongside 3 Pl in the woods.
|
 |
Another view. The near half of this ploughed field contains anti-tank mines.
|
The Battle:
 |
The Germans led with their armoured stuff on their Right, aiming to concentrate on encircling and taking Copse Hill first, holding back the rest of their force for a later attack on the Left past Red Farm.
|
 |
"But, before I could say don't drive onto a mine...he drove onto a mine"
|
 |
| The German platoon in the minefield dismounts and advances, whilst the
Company Commander moves back out of the ploughed field. He send his
second and third platoons left and right flanking, whilst the Panthers
hold off. The Brits don't shoot, not wanting to reveal their positions
early. |
 |
One of the outflanking platoons runs into the barrel of a Sherman, which eliminates it pronto.
|
 |
The 6pdr on the other side of Copse Hill destroys 3 Hanomags in very short order indeed! The dismounted Panzergrenadiers try to silence it with MG42 fire, but they are in turn silenced very quickly when the Vickers MMG opens up...whose crew are then pinned down by the tripod-mounted MG42 on Red Ridge...
|
 |
...who in turn get their heads pushed down when the mortar bombs start landing, watched in by the mortar controller in the woods. Note that the other two Hanomags have retired before they even got into the gunsight of the Sherman... (left). Some German engineers have arrived to try and sort out this minefield too...
|
 |
They start work, but suffer some accidental casualties and work progresses very slowly
|
 |
As the right-flanking Panzergrenadiers dismount, they are engaged by British infantry from 3 Platoon, as well as the mortar fire observers...half of the remaining Panzer Grenadiers are cut down in seconds..
|
I am missing a couple of photos here, not sure why. What happened was that combined HE and machinegun fire from the Panthers, assisted a little by some of the Panzergrenadiers and supports, killed the British mortar control team and persuaded 3 Platoon to pull back into the depths of the wood.
 |
Then everything happened in a few moments: the first Panther cam around to see the Sherman in front of it, which was incapable of harming it. But at that point, the Sherman at the edge of Red Farm opened fire and brewed up the lead Panther! He missed the second Panther though, which promptly despatched the plucky Sherman. At that point, the 3 Platoon PIAT team at the edge of Copse Hill then knocked out the remaining two Panthers in quick succession!
|
 |
With no-one to spot for them, the British mortars are withdrawing towards Fir Tree Hill (left); however, the Germans are pretty much stuck. Rather than press on and launch the attack with the two motorized infantry companies down the Right (i.e. top), I decided the German commander would probably quit at this point.
|
Game Notes:
Good fun, and good to get this classic to the table for the first time. A mixture of things did for the Germans, most of which was pure bad luck/good British dice-rolling at key moments. However, there were important structural differences. The most obvious was the minefield, although that was mainly just annoying for the Germans than seriously detrimental. I think differences in rules philosophy made a more important difference: in Gummipanzergrenadier, anti-tank guns are great because they interact with the observation and accuracy rules in a better way than tanks do. 'Don't be seen' is rule #1 here. Additionally, direct fire weapons are somewhat less powerful than in many WW2 rulesets, whereas artillery is somewhat more useful. This meant that Featherstone's tactics, fairly appropriate for his own scenario, were less good for this game - the Germans should have got their observers into place nice and early (and even better, pre-registered the very obvious targets) in order to make life much more difficult for the British. But that said, there was some good shooting by the British anti-tank gunners, tankers and PIAT operators too!
The engineering rules worked well and were easy to understand. Basically, engineers are 'attacked' by mines and booby-traps (if that is what they are trying to clear) and then roll to succeed with different odds depending upon the difficulty of the task. Trained engineers can therefore do more stuff and are less likely to suffer casualties doing it. Engineering times are only somewhat predictable - they are based on chance, so you can work out how long things might take, but not how long they will take.
Anyway, all good fun and looking forward to giving them another go. What this scenario did teach me is that my WW2 collection is in a bad state; things are mixed up, in the wrong boxes, some stuff I got second-hand I have never got around to finishing off the painting, the models aren't arranged in meaningful chunks so I can just quickly pull out a company or battalion - this is especially true of the infantry support platoons and companies, I am noticing. I should make some more distinctive FOO and FAC and MFC bases. I am also not quite sure I am organizing things quite right for these rules (my troops are basically configured for WRG 1925-1950). I am not quite sure whether platoon commanders should be 'independent' and attach themselves to a section as and when they need to, or whether one of the rifle sections in a platoon should always be considered a command section. And I need to work out whether a 1944 Panzergrenadier squad should basically be two belt-fed LMGs and a rifle group, or just the LMGs. Anyway, some few modelling things to ponder!
Models were a mixture of Baccus, GHQ and H&R. Buildings were from Leven and Battlescale, with walling from Baccus.


Excellent! Nice to see St James on the table again. I ran it at the club a few years ago using the original Lionel Tarr rules in 20mm. Although we didn't have any plaster of Paris Panthers, as far as possible we used Airfix stuff. Tim produced three of the awful Airfix Panthers to use, I was most impressed.
ReplyDeleteHaha that is definitely getting into the proper spirit of the thing! I might have to have a go with the Tarr rules one day, maybe use my 15mm stuff for it.
DeleteThe Tarr rules are pretty brutal for infantry unless you have a lot of cover. They were actually good fun to play, and having seperate initiative rolls for moving and shooting worked very well. The AT fire system resurfaced in a slightly different form in the Mediterranean Tank Battles in Miniature book, so I also used them to run the Steamroller Farm scenario from that book.
DeleteOh ok, intriguing - although I vaguely recall a comment from John D Salt saying something similar, in the context of WW2 vets writing rules in which infantry would die like flies if caught in sight, out of cover.
DeleteInteresting to see how some of the older scenarios work with newer rulesets. I do enjoy reading your game notes.
ReplyDeleteThanks Peter. I enjoy writing them: writing down what I think is one of the best ways of actually finding out what I think.
DeleteA classic game and one I played based around Operation Barbarossa IIRC. You do need to tweak things to take into account the rules used and as in my case, a change in time and forces involved.
ReplyDeleteYes, indeed. Did you blog that one?
Delete