Battle 7: The Battle of Calubriga
Situation: The situation has remained fairly similar into the first half of 55BC: the Romans and their Gallic allies are attempting to clear the Gallic frontier up to the Rhine, whilst the Germans and their Gallic allies try to prevent this by continually instigating revolts. Ariovistus, having got the Mandubi to abandon the Roman cause and join his own again, has launched another invasion of the Treveri's territory...
The Forces:
The Germans:
Commander: Ariovistus (Inspiring, Steady)
Germans: Commander Zelig (Inspiring, Cautious), 2 bases Trained Cavalry, 8 bases Trained Tribal Foot, 2 bases Trained Skirmishers
Gauls: Commanders Biuito (Average, Rash), Andoston (Average, Cautious), 1 base Veteran/Elite Cavalry, 1 base Trained/Elite Cavalry, 1 base Trained Tribal Foot, 3 bases Raw Tribal Foot, 2 bases Raw Skirmishers
The Roman-Aligned Gauls:
Commander: Samo (Average, Steady)
Gauls: Commander Lukotrix (Poor, Rash), 1 base Veteran/Elite Cavalry, 1 base Trained/Elite Cavalry, 1 base Trained Tribal Foot, 7 bases Raw Tribal Foot, 2 bases Raw Skirmishers
The Set-Up:
 |
The defending Treveri have a position around a small settlement (bottom) flanked by hills, a wood and some enclosures (centre). Their youths are in the woods and the enclosures, with their cavalry on the hill (bottom-left) and the foot warriors in the settlement and enclosure.
|
 |
| A wider shot, where one can see the Gallic reserves (bottom); there are also 1000 warriors just out of shot on the hill to the right, defending against the flanking movement. |
|
The Battle:
 |
The battle begins ominously for the Gauls - their youths are surprised by the accuracy of the German youths' spear-throwing and retire deeper into the wood.
|
 |
Ariovistus moves his troops forward, starting to veer towards the enclosure...
|
 |
Meanwhile, Ariovistus' Mandubi allies arrive promptly and in good order on the Treveri flank.
|
 |
Ariovistus leads his warriors into the enclosure in person, sword in hand...
|
 |
The Mandubi eschew subtlety and charge the small holding detachment of Treveri warriors up the hill.
|
 |
Ariovistus' charge is successful and the leading Treveri warriors fall under his sword...
|
 |
Whilst the Mandubi's charge has been equally successful, routing the Treveri foot warriors.
|
 |
Ariovistus' charge continues and routs the remaining Treveri warriors out of the enclosures; the Treveri youth, in some desperation, try to get around the flank of the advancing Germans (top).
|
 |
Samo, realizing he faces quick defeat unless he can seize back the initiative, puts himself at the head of the Treveri horsemen and charges the German cavalry: Zelig falls, wounded by a Gallic sword and his comitatus is pushed back (top-right); the other fight is more equal.
|
 |
Unfortunately, there were a lot of unusable photographs towards the end of the battle, so I will have to summarize events: after a short but sharp struggle, Ariovistus managed to break into the settlement. The Treveri's reserves counter-attacked, and forced back some of the German infantry and causing severe casualties - but the Mandubi arrived on the flank, Ariovistus restored the situation, and the brave Treveri were surrounded and eliminated - this is the position that one can see now. Note (top-left) that the leading Treveri reserves actually managed to push the Germans back quite far, but in the end, numbers told...
|
 |
A wider shot of the end of the battle. The cavalry are still locked in indecisive combat (left), whilst Samo having led his Comitatus to victory in the charge, has only just managed to get his warriors back in some kind of order, as the rest of his troops are defeated. The pincer movement is hopefully clear around the settlement, as are the routing Treveri foot warriors from the settlement (bottom).
|
 |
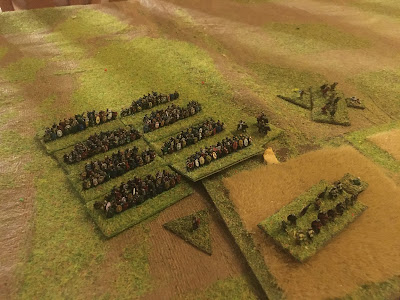
Another wide shot. As is typical, the two skirmish fights were entirely inconclusive (centre, above enclosure; and left, at edge of wood).
|
Game Results: Despite some brave local fights, the Treveri suffered very heavily, losing c.2200 warriors killed and wounded, and about the same have fled. Both their commanders survived and escaped, however. The German on the other hand lost only around 600, roughly evenly divided between their foot and horse warriors, although this did include Zelig, who died at the head of the horsemen. The Mandubi suffered only trivial loses.
Game Notes: The Treveri's fate was more-or-less sealed when the Mandubi turned up right at the beginning of the battle. As is typical in Polemos:SPQR, the attacker can stack up odds in their favour so heavily as to make them all but certainties.
There were a couple of points about how the rules played out in this battle. The rules for skirmishers outside the woods skirmishing with enemy skirmishers at the edge of the woods wasn't particularly clear. The rules put in range restrictions for ranged weapons in woods but it isn't clear how that applies to skirmishers firing into, and out of, the edge of woods. Interestingly, javelin-armed skirmishers are typically more effective than archers in these rules.
There were also some interesting interactions in the infantry combat when Tribal Foot break Tribal Foot, when both are in multiple ranks. I think the intended outcome should be that if attacking charging tribal foot break their immediate opponent, then the immediate opponent is removed and the base behind gets a single shaken point. The charging tribal foot has to pursue in their next movement phase (p.33). At this point the originally attacking tribal foot (assuming it isn't attacked first) then has to attack the second defending tribal foot base. I am not clear whether this should be an advance-to-contact or a charge.
This kind of thing (i.e. combat outcomes) is the most awkward part of most Polemos sets (excepting Ruse de Guerre, which eliminated most of the issues by eliminating most 'outcome' types of movement).
Anyway, the game was generally fine, the Treveri were always on a bit of hiding to nothing, but the individual combats and general shape of the battle all seemed plausible enough.
Figures as ever by Baccus 6mm.


A nice game once again Peter, which looked good too. It can be frustrating when rules are not clear as to intent or outcomes, but when playing solo, you can go with the common sense option, which is my default position!
ReplyDeleteThanks Steve. It comes with the territory of solo gaming to some extent - when I find something a little difficult to grasp, very often the answer is that it is me! But I persevere with SPQR because it does seem to capture the key things very well. I am thinking that maybe I do need to sort of 'formalize' my own clarifications.
DeleteVery nice battle report I have shared your post here https://wargames-directory.com/forums/topic/battle-7-the-battle-of-calubriga/
ReplyDeleteWhy not join and share your future work
Take care
Andy
Thanks very much Andy. I'm afraid this is the first time I have heard of wargames-directory, I will have a look.
DeleteThank you it's a relatively new site
DeleteTake care
Andy