The next scenario in the TooFatLardies' Capturing Caesar's Camp pint-sized campaign (the first action was detailed here) has the Seaforths attack a German flanking position, a necessary preliminary before the Camerons can launch the main attack.
The Set-Up:
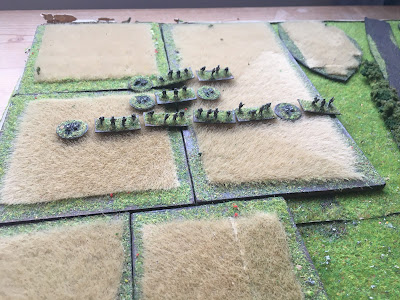
 |
| The battlefield: the Germans are defending the hamlet; the Brits could come from the top of right-hand sides. |
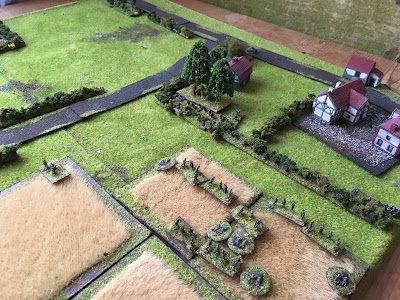
 |
| A closer look |
The Battle:
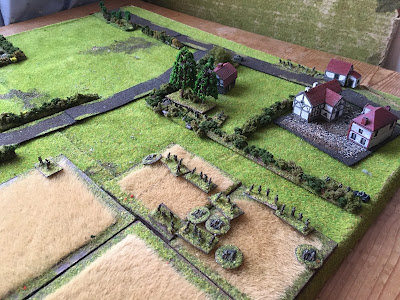
 |
| The British platoon advances two-up one-back through the wheatfield on the left-hand side of the board, trying to see if they can get close to the target without being spotted. They bump into the German command group! Presumably out on a recce... |
 |
| The German platoon commander very sensibly makes a withdrawal |
 |
| The Seaforths continue their advance, getting the drop on a German infantry gun |
 |
| Fire is briefly exchanged... |
 |
| And the Germans are eliminated |
 |
| The German command group meets a nuch of German engineers - presumably they knew they were there and are warning them of the British advance |
 |
| The German engineers bravely try to delay the Seaforths' advance, whilst the German commander gets back towards his CP |
 |
| French armour puts in an appearance! |
 |
| Jerry seems to have been caught rather on the hop this morning: a bunch of engineers by the trees are a bit stuck between Scottish infantrymen and French armour. |
 |
| The German command team at last reach some kind of safety... |
 |
| And get one of the German squads to hop to it. |
 |
| Meanwhile, the British come up against the first real resistance - another German squad is located - around the trees at the corner of the hedgeline - but this one knows its business, and stops the Scots' advance in its tracks |
 |
| Another look - note that the British FOO has sneaked up too (bottom-left) |
 |
| The Germans were trying to move, but are caught by the machine guns of the French armour |
 |
| The Scottish infantry are currently checked by the German fire |
 |
| The German company commander turns up, trying to investigate the commotion; and immediately realizes he is pinned, unable to cross the road for fear of the French tank! |
 |
| The British manage to get a section forward to the hedgeline and eliminate the valiant group of German engineers; note the reserve section is starting to go right flanking (bottom-right) |
 |
| The French armour's incessant machinegun fire starts to cause some casualties amongst the German infantry, rather than suppression. |
 |
| Things happen slowly and then quickly! The British manage to suppress a few defenders in the buildings (including the Platoon commnad group), advance and then eliminate them. The British are then checked by the remaining Germans on the other side of the road - however, that is a pretty precarious position. |
 |
| Those Germans retreat, whilst the remaining pocket of Germans (at the corner of the hedgerows, centre) begin to surrender |
Game Notes:
All very satisfactory from the Seaforth's point-of-view: only a few casualties amongst the infantry platoon (1 KIA, 3 WIA), against two-thirds of the German grenadier platoon destroyed (7 KIA, 8 WIA, 15 POW). All the luck was with the British, the Germans kept on being generated in not-very-useful places, although this was perhaps the minor problem: the major problem was a flaw in my solo scenario design. To explain: rather than the core platoon plus points-buy in the published campaign scenario, I use a core platoon plus random draw for the side the system is playing. This adds to the unpredictability (I do not know what I am facing) and usually the difficulty (it is more likely that the non-player side will be stronger, sometimes much stronger, than that envisaged in the written scenario). However, I think this is the first time where the non-player faction has really needed specific choices: given the possibility of French armour and the lack of integral anti-tank weapons in the German grenadier platoon, it needs some kind of anti-tank choice to be guaranteed. Now, one could argue that it is realistic, since in many of these campaign scenarios the Germans did get anti-tank support, so that is just too bad for them that they didn't get some this time. But it does feel that the British were going to win whatever, here. Note that it doesn't apply in reverse - becasue the British platoon gets an integral ATR, they would always have a chance, even if a small one, against German armour. That, to my mind, is fair. But in this case, the Germans were toast, faced with French armour and British mortars, and they had neither AT weapons or any artillery support of their own. Ho hum.
Anyway, that aside (I didn't know the Germans had no support until after the game and checked the card deck) it was quite a fun game. There was a brief moment when I thought the Germans were going to make a fight of it, given the heroics of their Engineers and one of their infantry squads. But the disparity in combat power was too great.
Rules used were the
Wargame Rules for Armoured Warfare 1925-1950, aka the Farquhar version. I thought they worked well, no issues, all the results seemed believable. Given the relatively small numbers of troops on the table at any point, it was very easy to remember who had acquired who at any point, which helps.
Figures were by Baccus 6mm, vehicles by Heroics and Ros. Buildings are a mixture of Leven and Timecast here, I think.


That was a brisk little action! I had a German infantry gun in one of my 25 to 50 games, and it proved to be quite deadly against early war armour. Shame the Germans lost theirs so early.
ReplyDeleteThanks Martin. And that is a good point, perhaps the Germans did have a higher (theoretic!) chance than I made out - although I can't imagine it would have had much joy against the Char1. Perhaps the Hotchkiss though...
ReplyDeleteNot a hope against a Char B,even from the side, it would have blown the Hotchkiss to pieces though.
DeleteCould possibly track/mobility kill the Char B, but that would be a long shot (or a point blank shot, as it were).
DeleteYes, perhaps it would have been worth a shot (so to speak!). All moot since the Seaforths overran it quite early, but it might come up in a future scenario.
DeleteUsing the Farquhar rules, I think an infantry gun could knock out a Char B using HE (area fire in a beaten zone) on a roll of 10 (4 followed by 6). Is that correct?
DeleteYes, I think that would work.
DeleteQuit complaining and take the win! ;)
ReplyDeleteGood stuff, John, thanks for sharing.
V/R,
Jack
Ha! Hold that thought...thanks Jack.
DeleteNice narrative and it was a nice little surprise to see at the end what rules you had used - nice outing.
ReplyDeleteThanks Norm. And I know you don't have comments on at the moment, but want to say I really enjoyed your Quatre Bras/Ligny write-up the other day.
DeleteA great little game. I really love games about this size. I have a table setup to play a few WW2 games and am tempted to give these rules a go. Of course, I have planned a couple of times to do so, then just revert to my own rules. lol.
ReplyDeleteWell if I had my own rules, I would probably use those also! And yes, I love games this size. I honestly wish I had worked this out ~40 years ago, it would have really improved my gaming, especially WW2 gaming.
DeleteAnother fine game there John:)! Hopefully when the weather cools down I can get scenario 2 of my French-Canadians in Normandy set up and played...
ReplyDeleteReally looking forward to it!! Your campaign set-up, and some of the great beach defence models, were quite inspiring!
Delete